RTS KP-32 User Manual
Telex kp-32 intercomsystem: user manual
Hide thumbs
Also See for KP-32:
- User instructions (120 pages) ,
- Installation manual (2 pages) ,
- User manual (112 pages)
Table of Contents
Advertisement
Quick Links
Advertisement
Table of Contents

Related Manuals for RTS KP-32


Summary of Contents for RTS KP-32
- Page 1 RVON-1 for the KP-32 and KP-812 Family of Keypanels 93507757000 Rev F June 2006...
- Page 2 OTICE The product information and design disclosed herein were originated by and are the property of Telex Communications, Inc. Telex reserves all patent, proprietary design, manufacturing, reproduction, use and sales rights thereto, and to any article disclosed therein, except to the extent rights are expressly granted to others.
-
Page 3: Table Of Contents
Installation of the RVON-1 Card ...5 RVON-1 Relay ...7 Addresses and the RVON-1 ...7 Configure the RVON-1 from the KP-32 ...8 Set the IP Address from the Service Level Menu ... 8 Select an RVON Connection from the Top Level Menu ...9 Configure the RVON-1 from the KP-812 ...10... - Page 4 Table Contents Appendix B Telnet & Serial Port Programming ...25 RVON Serial and Telnet Commands ...25 Setup ...25 How to Configure the RVON-1 using Telnet ... 26...
-
Page 5: Chapter 1 Introduction
The RVON-1 is compatible with any RTS™ Matrix Intercom System equipped with a suitable RVON interface. In conjunction with any new or existing KP-32 or KP-812 keypanel, the RVON-1 brings a new level of enterprise-wide and remote access functionality to your RTS™ Matrix Intercom. -
Page 6: Specifications
Introduction Specifications DIGITAL Compression Audio Bit Rate G.711 G.729AB G.723 5.3k/6.3k *Data depends on CODEC selection. NOTE: The Playout Delay and Bandwidth depend on the configured amount of audio per packet. CONNECTIONS RJ-45 Ethernet via backcard • • 14-pin KP Compatible Expansion Connector Pin 1... -
Page 7: Dip Switches
DIP switch 4 should always be left in the OFF position. It is reserved for debugging and can have unintended consequences. Firmware Compatibility Requirements for the RVON-1 Card Description Master Controller Peripheral Controller AZedit RVON-8 KP-32 Compatibility Requirements for the RVON-1 card. TABLE 1. Version 9.19.0 or later 10.10.0 or later 1.10.1 or later 2.06.06 or later 1.1.0 or later... -
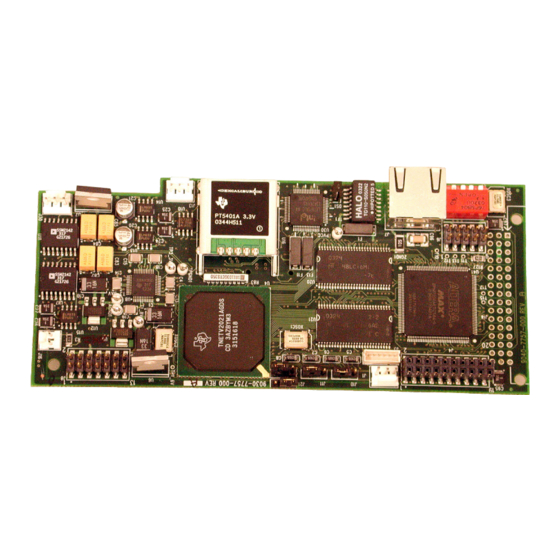
Page 8: Flash Chip Replacement
Introduction Flash Chip Replacement KP-32 Standard KP-32 (Japan) KP-632 KP-832 TABLE 2. Flash Chip placement on the KP-32 motherboard Figure 1. Keypanel Flash Chip Replacement 9015-7656-002 (U2) 9015-7656-003 (U3) 9015-7656-042 (U2) 9015-7656-043 (U3) 9015-7656-202 (U2) 9015-7656-203 (U3) 9015-7656-302 (U2) 9015-7656-303 (U3) Flash Chip replacement part numbers. -
Page 9: Chapter 2 Installation
Installation of the RVON-1 Card Before using the RVON-1 card with the KP-32, a few modifications need to be made to the keypanel. If the serial number on your KP-32 keypanel is 61170, you will need to update you backpanel with the Ethernet RJ-45 connection (part number - 9080-7656-002) knockout present. - Page 10 The placement of the spacer and screw position on the RVON-1 card. Figure 3. Replace the GPI/O board. Re-attach the backplate to the KP-32 keypanel. Be sure to secure the spacer with a screw in the back plate. See Figure 2 on page 5 Replace the cover on the KP-32 keypanel.
-
Page 11: Rvon-1 Relay
NOTE: Be sure the orientation of the board is correct, otherwise undesirable effects may occur. Make sure the RJ-45 connection is positioned so it will fit through the specified knockout on the back cover. When installing the RVON-1 card in an existing KP-32 or KP-812, each keypanel needs to be upgraded to include the following: KP-32 •... -
Page 12: Configure The Rvon-1 From The Kp-32
Configure the RVON-1 from the KP-32 To use the RVON-1 with the KP-32, the KP-32 firmware must be at version 2.0.0 or higher. In turn, the firmware requires that larger flash chips be used as well (see See “Flash Chip replacement part numbers.” on page 4.). -
Page 13: Select An Rvon Connection From The Top Level Menu
Configure the RVON-1 from the KP-32 Press PGM. The actual Gateway IP Address appears. Enter the first number in the Gateway IP Address. This activates the first octet of the Gateway IP Address and clears the rest of the address. -
Page 14: Configure The Rvon-1 From The Kp-812
Installation Configure the RVON-1 from the KP-812 TOP LEVEL MENU, SERVICE, RVON SETUP Set the IP Address from the Service Level Menu The RVON-1 card, when shipped has a default IP Address already configured. This must be changed in order for the RVON-1 card to function properly because the pre-configured IP Address may not work with you network. -
Page 15: Select An Rvon Connection From The Top Level Menu
Configure the RVON-8 using AZedit to contact the RVON-1 Enter the first number in the Gateway IP Address. This activates the first octet of the Gateway IP Address and clears the rest of the address. Tap the encoder knob. This confirms the first octet in the Gateway IP Address and moves you to the second octet. NOTE: Press PGM to skip over any octet that does not need modifications. - Page 16 Installation Right click on an RVON-8 card and select RVON-8 Configuration The RVON-8 Configuration screen appears. NOTE: The RVON-8 you use should be already configured. If it is not configured, refer to your RVON-8 Card User Manual. Remember, the RVON-1 has only one channel that can be configured. In the RVON-8 Channel drop down list, select the channel that will be used to communicate to the RVON-1 card across network.
-
Page 17: Chapter 3 Configuration
Download RVON-1 Firmware Through AZedit NOTE: AZedit sends firmware directly to the RVON-1 card over Ethernet. This is different from other I/O cards (except the RVON-8) that receive the firmware from the Master Controller. For this reason, verify the PC running AZedit is able to contact the RVON-1 card via the network, or is configured with a Gateway IP Address that can contact the RVON card. - Page 18 Configuration Using the Browse feature, browse to the file to be downloaded. Click Open. The Download Device Firmware screen appears. Click Begin Download. The download begins. Click OK. The RVON-1 firmware download is complete. This takes a minute or two to occur. WARNING!: Do NOT power down the keypanel until you have verified the new version information from AZedit.
-
Page 19: Basic Network Configuration
CHAPTER 4 Basic Network Configuration Basic Network Configuration This section covers basic network configuration set-up and testing. Also covered are basic concepts and operations, including the difference between LAN and WAN networks and how IP Addressing is used. In a networked environment, such as a company, typically there are many computers connected together using a router or a switch. -
Page 20: Wide Area Network
A wide area network (WAN) connects two or more LANs and can span a relatively large geographical area. For example, Telex Headquarters in Burnsville, MN is connected to several branch offices in Nebraska and Arkansas over a WAN. The largest WAN in existence is the Internet. -
Page 21: Accessing The Wide Area Network (Wan)
80 is used for HTTP traffic. When you type an address into the address bar of a web browser, your computer goes to find an IP Address for the url you are requesting (http://www.telex.com). To obtain this address, the computer contacts a DNS server (Domain Name Server). -
Page 22: Ip Addresses
Basic Network Configuration Packet Translation TABLE 2. Packet before Translation Source Port IP Address Number 10.2.100.1 1031 Internet From 192.156.136.22 Internet Amazingly, all the address translation that occurs takes place automatically in order to make web browsing and other functions easier. -
Page 23: Ping A Computer
Basic Network Configuration To find your IP Address using ipconfig, do the following: From the Start Menu, open a Command Prompt screen. At the prompt, type ipconfig, then press Enter. The IP configurations appear for your machine, such as the DNS suffix, IP Address, Subnet Mask, and Default Gateway. At the prompt, type Exit to close the screen. -
Page 24: Possible Pitfall With Routers, Gateways, And Switches
Basic Network Configuration At the Run command, type CMD to open a Command Prompt screen. At the prompt, type the IP Address of the computer you wish to ping (for example, 10.2.100.130). Press Enter. NOTE: If the computer you are pinging is not responding to the ping, you will receive a time-out message in the command prompt screen. -
Page 25: Rvon Configuration
Ports necessary for RVON card functionality. TABLE 4. Port Port Description 2076 UDP Call Control Signalling 2077 UDP Audio Packets 2079 UDP Telex Proprietary Signalling 2080 TCP Telex Keypanel Protocol 2081 UDP Pass Through Serial 2082 TCP Firmware Download 2100 Remote Administration... -
Page 26: Network Terminology
A DNS Server is an Internet service that translates domain names (for example, in the URL http:// www.telex.com, the domain name is the telex.com) into IP Addresses. The Internet is based on IP Addresses which are numeric and since domain names are alphabetic, they are easier to remember. Every time a... - Page 27 Network Terminology Gateway A gateway is a node on a network that serves as an entrance to another network. The gateway routes traffic from a computer to an outside network that is serving the web pages. For example, the gateway for a home computer is the ISP provider that connects the user to the Internet.
- Page 28 A wide area network connects two or more LANs and can span a relatively large geographical area. For example, Telex Headquarters in Burnsville, MN is connected to several of its branch offices in Nebraska and Arkansas over the wide area network. The largest WAN is the Internet.
-
Page 29: Telnet & Serial Port Programming
RVON Serial and Telnet Commands RVON card programming can be done via direct serial or telnet connection. There are several physical connections to an RVON board: • Direct serial through custom debug cable (J20 6-pin bottom front) The customer debug cable always functions as the general-purpose debug tool. •... -
Page 30: How To Configure The Rvon-1 Using Telnet
How to Configure the RVON-1 using Telnet Without access to the physical KP-32 with RVON-1 installed on it, you can still configure the card through the use of Telnet. The following instructions will show you how to access the Telnet screen and show you some of the information you can see and edit. - Page 31 How to Configure the RVON-1 using Telnet Press Enter. A prompt appears. Type dbgcmd to access the debug command screens. Press Enter. An MXP prompt appears. At the prompt, type Show. Press Enter. The show commands screen and MXP prompt appears. At the MXP prompt, type the show command you want to see (for example, “show rvon”).
- Page 32 Allows you to set the baud rate (50-38400) Allows you to set the username for the RVON-1 card. By default the user name is “telex” Allows you to set the password for the RVON-1 card. By default, the password is “password”...
- Page 33 How to Configure the RVON-1 using Telnet set channel dest_channel set channel channel_codec set channel input_gain set channel output_gain set the channel onhook set channel offhook Allows you to edit the destination channel of the device the RVON-1 will talk with Allows you to edit the CODEC to be used for transferring the data between the two devices Allows you to edit the input gain for the RVON-1 card...
- Page 34 12000 Portland Avenue South • Burnsville, MN 55337 • U.S.A.
Need help?
Do you have a question about the KP-32 and is the answer not in the manual?
Questions and answers