SPYPOINT FLEX G-36 - Cellular Trail Camera Manual
- User manual (24 pages) ,
- Quick start manual (16 pages) ,
- Quick start manual (16 pages)
Advertisement
- 1 INTRODUCTION
- 2 COMPONENTS
- 3 FEATURES
- 4 POWER SUPPLY
- 5 MEMORY CARD
- 6 PREPARATION
- 7 ACTIVATION
- 8 INSTALLATION
- 9 STARTING YOUR CAMERA
- 10 CONFIGURATION
- 11 VERIFICATION
- 12 TOOL – ACCESSORIES – OPTIONS
- 13 TRANSFERRING FILES TO A COMPUTER
- 14 OFFERED ACCESSORIES
- 15 TROUBLESHOOTING
- 16 WARRANTY
- 17 DISPOSAL & FREQUENCY
- 18 Documents / Resources
INTRODUCTION
FLEX G-36 PRESENTATION
The FLEX G-36 is one many SPYPOINT trail cameras. While SPYPOINT has been a cellular trail camera leader for some time, the FLEX G-36 is a major step forward in customer-friendly and innovative design, optimized antenna, straightforward interface, TEST and FORMAT buttons, and automatic carrier connection technology.
The FLEX G-36 is a cellular trail camera that works with the SPYPOINT mobile app to:
- Send photos and videos to your smartphone or tablet.
- Check camera status.
- Manage camera settings and preferences.
The FLEX G-36 offers features and performance that are unheard of at its price point. The commitment to user value carries through to the FLEX G-36, even with all the new and innovative features that have been included. Hunters are loving the performance and flexibility the latest camera from SPYPOINT delivers.
SUPPORT
This User Manual will introduce you to the features of your new FLEX G-36 and will guide you through the acquisition of its functionalities so that you can use it to its full potential.
Our priority is to offer outstanding service to our customers. If you need technical support for your camera, here is how to contact us:
Contact our chat service directly on the SPYPOINT site (in the lower right-hand corner of the Support section, by clicking on the "Start Chat" window, www.spypoint.com).
- Monday to Friday — 8:30 a.m. to 8:00 p.m.
- Saturday-Sunday — 8:30 a.m. to 5:30 p.m.
Go to www.spypoint.com/en/support for more information about our devices.
ABOUT US
SPYPOINT's mission is to offer you products that are easy to use, innovative, affordable, and of exceptional quality. Our products are mainly used in the hunting field and residential and commercial safety fields. They are distributed and appreciated on all continents and are continuously growing. Prosperous and respected, SPYPOINT is a company that is constantly developing new technologies and that remains attentive to its customer's needs to offer cutting-edge products with concrete solutions to improve hunting and outdoor activities.
JOIN THE SPYPOINT COMMUNITY
 www.facebook.com/SPYPOINT
 www.twitter.com/SPYPOINTcamera
 www.youtube.com/SPYPOINTtrailcam
 www.instagram.com/spypointcamera
 www.tiktok.com/@spypointcamera
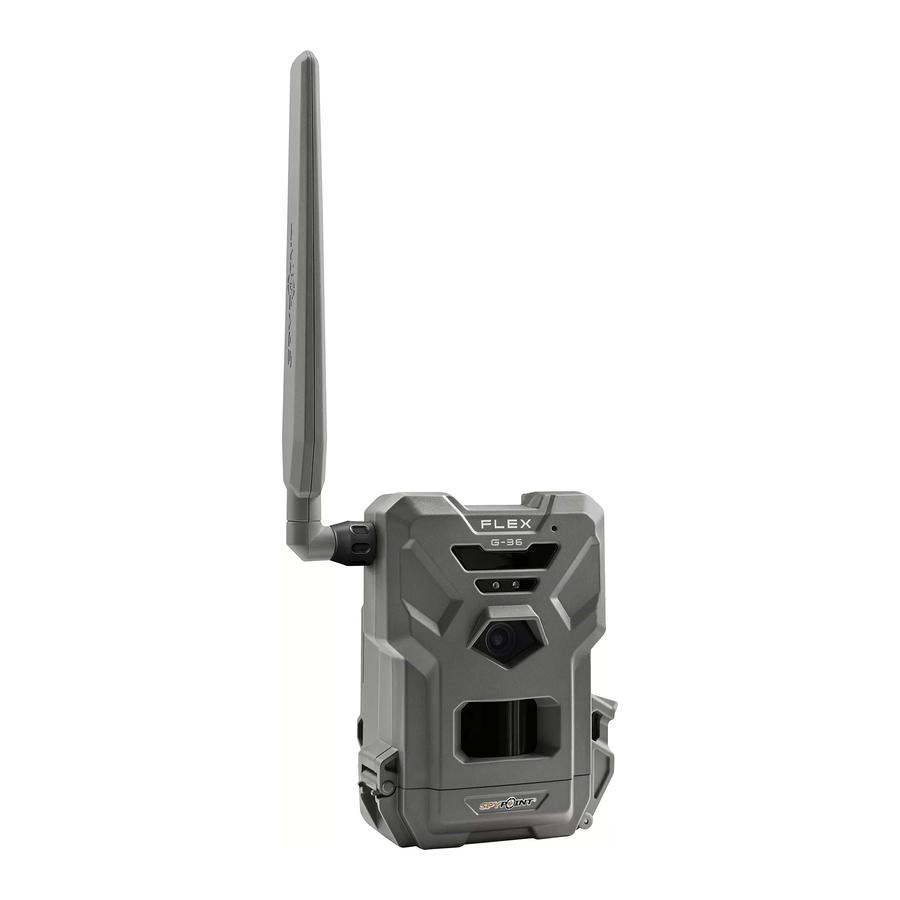
COMPONENTS

- MICROPHONE
Records sound in video mode. - IR LED
4 powerful LEDs that illuminate at night for clear black and white photos and videos. - LIGHT SENSOR
Detects the ambient lighting conditions for taking photos and videos: in colors during the day, black and white at night. - DELAY LIGHT
During installation, once the signal is found, this light flashes for 30 seconds to allow the user to walk away without being captured. - PHOTO LENS
Image sensor. - DETECTION LENS
Enlarges the detection area of the camera's motion sensor. - BATTERY DOOR
Provides access to the battery compartment, microSD card, STATUS light, and OFF/ON switch. - microSD CARD SLOT
Space to insert the microSD card (not included) needed to save photos and videos. - MICRO SIM CARD SLOTS
Space to insert two SIM cards. It is necessary to activate cellular functions. The SIM cards, pre-installed and preactivated, are included with the camera. It is important to use a SPYPOINT SIM cards (supplied by SPYPOINT), otherwise the cellular functions of the camera will be inoperative. - BATTERY TRAY
Removable device in which the 8 alkaline or lithium AA non-rechargeable batteries are inserted (not included with the camera). - BATTERY LEVEL
During startup, the camera will illuminate the number of lights corresponding with the current battery level of the camera. - SIGNAL LEVEL
During startup, the camera will illuminate the number of lights corresponding with the signal level. 5 bars being excellent and 1 bar being poor. - STATUS LIGHT
During installation, it flashes to indicate to the user the strength of the cellular signal. During regular operation, it indicates that the camera is recording or transferring files. - FORMAT BUTTON
This button will allow you to format the microSD card during the start up of the device. - TEST BUTTON
This button will allow you to send a photo to your app (if you have a transmission plan with remaining photos) - OFF/ON SWITCH
Allows the user to turn the camera OFF/ON. - ANTENNA
Captures the cellular signal. - 12 V JACK
Allows you to insert a power cord connected to an external 12 V source. - CABLE LOCK HOLE
Allows you to install a #CLM-6FT padlock cable to secure the unit (sold separately). - LOCKING LATCH
Allows you to lock, unlock and open the door. - SLOTS FOR INSTALLATION STRAP
Allows the camera to be installed using the included installation strap. - SCREW-THREAD FOR STANDARD ¼"-20 TRIPOD MOUNT
Allows you to attach a standard tripod from ¼"-20.
FEATURES
| CELLULAR TRANSMISSION | |
| Network | LTE Multi-carrier auto connectivity |
| Transmission plan | Transmission of your photos and videos to your SPYPOINT application by cellular network. Visit www.spypoint.com/plans to choose a plan that suits you. |
| Camera configuration | Fully configurable remotely with the free SPYPOINT app. |
| PHOTO RECORDING | |
| Photo resolution | 36 MP |
| Photo file format | JPG |
| Time-lapse mode | Time-Lapse and Time-lapse+ (Time-lapse with motion detection enabled) |
| Multi-shot mode | Up to 3 photos per detection Date, time, temperature (°C/°F), moon |
| Info bar | Date, time, temperature (°C/°F), moon phase, SPYPOINT logo, and camera model |
| Capture mode | Colors by day, black and white by night |
| VIDEO RECORDING | |
| Video resolution | 1920 X 1080 (FHD 1080p) |
| Video file format | MP4 |
| Video length | 15 seconds |
| Capture mode | Colors by day, black and white by night |
| AUDIO RECORDING | |
| Audio mode | Yes |
| MEMORY | |
| External memory | microSD card up to 512 GB (not included) |
| VIEWING | |
| On the SPYPOINT app or on the website www.spypoint.com/en/manage | |
| POWER SOURCES | |
| Alkaline or lithium AA non-rechargeable batteries | 8 x AA (not included) |
| Lithium battery pack | Lithium battery pack #LIT-22 (not included) |
| External 12 V battery | 12 V battery Optional accessories available at SPYPOINT: #KIT6V-12V, #KIT-12V, #BATT-12V |
| Solar panel lithium battery | Solar panel lithium battery #SPLB-22 (not included) |
| DETECTION SYSTEM | |
| Movement detector | Infrared |
| Detection angle | 50° |
| Detection range | Up to 30 meters/100 feet |
| Trigger speed | 0.3 seconds |
| Delay between each detection | Adjustable from Instant to 30 minutes |
| ILLUMINATION OPTIONS | |
| LED | 4 powerful LEDs |
| Night light range | Up to 30 meters/100 feet |
| Exposure | Automatic adjustment of the infrared illumination |
| PHYSICAL DIMENSIONS | |
| 10,67 cm (H) x 13 cm (W) x 7.88 cm (D) 4.2'' (H) x 5.14'' (W) x 3.1'' (D) | |
| RECOMMENDATIONS | |
| Operating temperature | -30°C to 50°C (-22°F to 131°F) |
| Storage temperature | -40°C to 60°C (-40°F to 140°F) |
POWER SUPPLY
CHOOSING A POWER SOURCE
4 options are available to you:
- Alkaline or lithium AA batteries
- Rechargeable battery 12 V (#KIT-12V sold separately)
- Rechargeable battery pack 3.7 V (#LIT-10 sold separately)
- Solar panel lithium battery 12 V (#SPLB-22 sold separately)
NOTE
We suggest using a SPYPOINT #LIT-22 rechargeable lithium battery pack with your camera. It offers a longer battery life than AA batteries, and saves money over the life of the camera.
FOR BEST RESULTS AND NO LEAKAGE
- Use only new alkaline or lithium batteries.
- Do not mix new and old batteries.
- Do not use rechargeable AA batteries (their lower voltage will generate operational issues).
HOW TO INSTALL AA BATTERIES PROPERLY
- Unlock the latch and open the FLEX G-36 door.
- Place the battery holder back into the battery compartment with arrows facing up (See Photo)
![]()
- Insert the AA batteries into the battery holder following polarity (+) and (-) indications.
- Place the battery holder back into the battery compartment.

SPLB-22 – SOLAR PANEL LITHIUM BATTERY COMBO UNIT

- Combines solar panel and lithium battery into one unit to reduce wires and setup time.
- Plugs directly into camera to provide extensive, ongoing battery life for your camera so you can avoid visits.
- Additional jacks and plugs allows for device flexibility.
MANAGING VARIOUS CAMERA POWER SUPPLY
If you choose to plug an external 12 V battery (#KIT-12V, sold separately) into your camera, it becomes your camera's new primary power source. The AA batteries will only be used once the 12 V battery is depleted.
You can check the battery level on your device or in the mobile application:
- In the application: on the home page, you will see the battery charge level for each of your devices. You can access more details on the status of your battery by going to the STATUS page. When the battery logo turns red, we suggest that you change the batteries before it is completely drained.
- Once the device is powered on. There are four green lights within the battery icon indicating the battery level.
MEMORY CARD
INSTALLING A MEMORY CARD (NOT INCLUDED)
The use of a memory card is necessary for the operation of the camera. It is used to save photos, videos and other camera status files. Note that photos and videos in their original format are kept on the memory card. The files sent to your application are lighter versions. You can retrieve your photos and videos at any time by removing the card from the camera and transferring the contents to another device (e.g.: computer).
Your camera requires a microSD memory card, with a maximum capacity of 512 GB, sold separately. Here is a table showing the approximate quantity of photos or videos that can be recorded on the card, according to different memory card capacities.
| MEMORY | 4 GB | 16 GB | 32 GB | 128 GB | 512 GB |
| PHOTOS (36 MP) | 1 700 | 7 000 | 13 900 | 55 700 | 222 900 |
| VIDEOS (1080P) | 627 | 2 508 | 5 016 | 20 064 | 80 256 |
NOTE
The FLEX G-36 is equipped with continuous mode. This means that when the memory card is full, the camera continues to save your photos and videos by erasing the first recorded files.
INSERTING YOUR MEMORY CARD
- Ensure the camera is turned OFF.
- Find the microSD card slot. It is located at the bottom of the camera (see photo).
![]()
- Insert a microSD card (up to 512 GB) in the microSD card slot with the metal contacts facing up.
- The card is inserted correctly when a click is heard.

REMOVING YOUR MEMORY CARD
- Before removing a memory card, always turn your camera OFF to prevent files on the card from being deleted or damaged.

- To remove the card, push it lightly into the camera until you hear a click. Then take it out of the device.

FORMATTING THE MEMORY CARD
During the start up of the camera, you can use the FORMAT button on the device to quick format the microSD card. This is required if you want to be able to take photos and videos while transmitting.

- Turn ON the camera.
- Press and hold the FORMAT button for 5 seconds.
- The microSD light will blink green while the card is formatting.
- Once complete, the microSD light will become solid green.
PREPARATION
SCREW IN ANTENNA
The antenna doesn't come installed. Please insert as shown in the photo.

ACTIVATING YOUR CAMERA
 Before you can use your camera, you must activate it. To do so, you will need the activation code.
FINDING THE ACTIVATION CODE
The activation code is located inside the FLEX G-36's battery compartment.

ACTIVATION
SPYPOINT APP - NEW USERS
On your mobile device or a computer, use the web browser and navigate to www.spypoint.com, select "LOGIN" in the top navigation menu. On the displayed "SPYPOINT" page, select "CREATE AN ACCOUNT", fill out the required fields, then log in. Once your account is created you can either continue to use the web version of the application or you can switch to the mobile application.
If you choose to use the SPYPOINT app to activate your device, follow these steps:

- On Google Play TM or the App Store TM, search for "SPYPOINT".
- Download and install the app on your smartphone or tablet.
- Start the app. Select "LOGIN". Enter your account information and select "LOGIN".
- Select the "CAMERAS" tab at the bottom of the screen and press the orange + button.
- In the list, select "FLEX G-36" then follow the steps to scan your data matrix code.
- When complete, you will see the camera in the camera list.
If you choose to use our SPYPOINT website to activate your device, follow these steps:

- On the www.spypoint.com website, select "LOGIN" in the top navigation menu. On the displayed "SPYPOINT" page, login using your account information. Then press the "LOGIN" button.
- Select the + sign on the far right of the page; in the list, select "FLEX G-36" then follow the steps.
- When complete, you will see the device in your camera list.
CHOOSING A PHOTO TRANSMISSION PLAN FOR YOUR CAMERA
Go to www.spypoint.com/en/spypoint-experience/plans to read the latest offers and choose the plan that suits you.
INSTALLATION
INSTALLING YOUR CAMERA
- To install the camera, loop the installation strap through the intended slots.
- Choose a solid tree that does not move in the wind, as movement will cause false detections.
- Make sure the area immediately in front of your camera is free of branches or twigs that could be blown away by the wind.
- The camera should be at the same height of the animal's mid-body.
- The targeted animal should be at 25 feet (7.5 meters) away from the camera.

- To produce brighter photos and videos at night, there should be items reflecting the camera's flash in the background.

STARTING YOUR CAMERA

IMPORTANT VERIFICATIONS BEFORE STARTING YOUR CAMERA:
- The antenna is installed (antenna support removed).
- The 8 AA batteries or LIT-22 are inserted in the camera's battery compartment.
- The microSD card is formatted and inserted in the camera.
- The camera is activated.
- The camera is securely installed.
- Turn ON the camera.

- The green STATUS light will flash, the battery level will be displayed.
- The signal lights will flash together until signal is found. Once signal is found number of bars will correspond to the signal strength.
- The microSD light will be ON.
- The delay light will blink for 10 seconds, and the STATUS light will turn solid green.
- All lights will turn OFF and the camera will go into standby mode – awaiting a trigger.

OPERATIONAL VALIDATION TEST
You can use the following test to make sure everything works as it should:
TEST BUTTON

The TEST button forces the camera to take a single photo and transmits it. It will NOT work if the camera is already busy with another task. (Synchronizing with the server, recording a photo/video or running through the start up sequence of the camera.) This button will only work if the camera is on an active transmission plan with photos remaining.
- After the camera has started, and passed through the startup light sequence, the TEST button can be used. Ensure all lights are OFF before proceeding.
- Press the TEST button for at least 1 second.
- Battery level will be displayed.
- Signal lights will blink together every second until the camera receives the signal strength. Then it will display the number of lights corresponding to the signal strength.
- All Lights will turn OFF.
CONFIGURATION
MANAGE DEVICE
| EDIT DEVICE NAME All possible values | Allows you to name the camera for easy identification. This function is very useful for users with more than one camera. |
| RESTORE FACTORY SETTINGS Restore | Allows you to reset the camera to its original state. |
IMAGE CAPTURE
| CAPTURE MODE Photo; video; time-lapse; time-lapse+ |
|
| MOTION DELAY Instant; 10 seconds; 20 seconds; 30 seconds; 40 seconds; 50 seconds; 1 minute; 3 minutes; 5 minutes; 10 minutes; 15 minutes; 20 minutes; 30 minutes; 1 hour | Allows you to choose the period of time to wait before the camera detects again and records the next photo/video. A longer delay minimizes the number of photos and videos taken and therefore maximizes battery life. A shorter delay maximizes surveillance in the area but consumes more power. Shorter delays are recommended when the camera is used for security purposes. |
| SD PHOTO RESOLUTION High/optimal | Allows you to determine the quality of the photos saved on your microSD card. Optimal quality: 36 MP or high quality: 2 MP. |
| MULTI-SHOT 1; 2; 3 | Allows you to take 2 or 3 consecutive photos at each detection, with a 5-second delay between each photo. |
| SENSITIVITY Low; normal; high | Allows you to choose the detection sensitivity of the device. A higher sensitivity allows you to detect movement in front of the camera more effectively, so the camera will take more pictures. |
CELLULAR
| DAILY SYNC TIME All possible combinations | Allows you to choose the time when the camera makes its first transfer of the day, each day. Note: The camera transfers are configured by default with 6 times per day, determined from the time you activated your camera. For example, if your camera was activated at 1:42 p.m., this will be the default first transfer time. The next transfer will be at 5:42 p.m. |
| SYNC FREQUENCY 1; 2; 4; 6; 12; each detection | Allows you to choose the number of transfers the device performs each day. |
| CELLULAR Activated/not activated | Allows you to activate or deactivate the cellular mode. Note that this setting will only take effect the next time the camera makes a transfer. |
| TAKE A PHOTO/VIDEO AT EACH SYNC Activated/not activated | During the next transfer, the camera will automatically take a photo or a video and communicate it to your application. |
CAMERA COMMANDS
| UPDATE FIRMWARE | Allows you to request a firmware update to your device. |
GENERAL
| DATE FORMAT MM/DD/YYYY or DD/MM/YYYY | Allows you to choose the date format displayed. |
| TIME FORMAT 12 h or 24 h | Allows you to choose the time format displayed. |
| BATTERY TYPE Automatic or AA_LIT | Allows the user to select the battery type installed in the camera. |
VERIFICATION
VERIFYING CAMERA STATUS
Different tools are available to help you check the status of your FLEX G-36 and to inform you of any problems that may occur during its operation. In this section, we will see 3 tools:
NOTIFICATIONS
The camera was designed to send notifications to your SPYPOINT app. This is to help you stay informed of the status of your camera.

You will receive a notification on your smartphone at the next transfer when a photo/video is received or important notification is sent:
- You forget to insert a microSD card in your camera.
- The inserted microSD card is not compatible with your camera.
- The battery percentage is too low.
APPLICATION STATUS PAGE
Here are the different indicators of the FLEX G-36 status you have access to. They are accessible on your app or on the SPYPOINT website. What appears in this page is a reflection of the camera at the last communication.
| SIGNAL Strength of the cellular signal | 1 - 5 bars |
| BATTERY Battery percentage remaining | 0 - 100% (AA/LIT-22/12 V) |
| MEMORY CARD Used space | 0 - 100% |
| LAST COMMUNICATION The date and time of the last device transfer | Date and time |
| TEMPERATURE | °C or °F |
| POSITION GPS | GPS coordinates |
| MODEL | FLEX G-36 |
| VERSION Displays the firmware version | VX.XX.XX |
| LAST INSTALLATION Last time your camera was turned ON | Date and time |
| SIM Number on your SIM card | 89...... |
| ACTIVATION CODE | XXXX-XXX-XXXX |
STATUS LIGHT EXPLAINED
| STATUS LED COLOR | PATTERN | INDICATION | |
 | Green | Solid | When device gets triggered or is taking a photo or video |
 | Blue | Solid | When photo or video is getting transmitted |
 | Blue | Blinking each second till the reset is complete | Factory reset |
 | Orange | Blinking each second for 30 seconds | Firmware update |
 | Red | Solid (does not go OFF) | No signal detected |
 | Red | Slow blinking (every 2 seconds) | SIM issue/Critical hardware failure |
TOOL – ACCESSORIES – OPTIONS
SPYPOINT MOBILE APP

The key to a successful hunt is information and that's what the SPYPOINT app is all about. View and sort all your photos and videos from the field, check hunting conditions, update camera settings, manage stand locations on your property, and more, right from your mobile device. It's the mobile scouting solution you need to go into the woods confidently.
From the app, you can:
- Manage camera statuses, settings and plans
- View and manage photos and videos
- Sort photos with advanced AI species filters
- Request FULL-HD photos and videos
- Maintain custom maps and markers
- Monitor weather conditions
To learn more visit www.spypoint.com/app
PHOTO TRANSMISSION PLANS
SPYPOINT makes choosing a photo transmission plan as easy as possible with straightforward photo count thresholds and the option to go month-to-month to maximize flexibility, or annually to get the most savings. SPYPOINT even offers a free plan, sending 100 photos every month at no charge.
To learn more visit www.spypoint.com/plans
SPYPOINT WEB APP

As well as with the SPYPOINT mobile app, you can manage your device and photos/videos using the web app.
Log in at www.webapp.spypoint.com to manage cameras and view photos and videos online.
TRANSFERRING FILES TO A COMPUTER
- Turn the camera OFF.
- Remove the microSD card from the camera.
- Insert the microSD card in the microSD computer slot, or use a USB adapter for microSD cards.
- The computer will recognize the microSD card. There may be two different disks recognized, this is normal after use in the FLEX G-36.
- If the computer doesn't detect the microSD card, this means the memory card is corrupt and needs to be replaced.
ON A PC
On your desktop, click on "My Computer" or "This PC".
Locate your device under "Removable Disk" and click to access it. Then, click on "DCIM" and "100DSCIM" to find all saved photos and videos. If you do not see the photos or videos in the folder you checked, try again in the other "Removable Disk" folder.
Select the files you want to copy. With some Windows versions, the simplest way is to select them by clicking on the "Home" tab and choosing "Select all" on the right side. With some Windows versions, you can press on "Ctrl" and "A" or click on the "Edit" menu and choose "Select all".
Click on the "Copy" icon on the left of the ribbon (or hold the "Ctrl" and "C" keys).
Once your photos and videos are transferred, click the "Safely remove hardware and eject media" button located in the task bar, then click "Eject mass media storage device".
If you do not want to select all photos or videos, hold down the "Ctrl" key and click on the files you want to select before clicking on the "Copy" icon.
Access the folder where you want to save your photos and videos or create a new folder by clicking on the "New folder" button. (You can also click on "Ctrl", "Shift", and "N" to create a new folder, or right-click in a blank space in the "Pictures" folder and choose "New", then, in the following menu, click on "Folder".)
Enter a name for your new folder, click on "Enter", then double-click on the folder to open it. In the "Home" tab, choose "Paste" (or click simultaneously on the "Ctrl" and "V" keys). The photos and videos will be copied in the new folder.
ON A MAC
Click on the search tool in the "Toolbar". Click the "Go" Tab, then select "Computer".
Locate your device under the "Locations" tab and click to access it. Then click on "DCIM" and "100DSCIM" to find all saved photos and videos.
Click on "Edit" in the toolbar at the top of the screen, then click on "Select all" to highlight all individual files on the device. You can also access the "Select all" option by simultaneously clicking "Cmd" and "A". If you don't want to import everything, you can highlight the desired photos or videos individually. Transfer photos and videos by clicking on "Cmd" and on the file name. Click on "Edit again" and then "Copy" (or "Cmd" and "C") to copy the highlighted files.
Access the folder where you want to save your photos and videos, or create a new folder by right-clicking and pressing "Cmd" at the same time, then select "New folder" from the menu.
Click on "Modify", then on "Copy" (or "Cmd" and "V") to copy your chosen files in the selected folder. The photos and videos can take a few minutes to download, depending on the size and the number of the file you are importing.
Once your photos and videos are transferred, click on the "Eject" icon beside the name of your device, than unplug the device from your MAC.
OFFERED ACCESSORIES

For more information about other available accessories, got to www.spypoint.com.
*Steel boxes may affect wireless connectivity, especially in low-reception areas.
TROUBLESHOOTING
| ISSUES | POSSIBLE SOLUTIONS |
| MY CAMERA DOES NOT TURN ON |
|
| MY CAMERA DOESN'T HAVE GOOD SERVICE |
|
WARRANTY
LIMITED WARRANTY
This SPYPOINT product is covered by a 2-year warranty that also covers parts and workmanship from the purchase date. The electronic cash register receipt is a proof of purchase and must be presented to confirm that the warranty is applicable. This warranty will be honored in the country of the original purchase only.
THIS SPYPOINT WARRANTY DOESN'T APPLY TO:
- Consumable parts, including but not limited to batteries, the performance of which are known to decrease over time.
- Damages caused by improper use of the device, use of the device with another product, negligence, accidents, contact with liquid, fires, earthquakes, or any other type of external causes.
- SPYPOINT products bought online from an unauthorized retailer.
- Products that were modified or altered.
- Aesthetic damages, including but not limited to scratches or plastic breakage.
- Damages caused by the usage of a product outside of the SPYPOINT recommendations.
DISPOSAL & FREQUENCY
DISPOSAL
ONLY USE ORIGINAL SPARE PARTS AND ACCESSORIES.
If, one day, your camera has been used so intensively that it has to be replaced, or if you no longer have any use for it, you are obliged to dispose of it at a recycling center.
Information on return points for your electrical appliance can be obtained from your local waste disposal company or from your local administrative offices.
Electrical appliances not only contain valuable recyclable raw materials, but also substances which, if disposed of improperly, can affect public health and the environment. Help ensure that valuable raw materials are recycled by returning your old appliance to a central collection point.
The WEEE (Waste Electrical and Electronic Equipment Directive) symbol represents the obligation for the labeled camera to be sent to a separate center for the proper recycling of electrical and electronic equipment.

FREQUENCY
FREQUENCY RANGE:
800/850/900/1900/2100 MHz
MAXIMUM TRANSMISSION POWER:
| FREQUENCY | MAX. |
| GSM850 | 33 DBM ± 2 DB |
| EGSM900 | 33 DBM ± 2 DB |
| DCS1800 | 30 DBM ± 2 DB |
| PCS1900 | 30 DBM ± 2 DB |
| GSM850 (8-PSK) | 27 DBM ± 3 DB |
| EGSM900 (8-PSK) | 27 DBM ± 3 DB |
| DCS1800 (8-PSK) | 26 DBM ± 3 DB |
| PCS1900 (8-PSK) | 26 DBM ± 3 DB |
| UMTS 2100 | 24 DBM + 1,7/-3,7 DB |
| UMTS 1900 | 24 DBM + 1,7/-3,7 DB |
| UMTS 900 | 24 DBM + 1,7/-3,7 DB |
| UMTS 850 | 24 DBM + 1,7/-3,7 DB |
| UMTS 800 | 24 DBM + 1,7/-3,7 DB |
SPYPOINT FLEX G-36 | Made in India
12 V DC • LIT-22 Lithium battery pack • 8 X R6 (AA) batteries (2 X 6 V)
Contain FCC ID: XMR201807EG91NA • IC: 10224A-2018EG91NA
Manufacturer: SPYPOINT
Address: 330 de la Jacques-Cartier, Victoriaville QC G6T 1Y3 • Canada
E-mail: info@spypoint.com
Importer Information: SPYPOINT
Company Name: SPYPOINT
Address: 330 de la Jacques-Cartier, Victoriaville QC G6T 1Y3 • Canada
Distribution Center 3000 Gannett Avenue, Des Moines IA 50321 • USA
EUROHUNT GmbH Harzblick 25, 99768 Harztor OT Ilfeld • Germany

Documents / Resources
References
![www.spypoint.com]() Photo transmission plans
Photo transmission plans![www.spypoint.com]() Login
Login![www.spypoint.com]() SPYPOINT
SPYPOINT![www.spypoint.com]() Photo transmission plans
Photo transmission plans![www.spypoint.com]() Welcome to Spypoint Support
Welcome to Spypoint SupportFacebook
![www.twitter.com]() http://www.twitter.com/SPYPOINTcamera
http://www.twitter.com/SPYPOINTcamera![www.youtube.com]() SPYPOINT TRAIL CAMERAS - YouTube
SPYPOINT TRAIL CAMERAS - YouTube![www.instagram.com]() Instagram
Instagram![www.spypoint.com]() SPYPOINT App - Your Entire Hunt in the Palm of Your Hand
SPYPOINT App - Your Entire Hunt in the Palm of Your Hand
Download manual
Here you can download full pdf version of manual, it may contain additional safety instructions, warranty information, FCC rules, etc.
Advertisement


Need help?
Do you have a question about the FLEX G-36 and is the answer not in the manual?
Questions and answers