Table of Contents
Advertisement
Advertisement
Table of Contents

Related Manuals for Spypoint LM2


Summary of Contents for Spypoint LM2
- Page 1 USER MANUAL v.1.0...
- Page 2 LM2 PRESENTATION THANK YOU FOR CHOOSING A SPYPOINT PRODUCT The LM2 is the evolution of the revolution, with its roots in the wildly popular This User Manual will introduce you to the features of your new LM2 and will LINK-MICRO family of cellular trail cameras that changed the entire industry guide you through the acquisition of its functionalities so that you can use it to on its way to becoming the most popular cellular trail camera of all time.
-
Page 3: Table Of Contents
Table Of Content SPYPOINT Components ..................4 Features ....................6 Power Supply ..................7 Memory Card ..................8 Preparation ....................9 Activation .................... 10 Installation ..................11 Starting Your Camera ..............12 Configuration ..................13 Verification ..................15 Tool – Accessories – Options ............17 Transferring Files to a Computer .......... -
Page 4: Components
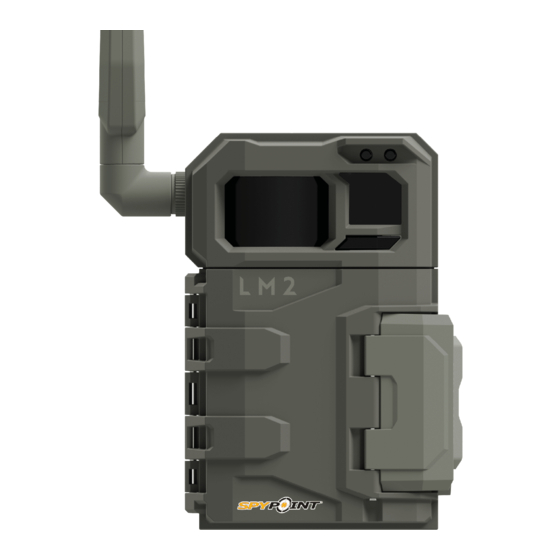
Components SPYPOINT Antenna OFF/ON switch Locking latch Detection lens STATUS light Cable lock hole microSD card slot SIM card slot 12 V jack Light sensor Battery compartment Screw-thread for standard ¼"-20 tripod mount Delay light Slot for installation strap Battery holder... - Page 5 The SIM card, pre-installed and pre-activated, is included with the camera. DETECTION LENS It is important to use a SPYPOINT SIM card (supplied by SPYPOINT), Enlarges the detection area of the camera’s motion sensor. otherwise the cellular functions of the camera will be inoperative.
-
Page 6: Features
32 GB (not included) Operating temperature -30 °C to 50 °C (-22 °F to 131 °F) VIEWING Storage temperature -40 °C to 60 °C (-40 °F to 140 °F) On the SPYPOINT app or on the website www.spypoint.com/en/manage... -
Page 7: Power Supply
• Additional jacks and plugs allows for device flexibility. NOTE MANAGING VARIOUS CAMERA We suggest using a SPYPOINT #LIT-10 rechargeable lithium battery pack with your camera. It offers a longer battery life than AA batteries, and saves money POWER SUPPLY over the life of the camera. -
Page 8: Memory Card
INSERTING YOUR MEMORY CARD Before inserting the microSD card into your camera, it must be formatted via a computer to ensure proper operations. Visit www.spypoint.com/en/support if you need help formatting your microSD card. • Ensure the camera is turned OFF. -
Page 9: Preparation
The antenna doesn't come installed. Please insert as shown in the photo. Before you can use your camera, you must activate it. To do so, you will need the activation code. FINDING THE ACTIVATION CODE The activation code is located inside the LM2’s battery compartment. Activation code... -
Page 10: Activation
“SPYPOINT” page, login using your account information. Then press the “LOGIN” button. 2. Select the + sign on the far right of the page; in the list, select “LM2” then follow the steps. 3. When complete, you will see the device in your camera list. -
Page 11: Installation
Installation SPYPOINT INSTALLING YOUR CAMERA 1. To install the camera, loop the installation strap through the intended slot (see diagram). 2. Choose a solid tree that does not move in the wind, as movement will cause false detections. 3. Make sure the area immediately in front of your camera is free of branches or twigs that could be blown away by the wind. -
Page 12: Starting Your Camera
Starting Your Camera SPYPOINT 6. If the light is red during step 3, you should: • Turn your camera OFF and then back ON. • Retry while pointing the antenna at different angles. • Try moving it to a spot with better signal. -
Page 13: Configuration
Configuration SPYPOINT BASIC CONFIGURATION Use the SPYPOINT app to configure your camera. MODE Allows you to start the device in Photo mode. The Video mode and the Time-lapse mode are not offered for this camera model. Photos only DELAY Allows you to choose the period of time to wait before the camera detects again and records the next picture. - Page 14 Configuration SPYPOINT ADVANCED CONFIGURATION DATE FORMAT Allows you to choose the date format displayed. MM/DD/YYYY or DD/MM/YYYY TIME FORMAT Allows you to choose the time format displayed. 12 h or 24 h TEMPERATURE UNIT Allows you to choose the temperature unit format displayed.
-
Page 15: Verification
APPLICATION STATUS PAGE Different tools are available to help you check the status of your Here are the different indicators of the LM2 status you have access to. They are LM2 and to inform you of any problems that may occur accessible on your app or on the SPYPOINT website. - Page 16 Verification SPYPOINT STATUS LIGHT AND DELAY LIGHT Delay light Those two lights are another tool giving you clues on your camera status. The following table shows you what these lights indicate when the camera starts up and during normal operations. The fact that they are flashing or fixed, and their different colors are significant.
-
Page 17: Tool - Accessories - Options
From the app, you can: SPYPOINT WEB APP • Manage camera statuses, settings and plans As well as with the SPYPOINT mobile app, you can • View and manage photos manage your device and photos using the web app. • Sort photos with advanced AI species filters Log in at www.webapp.spypoint.com to manage... -
Page 18: Transferring Files To A Computer
Transferring Files to a Computer SPYPOINT TRANSFERRING FILES TO A COMPUTER Access the folder where you want to save your photos or create a new folder by clicking on the “New folder” button. (You can also click on “Ctrl”, “Shift”, and “N”... -
Page 19: Offered Accessories
LONG RANGE CELLULAR ANTENNA 12 V BATTERY, CHARGER & HOUSING KIT Boosts the cellular signal. 15 feet (4.57 meters) Compatible with all SPYPOINT devices with a cable. No external power source necessary. 12 V socket. Case, AC charger, 12 ft (3.6 meters) power cable (#PW-12FT) and strap included. -
Page 20: Troubleshooting
3. From the app, reset the device to its original state. 4. Perform the latest update (available on www.spypoint.com under the SUPPORT section). 1. Make sure the camera is turned ON. 2. If it is not already done, remove the protective sticker on the detection lens of your camera. - Page 21 Troubleshooting SPYPOINT ISSUES POSSIBLE SOLUTIONS 1. Verify if the signal strength received by your device is sufficient. 2. Make sure you have not reached the photo limit of your cellular plan. 3. Verify if there is a message in the Photo section of your app.
- Page 22 Troubleshooting SPYPOINT ISSUES POSSIBLE SOLUTIONS During the installation, the delay light flashes for 30 seconds to allow the user THE RED LIGHT IN FRONT OF THE CAMERA FLASHES to walk away without being photographed. 1. Verify the charge level of the batteries, as the night lighting may be malfunctioning if the charge level is low.
-
Page 23: Warranty
SPYPOINT LIMITED WARRANTY This SPYPOINT product is covered by a 2-year warranty that also covers parts and workmanship from the purchase date. The electronic cash register receipt is a proof of purchase and must be presented to confirm that the warranty is applicable. -
Page 24: Regulation
Class B digital device, pursuant to Part 15 of the FCC Rules. These limits are designed to provide reasonable protection against harmful interference in Use the LM2 in the environment with the temperature between -1°C and 35°C. a residential installation. This equipment generates uses and can radiate radio frequency energy and, if not installed and used in accordance with the instructions, may cause harmful interference to radio communications. -
Page 25: Disposal & Frequency
UMTS 800 24 DBM + 1,7/-3,7 DB SPYPOINT LM2 | Made in China 12 V DC • LIT-10 Lithium battery pack • 8 X R6 (AA) batteries (2 X 6 V) US/CAN models contain FCC ID: XMR201606EC21A • IC: 10224A-201611EC21A V models contain FCC ID: XMR201609EC21V •...
Need help?
Do you have a question about the LM2 and is the answer not in the manual?
Questions and answers