Advertisement
Quick Links
Download this manual
See also:
User Manual
IRON
Camera
Quick start guide
Allows to easily manage your photos and trail cameras online. A must
for enjoying your SPYPOINT trail camera to its fullest!
Invisible LEDs
Geotag capabilities
trail camera
Models:
Cloud system
IRON-9
IRON-10
C9 / B10 / G8
v1.7
Account sharing
support.spypoint.com
1-888-779-7646
Automatic photo
tech@spypoint.com
sorting
Add your camera to your
mySPYPOINT.com
Visit mySPYPOINT.com and create your
free account
now!
In the box
Useful:
Detach the desired section of this guide and
insert it into the sleeve provided on the back housing of
the camera.
&
photo
management system
Track back your cameras, com-
Camera
Installation
Quick start
pile location information and
guide
weather data over the years and
plan your next hunting season
effectively.
Note: Memory card and batteries are sold separately.
Access
your
photos
from
anywhere in the world. With the
cloud system, don't worry about
Components
losing your data.
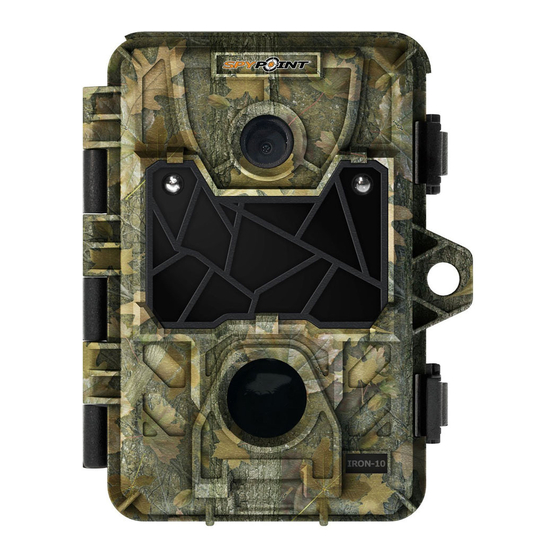
1
Photo lens
See your hunting partners' pho-
Invisible LEDs
2
tos by sharing your account with
3
Test light
your group.
4
BUSY LED
5
Detection lens
Take advantage of the automa-
6
Cable lock hole
tic organization of photos and
Battery case
7
apply tags on photos to easily
find them.
8
Configuration screen
9
Switch panel
ON/OFF
10
11
Slot for installation strap
free BRONZE
account now!
1
3
2
6
5
USB
Audio-video
strap
cable
cable
Tripod mount
12
13
Microphone
14
13
(if applicable)
14
12V jack
USB port
15
TV OUT
16
Distance dial
17
SD card slot
18
11
12
Getting started
1.
CHOOSE A POWER SOURCE
8
4
9
10
6 alkaline AA batteries
Lithium battery pack
LIT-09/LIT-C-8
We recommend the use of new alkaline batteries to ensure
7
maximum performance of the camera. Rechargeable AA batte-
ries are not recommended.
Power source
Battery switch position
• 6 AA
• 12V
ALK
• 12V + 6 AA
16
•
LIT-09*
LIT-09 or RECH
• 12V +
LIT-09*
15
(depending on the camera)
• Solar panel +
LIT-09*
*
Rechargeable lithium battery pack, sold separately (LIT-09)
or with a charger (LIT-C-8).
18
2.
INSERT THE MEMORY CARD
Insert an SD/SDHC memory card (up to 32 GB
17
capacity) in the card slot. The card is inserted
correctly when a click is heard.
Before inserting or removing a memory
card, always turn off the camera to
prevent loss or damage of the photos already
recorded.
3.
INSTALL THE CAMERA WITH THE SUPPLIED STRAP
1. Insérez l'extrémité de la courroie dans la fente
1. Insérez l'extrémité de la courroie dans la fente
1. Insérez l'extrémité de la courroie dans la fente
2. Insérez la courroie dans la fente sous le levier
2. Insérez la courroie dans la fente sous le levier
2. Insérez la courroie dans la fente sous le levier
3. Créer une tension sur la courroie en la tirant vers
3. Créer une tension sur la courroie en la tirant vers
3. Créer une tension sur la courroie en la tirant vers
qui se trouve au dos du mécanisme.
qui se trouve au dos du mécanisme.
qui se trouve au dos du mécanisme.
et faites-la ressortir en arrière.
et faites-la ressortir en arrière.
et faites-la ressortir en arrière.
la droite, puis rabattez vers la gauche le levier pour
la droite, puis rabattez vers la gauche le levier pour
la droite, puis rabattez vers la gauche le levier pour
maintenir la position.
maintenir la position.
maintenir la position.
RECOMMENDATIONS:
PRACTICAL TIP :
3 ft
Recommended installation height:
Once installed, the inner part
about 3 feet above the ground.
of the camera can be removed
from the housing to easily
Do not place the camera
adjust the settings.
facing the sun.
Advertisement

Related Manuals for Spypoint IRON-10


Summary of Contents for Spypoint IRON-10
- Page 1 Quick start guide Allows to easily manage your photos and trail cameras online. A must for enjoying your SPYPOINT trail camera to its fullest! 6 alkaline AA batteries Lithium battery pack Invisible LEDs LIT-09/LIT-C-8 ...
- Page 2 PERFORM THE STEPS 4 AND 5 DURING THE FINAL Press OK to enter the menu. The flashing option is the one that can be Delay (with Time-Lapse ON) *IRON-10 only : Allows the camera to The DISTANCE dial can be turned to the right to increase the detection INSTALLATION OF THE CAMERA.
Need help?
Do you have a question about the IRON-10 and is the answer not in the manual?
Questions and answers