SPYPOINT LINK-MICRO-LTE - Cellular Trail Camera Manual
- Quick start manual (120 pages) ,
- User manual (26 pages) ,
- Quick start manual (31 pages)
Advertisement
Introduction
LINK-MICRO-S-LTE PRESENTATION
The LINK-MICRO-S-LTE is one of the many hunting cameras of the SPYPOINT brand. What distinguishes it is, first of all, its dimension. The cameras of the MICRO series are the smallest on the market, which allows, in addition to their camo color, to hide them easily.
The LINK-MICRO-S-LTE is also a cellular camera, i.e. it allows you to remotely, through the cellular application associated to it:
- Transfer to your smartphone or tablet the photos taken.
- View your photos.
- Check the status of your device.
- Do the complete programming of the device.
It is also a solar camera. Therefore, it offers an interesting autonomy in terms of power supply. It is delivered with a very powerful lithium battery pack that is powered as soon as the integrated solar panel detects light.
Its robust design, simple operation, reliable connection (LTE network), quick triggering upon motion detection, and more affordable price make it a unique and extremely popular product among hunting enthusiasts.
THANK YOU FOR CHOOSING A SPYPOINT PRODUCT
This User Manual will introduce you to the features of your new LINK-MICRO-S-LTE and will guide you through the acquisition of its functionalities so that you can use it to its full potential.
Our priority is to offer an outstanding service to our customers. If you need technical support for your camera, here is how to contact us:
Contact our chat service Monday to Friday, from 8:30 a.m. to 4:30 p.m., directly on the SPYPOINT site (in the lower right-hand corner of the Support section, by clicking on the "Chat with an expert" window, www.spypoint.com).
Go to www.spypoint.com/en/support for more information about our devices.
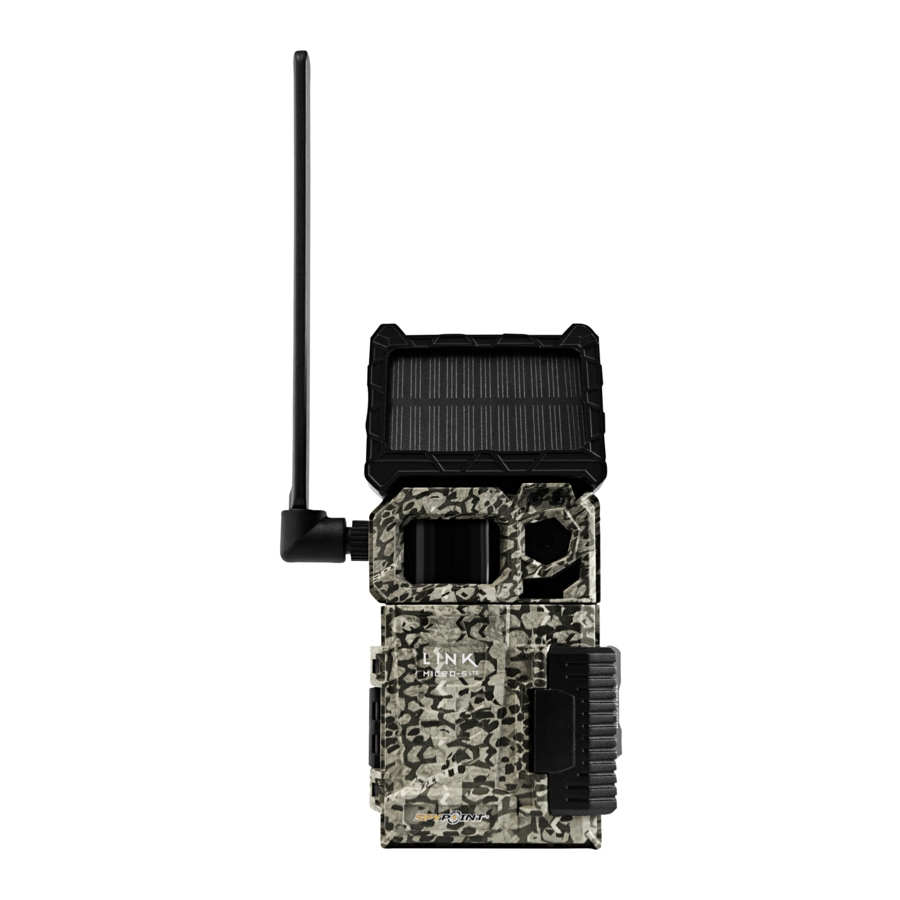
Components

- Solar panel
- Antenna
- Detection lens
- MicroSD card slot
- Light sensor
- Delay light
- Photo lens
- LED
- OFF/ON switch
- STATUS light
- SIM card slot
- Battery compartment
- Door
- Slot for installation strap
- Locking latch
- Cable lock hole
- Antenna support
- Antenna holder
- Lithium battery pack
- 12 V jack
- Screw-thread for standard
- ¼"-20 tripod mount
- SOLAR PANEL
Solar energy sensor for charging the internal lithium battery pack. - ANTENNA
Captures the cellular signal. - DETECTION LENS
Enlarges the detection area of the camera's motion sensor. - MICROSD CARD SLOT
Space to insert the microSD card (not included) needed to save photos. - LIGHT SENSOR
Detects the ambient lighting conditions for taking pictures: in colors during the day, black and white at night. - DELAY LIGHT
During installation, once the signal is found, this light flashes for 30 seconds to allow the user to walk away without being photographed. - PHOTO LENS
Image sensor. - LED
4 powerful LEDs that illuminate at night for clear black and white photos. - OFF/ON SWITCH
Allows the user to turn the camera OFF/ON. - STATUS LIGHT
During installation, it flashes to indicate to the user the strength of the cellular signal. During regular operation, it indicates that the camera is recording or transferring files. - SIM CARD SLOT
Space to insert a SIM card. It is necessary to activate cellular functions. The SIM card, pre-installed and pre-activated, is included with the camera. It is important to use a SPYPOINT SIM card (supplied by SPYPOINT), otherwise the cellular functions of the camera will be inoperative. - BATTERY COMPARTMENT
Space to insert the lithium battery pack #LIT-10 (included with the camera). - DOOR
Provides access to the battery compartment, microSD card, STATUS light, and OFF/ON switch. - SLOT FOR INSTALLATION STRAP
Allows the camera to be installed using the included installation strap. - LOCKING LATCH
Allows you to lock and open the door. - CABLE LOCK HOLE
Allows you to install a #CLM-6FT padlock cable to secure the unit (sold separately). - ANTENNA SUPPORT
Secures the antenna in a downward position to protect it when transporting the camera. - ANTENNA HOLDER
Secures the antenna in place to prevent it from moving. - LITHIUM BATTERY PACK
Main power source for the camera. It is a rechargeable lithium battery supplied with your camera. - 12 V JACK
Allows you to insert a power cord connected to an external 12 V source. - SCREW-THREAD FOR STANDARD ¼"-20 TRIPOD MOUNT
Allows you to attach a standard tripod from ¼"-20.
Features
| CELLULAR TRANSMISSION | |
| Frequency | LTE |
| Photo transmission | Transmission of your photos to your SPYPOINT application by cellular network. Visit www.spypoint.com/plans to choose a plan that suits you. |
| Camera configuration | Fully configurable remotely with the free SPYPOINT app. |
| PHOTO RECORDING | |
| Photo resolution | 10 Mpx |
| Photo file format | JPG |
| Time-lapse mode | No |
| Multi-shot mode | Up to 2 photos per detection |
| Stamp on picture (only on the picture) | Date, time, temperature (°C/°F), moon phase, SPYPOINT logo, and camera model |
| Capture mode | Colors by day, black and white by night |
| VIDEO | |
| Video mode | No |
| AUDIO | |
| Audio recording | No |
| MEMORY | |
| Internal memory | None |
| External memory | MicroSD card up to 32 GB (not included) |
| VIEWING | |
| On the SPYPOINT app or on the website www.spypoint.com/en/manage | |
| POWER SOURCES | |
| Main power source | Lithium battery pack #LIT-10 (included)/ rechargeable via the integrated solar panel or via the micro-USB cable (included) |
| Secondary power source | 12 V battery (optional accessories available at SPYPOINT: #KIT6V-12V, #KIT-12V, #BATT-12V) |
| DETECTION SYSTEM | |
| Movement detector | Infrared captor |
| Detection angle | 42° |
| Detection range | Up to 24 meters/80 feet |
| Trigger speed | 0.4 seconds |
| Delay between each detection | Adjustable from Instant to 30 minutes |
| NIGHT LIGHTING SYSTEM | |
| LED | 4 powerful LEDs |
| Night light range | Up to 24 meters/80 feet |
| Exposition | Automatic adjustment of the infrared illumination |
| PHYSICAL DIMENSIONS OF THE CAMERA | |
| 11 cm (H) x 8.9 cm (W) x 5.08 cm (D) 4.33'' (H) x 3.5'' (W) x 2'' (D) | |
| RECOMMENDATIONS | |
| Operating temperature | -30°C to 50°C (-22°F to 122°F) |
| Storage temperature | -40°C to 60°C (-40°F to 140°F) |
Power Supply
The main power source of your camera is the lithium battery pack (#LIT-10 included), which provides a long charge time, more than double that of AA batteries.
BEFORE YOUR FIRST USE, CHARGE THE LITHIUM BATTERY PACK
- Remove the lithium battery pack from the packaging. It is shipped with the camera.
![]()
- Using ONLY the supplied micro-USB cable and a 5 V wall outlet charger (not included), recharge the battery pack for about 12 hours. Plug the end of the cable (micro-USB part) in the battery pack provided for this purpose. Then plug the other end (USB part) into a wall outlet adapter.
- Once the lithium pack is fully charged, the red light will turn green.
- After unlocking the latch and opening the camera door, insert the battery pack in the compartment (see photo).
![]()


Do not insert AA batteries into the lithium battery compartment, as this could damage the camera.
OPERATION
- The solar panel is not an autonomous power source for your camera. Its only function is to maintain the charge of the lithium battery or to slowly charge it. The solar panel will be effective as soon as ambient solar energyis detected.
- Make sure there are no objects or elements obstructing the solar panel (e.g.: snow). If it is partially covered, the solar panel will still work, but to a limited extent. For optimal performance, it must be completely clear.
- Under optimal conditions (a configuration that consumes little energy), the energy and a sunny environment), the power supply of the camera will be autonomous.
- When the battery pack's charge level is low, you will receive a notification in your app.
- If your battery pack runs out, the camera will shut down.
- If the camera turns off, the solar panel will continue to power the battery pack. However, for a quick and complete recharge, connect the battery pack to a wall outlet using the supplied USB cable and a USB power adapter.
- When you restart your camera, after recharging the battery pack, it will return to the settings you previously selected.
LITHIUM BATTERY PACK SPECIFICATIONS
This lithium battery is compatible with all SPYPOINT LINK-MICRO cameras and the CELL-LINK.
Charging time ≈ 12 hours (with micro-USB cable)
Operating temperature -30°C to 50°C (-22°F to 122°F)
Storage temperature -40°C to 60°C (-40°F to 140°F)
Voltage 3.7 V
Capacity 10,200 mAh

The LIT-10 contains safety and protective devices which, if damaged, may generate heat, rupture, or ignite and cause serious injuries.
Be sure to follow the safety rules below:
- Do not modify the battery pack.
- Do not place the battery pack in a fire or close to a heat source exceeding 60°C (140°F). Avoid placing it in direct sunlight or inside a vehicle in hot weather.
- If the battery pack is leaking or emitting an odor, it must be immediately removed from any flame. The leaking electrolyte can ignite and cause a fire or explosion.
- Do not charge the battery pack if it looks abnormal in any way (discolored or deformed). If the battery pack is in use or being recharged, it must be removed immediately from the camera or charger and must not be used again.
- Keep out of reach of children.
CHARGING INSTRUCTIONS FOR THE LIT-10 BATTERY PACK
- Recharge the battery pack ONLY with a 5 V wall charger and using the micro-USB cable included in the package.
- Turn the camera OFF and remove the battery pack, if applicable.
- Charge the battery at room temperature or near-room temperature: avoid charging it in extreme temperatures.
- Stop using the charger and/or the battery pack if the battery pack becomes abnormally hot.
- Quickly charge your battery pack before storing it (40-50%).
AN EXTERNAL 12 V BATTERY
- The camera was designed to recognize and use an optional power source other than the lithium battery pack.
- You can purchase a 12 V cable and battery kit (like the #KIT12V, sold separately). Simply plug the 12 V cable into the 12 V jack of the camera and connect the other cable end to the 12 V battery.
MANAGING VARIOUS CAMERA POWER SUPPLY
If you choose to plug an external 12 V battery (#KIT-12V, sold separately) into your camera, it becomes your camera's new primary power source. The lithium battery pack will only be used once the 12 V battery is depleted.
NOTE
- Using an external 12 V battery source does not recharge the lithium battery pack.
- The camera's integrated solar panel will not recharge the external 12 V battery.
You can check the battery level of your device:
- In the application: on the home page, you will see the battery charge level for each of your devices. You can access more details on the status of your battery by going to the STATUS page. When the battery logo turns red, we suggest that you recharge the battery pack before it is completely drained.
- On the device: as soon as the device is switched on, when the STATUS light flashes orange, it indicates that the battery level is low.
Memory Card
INSTALLING A MICROSD CARD (NOT INCLUDED)
The use of a memory card is necessary for the operation of the camera. It is used to save pictures and other camera status files. Note that photos in their original format are kept on the memory card. The photos sent to your application are lighter versions. You can retrieve your photos at any time by removing the card from the device and transferring the contents to another device (e.g.: computer).
Your camera requires a memory card type microSD, with a maximum capacity of 32 GB, sold separately. Here is a table showing the approximate quantity of photos that can be recorded on the card, according to different memory card capacities.
| MEMORY | 4 GB | 8 GB | 16 GB | 32 GB |
| PHOTOS 10 MPX | 1,900 | 3,800 | 7,600 | 15,200 |
INSERTING YOUR MICROSD CARD
Before inserting the microSD card into your camera, it must be formatted via a computer to ensure proper operations. Visit www.spypoint.com/en/support if you need help formatting your microSD card.
- Ensure the camera is turned OFF.
- Find the microSD card slot. It is located on the left, above the battery compartment (see photo).
![]()
- Insert a microSD card (up to 32 GB) in the microSD card slot with the metal contacts facing down.
- The card is inserted correctly when a click is heard.

REMOVING YOUR MICROSD CARD
- Before removing a memory card, always turn your camera OFF to prevent files from on the card from being deleted or damaged.
- To remove the card, push it lightly into the camera until you hear a click. Then take it out of the device.
NOTE
The LINK-MICRO-S-LTE is equipped with continuous file recording. This means that when the memory card is full, the camera continues to save your pictures by erasing the first recorded files.
FREE THE ANTENNA
The camera comes with an antenna mount that holds and protects the antenna during shipping. You have to remove it. This will allow you to move and point your antenna in the desired direction.
Save and reuse the mount to protect your antenna during future trips.

ACTIVATING YOUR CAMERA
Before you can use your camera, you must activate it. To do so, you will need the activation code.
FINDING THE ACTIVATION CODE
The activation code is located inside the LINK-MICRO-S-LTE's battery compartment.

Activation
To activate your camera, you have two choices: you can either do it via the SPYPOINT app or via our website www.spypoint.com.
SPYPOINT APPLICATION
If you choose to use the SPYPOINT app to activate your device, follow these steps:

- On Google PlayTM or the App StoreTM, search for "SPYPOINT app".
![www.apple.com]()
![play.google.com]()
- Download and install the app on your smartphone or tablet.
- Start the app. Select "ACTIVATE A DEVICE". In the list, select "LINK-MICRO-S-LTE" then follow the steps to create an account.
- Once completed, a confirmation email with instructions on how to finalize the creation of your account will be sent to you.
- Log in to the SPYPOINT app using your email address and password.


SPYPOINT.COM WEBSITE
If you choose to use the SPYPOINT website to activate your device, follow these steps:

- On the www.spypoint.com, select "LOGIN" in the top navigation menu. On the displayed "SPYPOINT" page, select "REGISTER", fill out the required fields, then log in.
- Select the + sign on the far right of the page; in the list, select "LINK-MICRO-S-LTE" then follow the steps.
- When complete, a confirmation email with instructions on how to finalize the creation of your account will be sent to you.
- On the SPYPOINT website, log in to your account using your email address and password.
CHOOSING A PHOTO TRANSMISSION PLAN FOR YOUR CAMERA
Go to www.spypoint.com/en/spypoint-experience/plans to read the latest offers and choose the plan that suits you.
INSTALLING YOUR CAMERA
- To install the camera, loop the installation strap through the intended slot (see diagram).

- Choose a solid tree that does not move in the wind, as movement will cause false detections.
- Make sure the area immediately in front of your camera is free of branches or twigs that could be blown away by the wind.
- The camera should be at the same height of the animal's mid-body.
- The targeted animal should be at 25 feet (7.5 meters) away from the camera.
- Make sure the installation site allows enough light to pass through to allow the optimal operation of the solar panel.
- To produce brighter photos at night, there should be items reflecting the camera's flash in the background.

STARTING YOUR CAMERA
IMPORTANT VERIFICATIONS BEFORE STARTING YOUR CAMERA
- The antenna is freed (antenna support removed).
- The lithium battery pack is recharged and inserted in the camera's battery compartment.
- The microSD card is formatted and inserted in the camera.
- The camera is activated.
- The camera is securely installed.
- Turn ON the camera.
- The green STATUS light will flash while searching for a signal (can take a few minutes).
![]()
- The STATUS light will light up in one of the following 3 colors:
Red: Insufficient signal
Orange: Acceptable signal
Green: Optimal signal - When the top right light flashes red, 30 seconds remain before the photo mode is turned ON. This allows you to leave the area without being photographed.
- The camera is ready for use when all the lights are turned OFF.
- If the light is red during step 3, you should:
- Turn your camera OFF and then back ON.
- Retry while pointing the antenna at different angles.
- Try moving it to a spot with better signal.
- Try our #CA-01 long range cellular antenna (sold separately), which could help improve signal strength.

OPERATIONAL VALIDATION TEST
You can use the following test to make sure everything works as it should:
- When your camera is turned ON, open the door to gain access to the OFF/ON switch and the status light.
- Move in front of the camera so that it takes a picture. The STATUS light should light up while the camera takes and processes the picture.
- Turn the camera OFF and ON again.
- Verify the strength of the cellular signal.
- If everything works normally, your camera will connect to the cellular network and will transmit its status and at least one photo. The latter should appear in your app within 15 minutes.
NOTE
Inside your camera's door is a small checklist to guide you through the different steps to start your device.

CONFIGURATION
BASIC CONFIGURATION
Use the SPYPOINT app to configure your camera.
| MODE Photos only | Allows you to start the device in Photo mode. The Video mode and the Time-lapse mode are not offered for this camera model. |
| DELAY Instant; 10 seconds; 1 minute; 3 minutes; 5 minutes; 10 minutes; 15 minutes; 30 minutes | Allows you to choose the period of time to wait before the camera detects again and records the next picture. A longer delay minimizes the number of photos taken and therefore maximizes battery life. A shorter delay maximizes surveillance in the area but consumes more power. Shorter delays are recommended when the camera is used for security purposes. |
| MULTI-SHOT 1; 2 |
Allows you to take 2 consecutive photos at each detection, with a 5-second delay between each photo. |
| SENSIBILITY Low; medium; high | Allows you to choose the detection sensitivity of the device. A higher sensitivity allows you to detect movement in front of the camera more effectively, so the camera will take more pictures. |
| CAMERA NAME All possible values | Allows you to name the camera for easy identification. This function is very useful for users with more than one camera. |
CELLULAR CONFIGURATION
| FIRST TRANSFER TIME All possible combinations | Allows you to choose the time when the camera makes its first transfer of the day. Note: the camera transfers are configured by default with 4-hour intervals, determined from the time you activated your camera. For example, if your camera was activated at 1:42 p.m., the next transfer will be at 5:42 p.m. |
| TRANSFER FREQUENCY 1; 2; 6; 12; each detection | Allows you to choose the number of transfers the device performs each day. |
| TAKE A PHOTO AT THE NEXT TRANSFER Activated/not activated | During the next transfer, the camera will automatically take a picture and communicate it to your application. |
ADVANCED CONFIGURATION
| DATE FORMAT MM/DD/YYYY or DD/MM/YYYY | Allows you to choose the date format displayed. |
| TIME FORMAT 12 h or 24 h | Allows you to choose the time format displayed. |
| TEMPERATURE UNIT °C/°F | Allows you to choose the temperature unit format displayed. |
| OPERATING PERIOD 24 h/7 days | Allows you to choose the hours of operation of the camera, for each day, over a 1-week period. The selected start and stop times will determine the times during which the camera will be on and take pictures. For a 24-hour operation, the start and stop times should both be 00:00 or 12:00. NOTE: You can adjust the hour format to 12 or 24 hours. Refer to the "Time Format" option. |
| TRIGGER SPEED Optimal/fast | Allows you to choose the trigger speed of the image sensor. The "optimal" trigger speed provides better image quality but may cause you to miss a fast-moving subject. On the other hand, a fast trigger speed ensures that the fast-moving subject will be photographed, but the picture may be of poorer quality. |
| PHOTO QUALITY High/normal | Allows you to determine the quality of the photos saved on your microSD card. High quality: 10 Mpx (4,096 x 2,304) or normal quality: 2 Mpx (1,920 x 1,080). |
| CELLULAR MODE Activated/not activated | Allows you to activate or deactivate the cellular mode. Note that this setting will only take effect the next time the camera makes a transfer. |
OTHER CONFIGURATIONS
| RESET TO DEFAULT SETTINGS Activated/not activated | Allows you to reset the camera to its original state. |
RECOMMENDED CONFIGURATION
The camera can be configured to be used in trails. This situation usually presents a lower level of activity, topics that move quickly and fewer photos. This configuration increases the chances of detecting animals in succession.
The camera can also be configured to be used in a bait site. This situation usually presents a high level of activity, slower subjects and more photos. This configuration allows to reduce the number of photos taken while capturing all the activities at the baiting site.
This table presents the suggested configuration for these two situations:
Battery life may be affected if the configurations are not suitable for the situation.

VERIFICATION
VERIFYING CAMERA STATUS
Different tools are available to help you check the status of your LINK-MICRO-S-LTE and to inform you of any problems that may occur during its operation. In this section, we will see 3 tools:
NOTIFICATIONS
The camera was designed to send notifications to your SPYPOINT app. This is to help you stay informed of the status of your camera.

You will receive a notification on your smartphone for the next transfer when:
- You forget to insert a microSD card in your device.
- The inserted microSD card is not compatible with your device.
- The batterie charge is too low.
APPLICATION STATUS PAGE
Here are the different indicators of the LINK-MICRO-S-LTE status you have access to. They are accessible on your app or on the SPYPOINT website.
| SIGNAL Strength of the cellular signal | 1 - 5 bars |
| BATTERY Charge level | 0 - 100% (LIT-10/12 V) |
| SD CARD Used space | 0 - 100% |
| POSITION GPS | GPS coordinates |
| MODEL | LINK-MICRO-S-LTE |
| VERSION Displays the software version | VX.XX.XX |
| LAST COMMUNICATION The date and time of the last device transfer | Date and time |
| NUMBER OF PHOTOS TAKEN THIS MONTH | XXXX |
| TEMPERATURE | °C or °F |
| LAST INSTALLATION Last time your camera was turned ON | Date and time |
| SIM Number on your SIM card | 89...... |
| ACTIVATION CODE | XXXX-XXX-XXXX |
STATUS LIGHT AND DELAY LIGHT
Those two lights are another tool giving you clues on your camera status. The following table shows you what these lights indicate when the camera starts up and during normal operations. The fact that they are flashing or fixed, and their different colors are significant.

| 1 2 seconds | 2 ≈ 30-60 seconds | 3 15 seconds | 4 15 seconds | 5 |
| STATUS LIGHT | DELAY LIGHT | STATUS LIGHT | ||
 | 2 possibilities:  | 4 possibilities:  |  |  |
| Start-up cycle where the 3 colors of the status light alternate rapidly. | Searching cellular signal. Flashing green light: the battery charge is sufficient. Flashing orange light: the battery charge is low. It can last a few minutes, until a cellular signal is found. | Fixed light = found a cellular signal.
Flashing red light: | The light flashes red for 30 seconds: indicates the delay to move away without being photographed. | Fixed green light: Fixed orange light: |
 Insufficient signal
 Acceptable signal
 Optimal signal
SPYPOINT MOBILE APPLICATION

The SPYPOINT app is your hub for managing your cameras and photos. You can download it for free from iTunes and Google Play. The app requires no subscription or monthly payment.
From the SPYPOINT app, you can:
- Configure your camera.
- Manage your settings and account preferences.
- Verify your data usage and adjust your plans.
- Configure your transmission settings.
- View and sort your photos.
For more information, visit www.spypoint.com/en/experience-spypoint/application-spypoint.
PHOTO TRANSMISSION PLANS
- When activating your camera, you will immediately take advantage of our FREE 30-day package.
- You can keep the FREE monthly plan for life and keep receiving up to 100 photo transfers per month.
- At any time, you can choose a plan that best suits your needs from those we offer.
For more information or to choose one of our plans, visit
www.spypoint.com/en/spypoint-experience/plans.
ONLINE CAMERA AND PHOTO MANAGER

As well as with the SPYPOINT app, you can manage your device and photos using the online manager.
Create your user account for FREE!
Go to www.spypoint.com to discover a complete range of complementary features for your camera.
THE SPYPOINT EXPERIENCE
(Online scouting tools)
To make sure you use your trail camera in an optimal way, that it precisely meets your needs, and that you have better success as a hunter, SPYPOINT offers you a range of very useful additional digital features.
For more details on the SPYPOINT EXPERIENCE, see the following website:
www.spypoint.com/en/experience-spypoint.
TRANSFERRING FILES TO A COMPUTER
TRANSFERRING FILES
- Turn the camera OFF.
- Remove the microSD card from the camera.
- Insert the microSD card in the microSD computer slot, or use a USB adapter for microSD cards.
- The computer will recognize the microSD card.
ON A PC
On your desktop, click on "My Computer" or "This PC".
Locate your device under "Removable Disk" and click to access it. Then, click on "DCIM" and "100DSCIM" to find all saved photos.
Select the photos you want to copy. With some Windows versions, the simplest way is to select them by clicking on the "Home" tab and choosing "Select all" on the right side. With some Windows versions, you can press on "Ctrl" and "A" or click on the "Edit" menu and choose "Select all".
Click on the "Copy" icon on the left of the ribbon (or hold the "Ctrl" and "C" keys).
NOTE
If you do not want to select all photos, hold down the "Ctrl" key and click on the photos you want to select before clicking on the "Copy" icon.
Access the folder where you want to save your photos or create a new folder by clicking on the "New folder" button. (You can also click on "Ctrl", "Maj", and "N" to create a new folder, or right-click in a blank space in the "Pictures" folder and choose "New", then, in the following menu, click on "Folder".)
Enter a name for your new folder, click on "Enter", then double-click on the folder to open it. In the "Home" tab, choose "Paste" (or click simultaneously on the "Ctrl" and "V" keys). The photos will be copied in the new folder.
ON A MAC
Click on the search tool in the "Toolbar". Locate your device under the "Devices" tab and click to access it. Then click on "DCIM" and "100DSCIM" to find all saved photos.
Click on "Modify" in the toolbar at the top of the screen, then click on "Select All" to highlight all individual images on the device. You can also access the "Select All" option by simultaneously clicking "Cmd" and "A".
If you don't want to import everything, you can highlight the desired pictures individually. Transfer pictures by clicking on "Cmd" and on the file name. Click on "Edit again" and then "Copy" (or "Cmd" and "C") to copy the highlighted pictures.
Access the folder where you want to save your pictures, or create a new folder by right-clicking and pressing "Cmd" at the same time, then select "New Folder" from the menu.
Click on "Modify", then on "Copy" (or "Cmd" and "V") to copy your chosen pictures in the selected folder. The pictures can take a few minutes to download, depending on the size of the file and the number of pictures you are importing.
Once your pictures are transferred, click on the "Eject" icon beside the name of your device, than unplug the device from your MAC.
Offered Accessories

For more information about other available accessories, got to www.spypoint.com.
Troubleshooting
IMPOSSIBLE TO TURN THE CAMERA ON
Make sure the charge level of the lithium battery pack is enough.
NOTE: to verify the charge level, go to the STATUS section of your app and verify the battery % displayed. Don't forget that the indicated status is from the last transfer. Also, when turning on the camera, if the status light flashes red quickly, it indicates that the battery's charge is low.
THE CAMERA IS NO LONGER RESPONDING
Try the following solutions in order:
- Turn the camera OFF and ON again.
- Remove and reinstert the battery pack in the camera.
- From the app, reset the device to its original state.
- Perform the latest update (available on www.spypoint.com under the SUPPORT section).
THE CAMERA DOESN'T TAKE PICTURES
Issue with taking photos
- Make sure the camera is turned ON.
- If it is not already done, remove the protective sticker on the detection lens of your camera.
- Format the microSD card. Do not choose the "Quick format" option.
- In your app, in your configurations, verify the operating periods you chose. Make sure the camera is not outside the operating periods.
- If none of the previous solutions works, reset the camera and the settings.
THE CAMERA IS NOT TRANSMITTING PHOTOS
Photo transmission issue
- Verify if the signal strength received by your device is sufficient.
- Make sure you have not reached the photo limit of your cellular plan.
- Verify if there is a message in the Photo section of your app.
You will receive a notification if your camera is active, but no motion was detected. In those conditions, it is normal that your microSD card and your app did not receive new photos. - Note that photos older than 7 days won't be transferred.
NOTE : distinguish between "taking pictures" and "transmitting pictures" from your camera to your app. They are two distinct camera functions:
- If your microSD card contains photos, the camera has no problem taking photos.
- If your microSD card is empty (doesn't contain photos), put it back in the camera and reboot your camera. Make a movement in front of the camera for it to take a photo. If there are still no photos on your microSD card, there is an issue with taking photos.
- If one or many photos are added to your microSD card once you have moved in front of your camera, after turning the camera off and on again, it should transfer them to your app in the next 15 minutes at most. Otherwise, there is an issue with photo transmission.
THE CAMERA IS NOT RECEIVING A CELLULAR SIGNAL
- Verify the coverage area of the cellular network to make sure it reaches your area.
- Move your device to other locations to search for a stronger signal.
- Turn the device OFF and ON between the attempts.
- Make sure the antenna is installed properly (securely screwed down).
- Use the long range cellular antenna #CA-01 (sold separately).
THE BATTERY PACK IS DRAINING FAST
The following configurations of your camera affect power consumption:
Delay between shots – multi-shots – detection sensibility – transfer frequency – photo quality. If possible, choose the less power-consuming options.
THE RED LIGHT IN FRONT OF THE CAMERA FLASHES
During the installation, the delay light flashes for 30 seconds to allow the user to walk away without being photographed.
THE CAMERA TAKES DARK PHOTOS AT NIGHT
- Verify the charge level of the battery pack, as the night lighting may be malfunctioning if the charge level is low.
- Make sure the subject is within range of the night lighting (approximately 80 feet).
- To get better photos at night, try setting the night mode to "Enhanced" to increase the strength of the infrared LEDs.
- Make sure there are elements in the background for the light of the infrared LEDs to reflect on.
- Test the night lighting in a dark room to see if you are able to get good quality photos in black and white.
NO ONE OR NO ANIMALS ON PHOTOS
- Make sure the camera is not pointing the sunrise or sunset, which could cause false detections.
- At night, the motion detector can detect beyond the range of the infrared LEDs. Reduce camera sensitivity.
- Small animals may trigger the camera. Reduce the sensitivity and/or increase the height of the camera.
- The motion detector can detect animals through the foliage.
- Verify if the tree against which the camera is installed is stable and does not move.
- Make sure the area immediately in front of your camera is free of branches or twigs the wind could move. This would result in false detections.
FREQUENCY
FREQUENCY RANGE:
800/850/900/1900/2100 MHz
MAXIMUM TRANSMISSION POWER:
FREQUENCY MAX.
GSM850 33 DBM ± 2 DB
EGSM900 33 DBM ± 2 DB
DCS1800 30 DBM ± 2 DB
PCS1900 30 DBM ± 2 DB
GSM850 (8-PSK) 27 DBM ± 3 DB
EGSM900 (8-PSK) 27 DBM ± 3 DB
DCS1800 (8-PSK) 26 DBM ± 3 DB
PCS1900 (8-PSK) 26 DBM ± 3 DB
UMTS 2100 4 DBM + 1,7/-3,7 DB
UMTS 1900 24 DBM + 1,7/-3,7 DB
UMTS 900 24 DBM + 1,7/-3,7 DB
UMTS 850 24 DBM + 1,7/-3,7 DB
UMTS 800 24 DBM + 1,7/-3,7 DB
JOIN THE SPYPOINT COMMUNITY
![]() www.facebook.com/SPYPOINT
www.facebook.com/SPYPOINT
![]() www.instagram.com/spypointcamera
www.instagram.com/spypointcamera
![]() www.twitter.com/SPYPOINTcamera
www.twitter.com/SPYPOINTcamera
![]() www.youtube.com/SPYPOINTtrailcam
www.youtube.com/SPYPOINTtrailcam

Documents / Resources
References
![www.spypoint.com]() Welcome to Spypoint Support
Welcome to Spypoint Support![www.spypoint.com]() SPYPOINT
SPYPOINT![www.spypoint.com]() Photo transmission plans
Photo transmission plans![www.spypoint.com]() Photo transmission plans
Photo transmission plans![www.spypoint.com]() Login
Login![www.apple.com]() App Store - Apple
App Store - Apple![play.google.com]() Google Play
Google PlayFacebook
![www.instagram.com]() Instagram
Instagram![www.twitter.com]() http://www.twitter.com/SPYPOINTcamera
http://www.twitter.com/SPYPOINTcamera![www.youtube.com]() SPYPOINT TRAIL CAMERAS - YouTube
SPYPOINT TRAIL CAMERAS - YouTube
Download manual
Here you can download full pdf version of manual, it may contain additional safety instructions, warranty information, FCC rules, etc.
Download SPYPOINT LINK-MICRO-LTE - Cellular Trail Camera Manual
Advertisement


Need help?
Do you have a question about the LINK-MICRO-LTE and is the answer not in the manual?
Questions and answers