Table of Contents
Advertisement
Quick Links
Powerful Economical Made in the USA
Certified Full Unit HEPA
Vacuum - Meets EPA RRP
Requirements Including
Lead.
- Certificate included with every unit.
The Ceramic Dust Cobra Kit - XCK010000
1.800.732.4065
Oneida Air Systems, Inc. was founded in 1993 to bring cost effective, state-of-the-art
dust collection systems and material handling ductwork to woodworking shops. OAS
designs and manufactures industrial grade dust collection systems that create a prac-
tical, safe and healthy work place environment.
Owner's Manual
Put together specifically
to keep your clay studio
clean safely.
www.oneida-air.com
ZBM000025C
9_11
Dust
R
Advertisement
Table of Contents

Related Manuals for Oneida Air Systems Dust Cobra XCK010000


Summary of Contents for Oneida Air Systems Dust Cobra XCK010000
- Page 1 Owner’s Manual 1.800.732.4065 www.oneida-air.com Oneida Air Systems, Inc. was founded in 1993 to bring cost effective, state-of-the-art dust collection systems and material handling ductwork to woodworking shops. OAS designs and manufactures industrial grade dust collection systems that create a prac-...
-
Page 2: Table Of Contents
Thank You for Choosing an Oneida Air Systems Product! OAS manufactures and sells dust collection equipment only. Our qualified technicians and sales staff are available 8:30am -5:00pm EST Mon. - Fri. to answer any questions concerning OAS products and dust collection. Call for ductwork design and ductwork quotes, including system pricing and shipping cost. -
Page 3: System Start-Up Information
I. System Start-Up Information Safety Instructions to be Strictly Followed. Read the installation and maintenance instructions as well as the recommended safety practices in this manual before assembling and using the Dust Cobra. Caution The Dust Cobra is heavy! Handling and assembly should always be performed by experienced and trained personnel who have experience with assembling equipment. -
Page 4: General Specifications
II. System Specifications Oneida Ceramic Dust Cobra Kit ® Part # Description XCK010000 Dust Cobra - Standard Motor ® Dust Cobra - Brushless Industrial Motor XCK010099 ® 90” W/C Max. Suction - 260 CFM Max. Air Flow System Vacuum Motor Voltage: 110V / 11 Amps Performance Developes 3 psi. -
Page 5: Dimensions
III. Dimensions If you replace the filter it is imperative that you use a Cleanstream Pro HEPA fil- ® ter #09085 and not their non- HEPA filter. Otherwise it will not be a certified vacuum. 58” 35” Depth - 16” All dimensions are approximate. -
Page 6: Parts
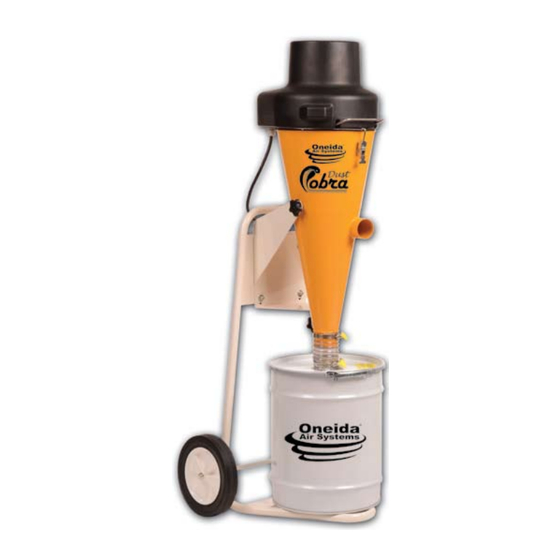
IV. Parts AFS156150 AFT00001 RGZ025050 BXI001205C/1206C AFW180516 SMS001200A AFW380125 AFL000003 ACB990300 AFT901032 SCX001205B BBS025050 SYSTEM: AFS103275 SMS001200A - Wall Bracket (1) DHF030000 SEX100300 ZBM000025 - Owner’s Manual (1) SES100000 SEX100300 - Drum Lid Steel 3” Inlet 10 Gal. (1) BXI001205C/1206C - Cobra Motor Assembly (1) SCX001205B - Cone (1) SES100000 - Drum Steel 10 Gal. -
Page 7: General Assembly
V. General Assembly Instructions 1. Put self-sticking gasket around inside rim on top of cyclone as shown in photos. Be sure ends meet evenly and there is no gap for air leakage. Axle Cap 4. Put wheels on axle by gently tapping with a hammer and pushing and turning wheel down axle. - Page 8 V. General Assembly Instructions Fasteners mounted on underside of motor housing to slide under edge of cone rim. Slide filter bracket foot underneath washer and bolt. 10. Carefully put filter down into cone and align the hole in motor tab with the hook clamp as shown below in Fig. A.
- Page 9 V. General Assembly Instructions 10. You must adjust the Hook Clamp so that it holds the motor housing tightly down when the clamp is closed. 13. Attach hose cuff to inlet and then plastic blast gate to the hose cuff with the gate opening at the bottom as shown in picture.
-
Page 10: Filter Maintenance & Cleaning
VI. Filter Maintenance & Cleaning How to Use the Filter Pulse Cleaning Bar 1. Push bottom of blast gate 2. Sharply push bar down and 3. Pull gate back down to When you replace filter, up to seal the vacuum. hold for 5 seconds then open suction to hose. -
Page 11: Assembling Bag Liner Hold-Down
VII. Assembling the Bag Liner Hold-Down Drum liner hold-down. (Retainer will come flat.) To assemble Retainer use (6) provided plastic Push Pins. Form the Retainer into a circle so the outside row of holes lines up. If this makes the liner too big for your drum, use the inner row of holes. -
Page 12: Emptying The Drum
IX. Emptying Dust Drum - Empty dust drum frequently. - Wear a mask when emptying drum. - Let dust settle before lifting off drum lid. - Dispose of waste safely and properly. X. Troubleshooting Poor Dust Pick-Up Caused By: Air leakage between cyclone and dust bin. Cyclone and dust bin must be air tight. Even small leaks can will cause poor pre-separation in the cyclone. -
Page 13: Terms And Conditions
Limited Warranty Oneida Air Systems has a limited warranty on this product for a period of 1 year to the original purchaser from the date of purchase unless otherwise specified. Items not manufactured by OAS are limited to their own manu- facturer’s warranties. - Page 14 Certificate of Compliance Dust Cobra™ HEPA Vacuum Unit Oneida Air Systems 1001 West Fayette St Syracuse, NY 13204 On this Date: 31 Jan 2012 Testing conducted in accordance with IES RP-CC002.3 & Following guidelines within Reference Standard; IES-RP-CC0034.3 Conducted by: ENV Services, Inc.
Need help?
Do you have a question about the Dust Cobra XCK010000 and is the answer not in the manual?
Questions and answers