Oneida Air Systems Supercell Mobile Owner's Manual
High-pressure dust collector
Hide thumbs
Also See for Supercell Mobile:
- Owner's manual (36 pages) ,
- Owner's manual (32 pages) ,
- Owner's manual (32 pages)
Table of Contents
Advertisement
Quick Links
OWNER'S MANUAL
U.S. Patent: #8393050,
#8377160, #9125535,
#D917806
READ AND UNDERSTAND ALL INSTRUCTIONS AND WARNING LABELS BEFORE
USING THE DUST COLLECTOR.
Rev: B 20221128LL
Appearance may vary slightly
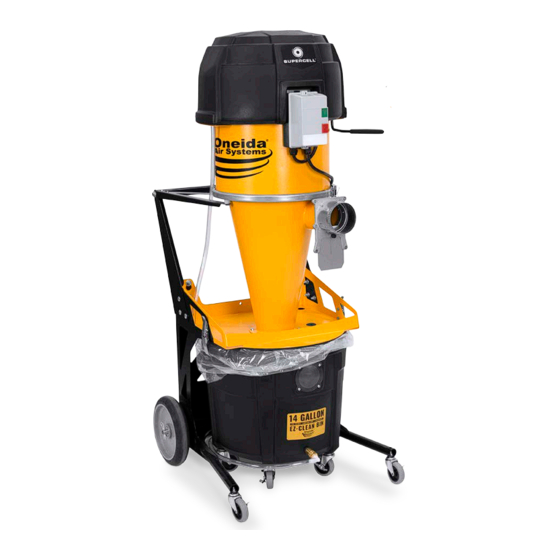
Supercell
Supercell
Turbo Mobile
®
High-Pressure
Dust Collector
Mobile
®
14 Gallon
# XSK000014-P
# XSK040014-P
Doc. #ZBM000040
Advertisement
Table of Contents

Related Manuals for Oneida Air Systems Supercell Mobile


Summary of Contents for Oneida Air Systems Supercell Mobile
- Page 1 OWNER’S MANUAL Supercell Mobile ® Supercell Turbo Mobile ® High-Pressure Dust Collector 14 Gallon # XSK000014-P # XSK040014-P U.S. Patent: #8393050, #8377160, #9125535, #D917806 READ AND UNDERSTAND ALL INSTRUCTIONS AND WARNING LABELS BEFORE USING THE DUST COLLECTOR. Appearance may vary slightly Rev: B 20221128LL Doc.
-
Page 3: Table Of Contents
Table of Contents System Start-Up Information Supercell/Supercell Turbo System Specifications System Dimensions System Contents Cart Contents Assembly Instructions Maintenance Troubleshooting F.A.Q. Recommended Accessories Warranty Information Notes oneida-air.com... -
Page 4: System Start-Up Information
Consult this owner’s manual or reach out for recommended accessories. 13. ENSURE enough air volume is at the suction point to capture all the particulate generated. Oneida Air Systems, Inc. - Page 5 System Start-Up Information (Continued) 14. NEVER make modifications without prior approval from Oneida Air Systems. Modifying the dust collector or using it differently than intended will void the warranty and may result in malfunction or mechanical failure that leads to serious personal injury or death! 15.
- Page 6 Oneida Air Systems assumes no responsibility or liability for the suitability of any fire and/ or explosion mitigation strategy, or any items incorporated into a collector as part of an owner/operators hazard mitigation strategy.
- Page 7 System Start-Up Information (Continued) 12. ALWAYS check your dust bin for smoldering materials before leaving the shop. 13. NEVER introduce sparks or sources of ignition into the dust collector. Sparks can be generated in several ways: a. High speed sanders, abrasive planers, saws, and edgers may strike foreign material and create a red-hot metal fragment.
-
Page 8: Supercell/Supercell Turbo System Specifications
30 Amp breaker Licensed Electrician licensed electrician. (minimum) by a licensed electrician. REQ UI RED Bare Wiring Two Hot Wires & Ground Bare Wiring Oneida Air Systems, Inc. Two Hot Wires & Ground... -
Page 9: System Dimensions
System Dimensions Nominal dimensions shown. Dimensions subject to slight variations in manufacturing. Allow for an additional 24" of clearance above the Motor Assembly to allow for its removal during filter replacement and other maintenance. 28 -1/2" 724 mm 29-7/8" 760 mm 21-9/16"... -
Page 10: System Contents
3" Caster with 5/16"-18 x 3/4" Stems AFT901032 10-32 Nylock Nut Please unpack the parts carefully and confirm you have received each item listed here. * Some components are pre-installed at the factory and are listed here for your convenience. Oneida Air Systems, Inc. - Page 11 FINISH: NAME: 14Ga Galv THE INFORMATION CONTAINED IN THIS FPX040001 - Filter Hold Down 14ga rev 3 DRAWING IS THE SOLE PROPERTY OF Oneida Air Systems Inc. AND SHALL SIZE TOL: PART NO. FPX040001 NOT BE USED OR DISCLOSED TO...
-
Page 12: Cart Contents
C ART AND C YCLONE BODY DRUM L ATCHES Channel Lock Pliers #2 Phillips-Head Screw Driver 3/8" Wrench 7/16" Wrench Rubber Mallet - Optional #2 Phillips-Head Screw Driver 7/16" Socket Wrench 1/2" Wrench 1/2" Socket Wrench Oneida Air Systems, Inc. - Page 13 Cart Contents (Continued) oneida-air.com...
-
Page 14: Assembly Instructions
Seal the two holes at the end of the tubes of the Cart Body with the Plastic Plugs (S12). [FIG. Note: For ease of assembly, we recommend channel lock pliers to tighten the casters. FIG. 2 Oneida Air Systems, Inc. - Page 15 Assembly Instructions (Continued) Secure both Rubber Wheels (R) to either side of the axel on the bottom of the Cart Body (Q) using a Cotter Pin (S10). [FIG. 3] FIG. 3 Lift the Mounting Bracket (F) up and over Threaded the Cart Body's (Q) threaded studs and slide Stud the Mounting Bracket (F) down so that the...
- Page 16 Cart Body (Q) [FIG 7a]. Secure them in place using three Carriage Bolts (S3), three Flat Washers (S4) and three Nylock Nuts (S5) [FIG 7b]. FIG. 7a Mirror these steps on the opposing side of the cart using the Right Bracket (O). FIG. 7b Oneida Air Systems, Inc.
- Page 17 Assembly Instructions (Continued) Align the Left Brace (N) with the hole on the Left Bracket (P). Secure to the Cart Handle (K) using a Hex Head Bolt (S6) and Flat Washer (S4) as shown in [FIG. 8a]. Mirror these steps using the Right Brace (O) and Right Bracket (M).
- Page 18 (E) using a 2-1/2" Hex Head Bolt (G7), Flat Washer (G8), Nylon Spacer (G12), Rubber Washer (G9), and Whiz-Lock Nut (G10) as shown in [FIG. 11]. Note: Hardware should be finger tightened until the Left and Right Brace (N, O) are installed. FIG. 11 Oneida Air Systems, Inc.
- Page 19 Assembly Instructions (Continued) Secure the Left Brace (N) to the Cyclone (E) using a 2-1/2" Hex Head Bolt (G7), Flat Washer (G8), Nylon Spacer (S7), Rubber Washer (G9), and Whiz-Lock Nut (G10) as shown in [FIG. 12]. Mirror these steps using the Right Brace (N). Note: The Hose Storage Strap (S9) can be attached to either the Left or Right side of the cart for your convenience.
- Page 20 (by roughly 50%). DO NOT OVERTIGHTEN. FIG. 15 Open and slide the Ring Clamp (D) over the assembly so that it rests outside the upper flange of the Cyclone (E) [FIG. 16]. FIG. 16 Oneida Air Systems, Inc.
- Page 21 Assembly Instructions (Continued) Install the Barrel Gasket (G2) onto the rounded, bottom edge of the Motor Assembly (A). The Barrel Gasket (G2) should be oriented so that the "ribbed" side is facing downwards [FIG. 17]. FIG. 17 Using pliers, squeeze and open the Double Spring Clamp (G19) and slip it onto the shorter end of the Tubing Assembly (G18A).
- Page 22 Note: Which hole you use will be determined by the orientation of your Motor Assembly (A). Use whichever hole is closest to ensure adequate length for the Vinyl Tubing (G18) to connect to the Drum (K1). FIG. 21 Oneida Air Systems, Inc.
- Page 23 Assembly Instructions (Continued) Connect the Dust Sentry's power adapter (I) to the small cord next to the Motor Assembly's (A) magnetic starter [FIG. 22]. The Dust Sentry's strobe light (I) should be mounted in a highly visible area using adhesive strips or the two mounting holes.
- Page 24 Drum (J1) [FIG. 27]. Note: If you are not using the automatic bag holding feature of the system, the Valve of the Tube Assembly MUST be in the closed FIG. 27 position. Oneida Air Systems, Inc.
- Page 25 Assembly Instructions (Continued) Attach the long end of the Tube Assembly G18C (G18C) onto the Nylon Elbow (G20A) installed on the lower section of the Drum (K). Push the Hose onto the fitting so that all barbs are covered [FIG. 30]. Note: If you are not using the automatic bag holding feature of the system, the Valve of the Tube Assembly MUST be in the closed...
-
Page 26: Maintenance
Use a hand-held, compressed air nozzle with a pressure up Replace the motor section and re-latch the drum clamp to 90 PSI max to blast air along the filter’s exterior pleating. around the motor section. Oneida Air Systems, Inc. - Page 27 Maintenance (Continued) Emptying the Drum Cleaning out the Cyclone When first using the dust collector, check the Drum If the drum becomes overfilled and the cone is packed Window (J1) regularly to get an idea of how often it needs with dust: to be emptied.
-
Page 28: Troubleshooting
2. Use the QR Code shown to download our instructions for the Testing and Replacement of the Motor Maintenance Kit. If you continue to experience difficulty with your dust collector, call Oneida Air Systems’ Customer Service Ÿ Department at 1-866-387-8822 or email support@oneida-air.com. - Page 29 5. The antenna wire can be further extended for improved reception if still necessary. Use wire strippers to expose metal on the wire and attach an additional length. If you continue to experience difficulty with your dust collector, call Oneida Air Systems’ Customer Service Ÿ...
-
Page 30: F.a.q
What dust can be collected? Oneida Air Systems' dust collectors are designed and tested for wood and wood dust. They can and have been used effectively for various other dusts and chips, such as drywall dust, paper dust, agricultural dust, metal chips and other forms of debris. -
Page 31: Recommended Accessories
Recommended Accessories 13" x 13" Conical HEPA-Grade Media Cartridge Filter #FCS131040H • Independently tested HEPA-grade media filter. • Wide-spaced pleated filters with non-stick coating for quick and easy dust removal. • Unique conical shape greatly facilitates dust release during pulse cleaning 5X Small 1.5 Mil Plastic Liner Bags #AXD600300A • Lines the inside of medium sized, 9-17 gallon containers for fast and simple waste disposal. - Page 32 #SDD990000 • This lightweight and low profile mobile dolly fits nearly any cylindrical waste bin. • Includes hardware for securing larger drums to the dolly. • Includes five 2" non-marking caster wheels (3 non-locking, 2 locking). Oneida Air Systems, Inc.
-
Page 33: Warranty Information
In no event shall Oneida Air Systems’ liability under this warranty exceed the purchase price paid for the product and any legal actions brought against Oneida Air Systems shall be tried in the State of New York, County of Onondaga. -
Page 34: Notes
Notes Oneida Air Systems, Inc. - Page 35 oneida-air.com...
- Page 36 Regardless of where you purchased your system, if you have any questions or issues with missing / damaged parts, please call Oneida Air Systems first to let us help resolve your problem. We fully stand behind the quality of our product and place the utmost value satisfaction of our customers.
Need help?
Do you have a question about the Supercell Mobile and is the answer not in the manual?
Questions and answers