Table of Contents
Advertisement
Quick Links
Advertisement
Table of Contents

Subscribe to Our Youtube Channel
Related Manuals for XAG V40


Summary of Contents for XAG V40
- Page 1 XAG V40 2022 LNT Pilot’s Operating Handbook Version AU V1.0...
-
Page 3: Disclaimer
XAG reserves the rights for final interpretation and revision of the Terms and conditions herein to the extent permitted by law. XAG also has the right to update, modify or terminate these terms and conditions via its official website without prior notice. -
Page 4: Safety
Safety Pesticide Usage • Pesticides are poisonous and pose severe risks to safety. Only use them in strict accordance with their specifications. • Chemicals residues on the equipment caused by splashes or spills during refilling or mixing can irritate your skin, rinse with clean water and seek medical attention accordingly. •... - Page 5 Flight Operation • Pre-flight Calibration and Inspection must be conducted before Operation. • Stand clear and do not approach rotating propellers and motors. • Operate within the specified max take-off weight to avoid potential safety risks which may result in serious injury to yourself and/or others, damage to your Products, and/or other objects in the vicinity.
- Page 6 Ingress Protection Rating Under stable laboratory conditions, this aircraft has a protection rating of IP67, which is waterproof, dustproof, corrosion-resistant, and can be cleaned using a small amount of water. However, this protection is not permanent and may reduce overtime after long-term use due to aging and wear. Liquid leakage or penetration may damage electrical and internal components, and it is not covered by the Product warranty.
- Page 7 Abide Local Laws and Regulations You must not fly your drone You must keep your drone at Remember, you must not op- higher than 120 metres (400 least 30 metres away from erate your drone in a way that feet) above ground level. other people.
-
Page 8: Table Of Contents
Content Disclaimer Warning Safety V40 Agricultural RPA Product Profile List of Items – V40 Overview – V40 Wiring Guide Status Indicator SuperX4 FC Status Indicator Spray Status Indicator (Arm) Flight Status Indicator (Tail) Preparing the Aircraft Unfolding the Arms Unfolding the Nozzles... - Page 9 Remote Controller List of Items – ACS2G Remote Controller Overview – ACS2G Remote Controller Status Indicator Status Indicator – Battery Status Indicator – Smart Device Status Indicator – Device Status Indicator – Control Mode Status Indicator – Terminal Status Indicator – RTK Using the Remote Controller Inserting SIM Card Charing the Remote Controller...
- Page 10 Battery Level Battery Charging Battery Status Indicator GNSS RTK Module Console XAG One APP Download XAG One APP APP – Operation View APP – Aircraft Module Preparing the Equipment Device Binding / Add Device Device & Network Setup – LNT Device Binding –...
- Page 11 Aerial Survey – Real Terra Aerial Spraying Emergency Control After-Flight Maintenance Operation with Multiple Aircraft Technical Specifications...
-
Page 12: V40 Agricultural Rpa
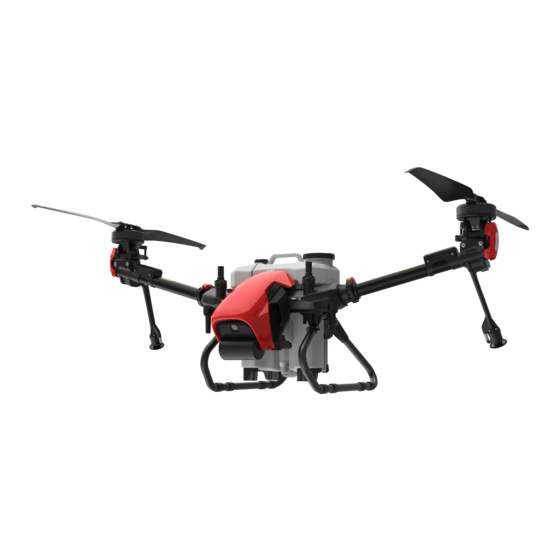
Breakthroughs in material science and manufacturing technology, dramatically reduce the mass and volume of the V40, making it more flexible and efficient during flight and transportation. The twin- rotor structure has a more concentrated wind field with multiple aerodynamic optimisations. Spray penetration is more than double of traditional Agricultural drones, and the modular design allows for rapid switching of task systems. -
Page 13: List Of Items - V40
List of Items – V40 Please check that the following items are all present when unpacking the box. Should there be any item missing, please contact your dealer. Airframe (including Liquid Tank) ACS2G Remote Controller ×1 (With ACS2 RTK)(Optional) ×1... -
Page 14: Overview - V40
Overview – V40 Head Cover Spraying Status Indicator Propeller ESC (Electronic Speed Controller) Motor RTK Antenna PSL Camera Arm Fastener Dynamic Radar 2.4GHz Antenna Terrain Sensor Airframe Nameplate Searchlight Peristaltic Pump Nozzle RealTerra Smart Battery Inside of the drone Rear view... -
Page 15: Wiring Guide
Wiring Guide 图 图 XAG AUSTRALIA... -
Page 16: Status Indicator
Initialisation Failed, Interface Rapid Flash – Red Disconnected. Pairing Mode Red & Green Alternate Flashing Indicators will Quick flash Green whether the pairing was Successful or incomplete System Status Indicator Description Solid Green System Normal Solid Red System Anomalous XAG AUSTRALIA... -
Page 17: Spray Status Indicator (Arm)
Initialising firmware update Rapid Flash – Cyan Downloading firmware update Rapid Flash – Purple Transferring firmware update Slow Flash - Purple Updating firmware Illumination Blue No signal from FC Rapid Flash – Blue Spray System offline Solid Yellow System Error XAG AUSTRALIA... -
Page 18: Flight Status Indicator (Tail)
FC initialising or warming up Sensor (Excluding IMU) Anomalous; or Rapid Flash – Red GPS Anomalous; or Low heading accuracy FC Format; or Rapid Flash – Purple Parameter Anomalous Rapid Flash – Blue Propulsion system Anomalous Rapid Flash – White IMU failure XAG AUSTRALIA... -
Page 19: Preparing The Aircraft
Preparing the Aircraft Unfolding the Arms Unlock the Arm fasteners and leave them in the Open position. Unfold both Arms frontward. XAG AUSTRALIA... - Page 20 Lock and Secure the Arm fasteners and ensure the fastener is tightened. XAG AUSTRALIA...
-
Page 21: Unfolding The Nozzles
Unfolding the Nozzles Gently lift the Nozzle inwards, and then rotate it outward XAG AUSTRALIA... -
Page 22: Unfolding The Propellers
Base Spring Plunger Unfold the Propellers until the spring plunger has properly snapped and secured in the base of the camp. Base Spring Plunger Push down the base to release the Propeller, then rotate and fold the Propellers. XAG AUSTRALIA... - Page 23 Check and ensure the correct corresponding Propeller is attached, the model of the propeller can be found between the Propeller blades and the clamp. Arm #1 – Right Arm: CCW Propeller Arm #2 – Left Arm: CW Propeller XAG AUSTRALIA...
-
Page 24: Installing The Liquid Tank
Unwire the Signal cable before removing the Liquid Tank. IMPORTANT �� Aircraft with RealTerra Module installed are limited to Aerial Survey, detach the RealTerra Module before conducting Aerial spraying/spreading. Liquid Tank Signal Cable XAG AUSTRALIA... -
Page 25: Installing The Realterra
Insert the RealTerra Module upwards into the slot under the Flight Status Indicator until you hear a clicking sound indicating the Real Terra is connected. IMPORTANT �� Aircraft with RealTerra Module installed are limited to Aerial Survey, detach the RealTerra Module before conducting Aerial spraying/spreading. XAG AUSTRALIA... -
Page 26: Installing The Battery
Then press and hold the power button again for approximately 1 second until you hear a beep from the battery. Both the Battery indicator and Aircraft Flight Status (Tail) Indicator will be OFF, indicating the battery can now be removed/swapped. XAG AUSTRALIA... -
Page 27: Local Network Terminal
List of Items – Local Network Terminal Please see that all the following items are present when unpacking the box. Should there be any item missing, please contact your seller immediately. Local Network Terminal (LNT) Antenna ×1 ×2 Power Adapter Stand ×1 ×1 XAG AUSTRALIA... -
Page 28: Overview - Local Network Terminal
Overview – Local Network Terminal Antenna Indicator Stand Power Port Power Button Reset Button XAG AUSTRALIA... -
Page 29: Installation Guide
Installation Guide Assemble the antennas Connect the Terminal of the Power Adapter to the Battery Terminal Connect the Output plug of the Power Adapter to the LNT Power port Place the LNT on the stand XAG AUSTRALIA... -
Page 30: Turning The Lnt On/Off
DO NOT turn off the Battery or disconnect the power cable until LNT is OFF. Powering off the LNT immaturely may lead to system corruption and system failure. User will be solely responsible for any failure due to system corruption. XAG AUSTRALIA... -
Page 31: Device Indicators
Wi-Fi network error WAN - On Access to WAN for data synchronization WAN - Flashing Wi-Fi network is busy WAN - Off Wi-Fi network fails to access WAN System - On Device is normal System - Flashing Device is busy XAG AUSTRALIA... -
Page 32: Remote Controller
Please carefully check if the product contains all the items listed below and your dealer if there are any missing items. USB To Type-C Micro USB To Type-C Type-C To Type-C Cable Cable Cable × 1 × 1 × 1 ControlStick (Body) Power Adapter × 1 × 1 XAG AUSTRALIA... -
Page 33: Overview - Acs2G Remote Controller
Terrain Button RTH Button Directional Control – Forward Directional Control – Sideway Right Directional Control – Backward Directional Control – Sideway Left Hover Button Rear View Nano SIM Slot Altitude + Altitude – Power Button Bottom View Power Port XAG AUSTRALIA... - Page 34 Press to Hover or Long Press to resume Autonomous Operation Power Button Used to turn ON/OFF the remote controller Nano SIM Slot Provides Cellular connection Altitude + Increase Altitude Altitude – Decrease Altitude Power Port Connects to a power source to charge the Remote Controller XAG AUSTRALIA...
-
Page 35: Status Indicator
5% and will automatically switch off after 60 seconds. Please command the drone to return and land immediately before the remote controller is switched off. Status Indicator – Smart Device Smart Device Description Solid Green Smart Device Connection Normal Solid Red Smart Device Connection Error Smart Device Not Connected XAG AUSTRALIA... -
Page 36: Status Indicator - Device
Not Connected Status Indicator – RTK Description Green Flashing Rover Mode – Float Solid Green Rover Mode – RTK Solid Red Rover Mode – Position Error Solid Yellow ACS2G RTK on Standby Mode ACS2G has no RTK Module XAG AUSTRALIA... -
Page 37: Using The Remote Controller
Close and Secure the Rubber Plug. SIM Card Cut-Corner Chip Side ACS2 uses a nano-SIM. Damages caused by the use of other specifications of SIM Warning will be beared by user IMPORTANT �� SIM Card is not necessary if operating with LNT XAG AUSTRALIA... -
Page 38: Charing The Remote Controller
When the charging adapter is applicable with Quick Charging, ACS2G will have a Voice Prompt indicating the Quick Charging Mode and the Indicator flashes more rapidly. Battery Level (Charging) Battery Description Flashing – Red 01% - 29% Flashing – Yellow 30% - 59% Flashing – Green 60% - 99% Solid Green 100% XAG AUSTRALIA... -
Page 39: Turning The Remote Controller On/Off
Release and then Press and Hold the Power Button again until a Broadcast is heard from the Remote Controller. TURN OFF Press and Hold the Power Button until all the indicators flash simultaneously. Release and then Press and Hold the Power Button again until all indicators are OFF. XAG AUSTRALIA... -
Page 40: Controls
RPA will not be able to descent once it reaches the height of 2.5 meters above ground • Return to Home (RTH) RTH: Press and Hold the RTH Button to command the RPA to return to Take- off-Point XAG AUSTRALIA... - Page 41 Press the Speed + Button to increase the Flight Speed by 0.5m/s Decrease Rate: Press the Speed - Button to decrease the Flight Speed by 0.5m/s IMPORTANT �� The Maximum Flight speed of the RPA with Obstacle detection is 0.5m – 6.0m/s XAG AUSTRALIA...
- Page 42 Switch Mode: Quick press the Terrain Button Twice to switch between GPS Height and Terrain Follow • Mapping Mode PREREQUISITE �� GNSS RTK Module had been attached Enable / Disable Mapping Mode Add Point Undo previous Added Point XAG AUSTRALIA...
-
Page 43: Acs2 Rtk Module
ACS2 RTK Module When ACS2G Remote Controller is equipped with ACS2 RTK Module, the ACS2G Remote Controller can be paired with GNSS RTK Mobile Station for Field Planning for XAG Agricultural Drone’s Operation Task. Attaching: Slide & insert the ACS2 RTK Module onto the top of the ACS2G Remote Controller. -
Page 44: Smart Battery
Overview – B13960S Battery Structure Handle Indicator Panel Battery Clip Max. Water Level Air Outlet Min. Water Level Air Inlet Indicator Panel Solid: Normal Slow Flash: Overcooled Fast Flash: Overheated Double Flash: Error Battery Level Indicator Battery Status Indicator Power Button XAG AUSTRALIA... -
Page 45: Using The Battery
DO NOT use Batteries with abnormal conditions such as swollen, leaking, or deformed batteries. Contact XAG After-sales Support for further assistance. DO NOT use Overheated Battery exceeding 40° C, may lead to fire or an explosion. DO NOT disassemble, pierce or apply pressure the battery in any way, including but not limited to behaviours such as Sitting / Standing on the Battery. -
Page 46: Battery Status
Connect the battery to a device, then press the Power button once for at least 1 second until all the indicator lights flashes, then press and hold the power button again for at least 1 second until you hear a beep from the battery. Repeat Step 02 to turn OFF the Battery. XAG AUSTRALIA... -
Page 47: Battery Charging
DO NOT use Corrosive liquids for heat Dissipation, or Battery will be damage. DO NOT exceed 60 minutes for heat Dissipation, or Battery will be damage. DO NOT clean the charging device with alcohol or other combustible liquids. XAG AUSTRALIA... - Page 48 Charging with CM12500P Battery Charger Charging with GC4000+ Auto SuperCharger Station Charging with GC4000+ Auto SuperCharger Station with Charging Water Tank XAG AUSTRALIA...
-
Page 49: Battery Storage
ENSURE the Batteries are recharge every 90 days to maintain battery health. DO NOT Store Batteries with less than 30% Power. DO NOT store Batteries for an extended period, otherwise it may damage the battery or impact battery life. XAG AUSTRALIA... -
Page 50: Gnss Xrtk4 Mobile Station
List of Items – GNSS XRTK4 Mobile Station GNSS RTK Module Toolbox × 1 GNSS XRTK4 Module Power Supply Cable × 1 × 1 GNSS RTK Battery B4100 Battery Extension Rod × 1 GNSS RTK Mobile Station Package Balance Plate Tripod × 1 × 1 XAG AUSTRALIA... -
Page 51: Overview - Gnss Xrtk4 Mobile Station
Overview – GNSS XRTK4 Mobile Station The XRTK4 Mobile Station is comprised of the GNSS RTK Module, B4100 Battery Extension Rod, Base Plate, and Tripod. GNSS RTK Module B4100 Battery Extension Rod Balance Plate Tripod Battery Extension Rod Console Antenna XAG AUSTRALIA... -
Page 52: Battery Extension Rod Console
Battery Level Indicator LED Description 1 Green Flash 00 -09 % 1 Solid Green 10 – 24 % 2 Solid Green 25 – 49 % 3 Solid Green 50 – 74 % 4 Solid Green 75 – 100 % XAG AUSTRALIA... -
Page 53: Battery Charging
Normal Temperature is too HOT Red Quick Flash Too HOT Charging / Discharging temporary Disable Temperature is too COLD Red Slow Flash Too COLD Charging / Discharging temporary Disable Battery Malfunction Red Double Flash Anomalous Contact After-sales Support XAG AUSTRALIA... -
Page 54: Gnss Rtk Module Console
Connected, but no available fixed station Solid Yellow nearby (Automatic switch to 24-hour selfcapturing mode). Checking Positioning Status Status Positioning Status Indicator Not connected Blue Light OFF Single Blue Single Flash Float Blue Double Flash Blue Triple Flash XAG AUSTRALIA... -
Page 55: Xag One App
XAG One APP XAG One APP is designed for applications of the compatible XAG Agricultural RPA. The App displays the status of the aircraft, task system (RealTerra, RevoCast, RevoSpay), Remote Controller, RTK Station. It enables the Users to configure various settings, planning a field, and operating the aircraft autonomous following the pre-planned flight routes and configuration, and manually with the remote controller. -
Page 56: App - Operation View
APP – Operation View XAG AUSTRALIA... - Page 57 Tap & Go: Command RPA to move to location specified by Pilot. Follow Terrain: Enable / Disable Terrain following in Operation route. Obstacle Enable / Disable Obstacle Avoidance. Avoidance: Task Status Bar Shows the Completion rate of the Aircraft’s Task. XAG AUSTRALIA...
- Page 58 Tap to expand the menu for the measurement tool. Height Shows the altitude of the Aircraft in relation to the ground. Speed Shows the movement speed of the selected Aircraft. Location (Aircraft) Shows the approximate location of the Aircraft. XAG AUSTRALIA...
-
Page 59: App - Aircraft Module
This interface displays the basic information about the Aircraft’s data link status, the options to diagnose the network health, and the manual adjustment of the Carrier Settings. Carrier Settings are reserved for professional adjustment to achieve best communication latency. XAG AUSTRALIA... - Page 60 (RTL) settings which pilot can pre-set when the aircraft will return upon battery reaching the set percentage. Before Flight operation, it is recommended to ensure √ Remaining Battery > 30% √ Sufficient Battery for your Task / Flight XAG AUSTRALIA...
- Page 61 & Flight test to ensure all the motors are operating correctly. Before Flight operation, it is recommended to ensure Idle Test: Ground Test for Motor In-Situ Flight Test: Testing via Aircraft Taking-off & Landing Servo Calibration: Balancing the Servo XAG AUSTRALIA...
- Page 62 This interface displays the information and current settings of the sensor module available on the Aircraft, primarily with Terrain Radar, Obstacle Avoidance and PSL Camera. This interface would also allow the pilot to Turn ON/OFF the searchlight for low visibility conditions. XAG AUSTRALIA...
-
Page 63: Preparing The Equipment
Green, indicating the LNT is ready to be used. Select and Connect to the Local Network Terminal via Wi-Fi. Default LNT Wi-Fi Network: XAG-XXXX Default LNT Wi-Fi Password: 20070401 Open XAG One APP. Tap on “My” to access Account Menu. Tap on “Device”. XAG AUSTRALIA... - Page 64 ” for more options, then Tap on “ ” for Device Binding. Tap on “Local Network Terminal” to start Binding. Tap on “I’m Connected” to access Equipment Network Settings”. Enter the password and login to the Module to edit Settings. Default LNT Admin Password: 20070401 XAG AUSTRALIA...
- Page 65 Select the corresponding Options for setting Settings for Hotspot to share the LNT’s Wi-Fi or Internet data Hotspot connection with nearby XAG devices. Connections can be shared with up to XX devices. Ⓝ Notes Default LNT Wi-Fi Network: XAG-XXXX (“XXXX” is the last 4 digit of the MAC Address on the top of the LNT)
-
Page 66: Device Binding - Rtk Mobile Station
WAN indicator on the LNT. Device Binding can only be achieved once all the Indicators on LNT is ON. Turn ON the RTK Module & Open XAG One APP. Tap on “My” to access Account Menu. Tap on “Device”. - Page 67 Press and hold F1 on the RTK Module Console for at least 3 seconds and release after hearing a beep. This indicate that the RTK Module is ready to bind. Tap on “Settings” to bring up the Available Wi-Fi List. Select the corresponding RTK Module Wi-Fi Default Module Wi-Fi Network: XBASE_XXXXXXXXXXXX Default Module Password: 20070401 XAG AUSTRALIA...
- Page 68 Terminal), then save the settings via “Confirm” Default LNT Wi-Fi Network: XAG-XXXX Default LNT Password: 20070401 Warning Check & ensure the entered LNT Network Name & Password is Correct, otherwise APP will NOT be able to add the device. XAG AUSTRALIA...
- Page 69 RTK Module is ready to be added. Add the Device by Entering the Device S/N Manually or Scanning the QR Code on the Device. Rename the RTK Module and Tap on “CONFIRM” to Save. XAG AUSTRALIA...
- Page 70 If the APP display “ ”, the Device has been added successfully. Return to the Device Menu and check if the Device is displayed in your list of Device. Please restart APP once the binding is completed. XAG AUSTRALIA...
-
Page 71: Device Binding - Remote Controller
WAN indicator on the LNT. Device Binding can only be achieved once all the Indicators on LNT is ON. Turn ON the Remote Controller & Open XAG One APP. Tap on “My” to access Account Menu. Tap on “Device”. - Page 72 ” for more options, then Tap on “ ” for Device Binding. Tap on “Remote Controller” to start Binding. Tap on “Settings” to bring up the Available Wi-Fi List. Select the corresponding ACS2 Wi-Fi. Default ACS2G Wi-Fi Network: ACS2_XXXXXXXXXXXX Default ACS2G Password: 20070401 XAG AUSTRALIA...
- Page 73 Terminal), then save the settings via “Confirm”. Default LNT Wi-Fi Network: XAG-XXXX Default LNT Password: 20070401 Warning Check & ensure the entered LNT Network Name & Password is Correct, otherwise user will not be able to add the device. XAG AUSTRALIA...
- Page 74 This indicates that the Remote Controller is now ready to be added. Add the Device by Scanning the QR Code on the Device or Enter the Device S/N Manually. Rename the Remote Controller, and Tap “Complete” to Save. XAG AUSTRALIA...
- Page 75 If the APP display “ ”, the Device has been added successfully. Return to the Device Menu and check if the Device is displayed in your list of Device. Please restart APP once the binding is completed. XAG AUSTRALIA...
-
Page 76: Device Binding - Aircraft
WAN indicator on the LNT. Device Binding can only be achieved once all the Indicators on LNT are ON. Turn ON the Remote Controller & Open XAG One APP. Tap on “My” to access Account Menu. Tap on “Device”. - Page 77 The Wireless Communication indicator (3rd Indicator) will start flashing orange indicating the Aircraft is ready for binding. Tap on “Settings” to bring up the Available Wi-Fi List. Select the corresponding Aircraft Wi-Fi. Default Aircraft Wi-Fi Network: XAG_XXXXXXXXXXXX (Aircraft S/N) Default Aircraft Password: 20070401 XAG AUSTRALIA...
- Page 78 Terminal), then save the settings via “Confirm”. Default LNT Wi-Fi Network: XAG-XXXX Default LNT Password: 20070401 Warning Check & ensure the entered LNT Network Name & Password is Correct, otherwise user will not be able to add the device. XAG AUSTRALIA...
- Page 79 ” and select “Add a Device” Add the Device by Scanning the QR Code on the Device or Enter the Device S/N Manually.. Rename the Aircraft, and Tap “Confirm” to Save. If the APP display “ ”, the Device has been added successfully. XAG AUSTRALIA...
- Page 80 Return to the Device menu and check if the Device is displayed in your list of Devices. Please restart the APP once the binding is completed. XAG AUSTRALIA...
-
Page 81: Preparing The Gnss Xrtk4 Mobile Station
Preparing the GNSS XRTK4 Mobile Station Station Location selection Select solid and flat ground with open space above. There should be no obstacles over the elevation angle of 15° for continuous tracking and observation of the satellite and high- quality satellite signals. XAG AUSTRALIA... - Page 82 Mobile Station. IMPORTANT �� Adjust the three retractable legs of the Tripod accordingly to ensure the bubble on the Balance Plate is centred and level. Unlevelled RTK Mobile Station may lead Aircraft to behave erratically. XAG AUSTRALIA...
- Page 83 Please be patient, the device may take up to 30 seconds before coming ONLINE. • XAG GNSS RTK Mobile Station provides Low Precision accuracy as default, there may be a margin of error between the coordinates captured with Low Precision accuracy and the actual coordinates.
-
Page 84: Preparing The Acs2G Remote Controller
Tap on “Device” and wait for the Remote Controller & Mobile Station is Online. IMPORTANT �� Please be patient, the devices may take up to several minutes before coming ONLINE. Tap on “Mobile Station” for Mobile Station Device Details and ensure the Positioning Status is now displaying as FIX (Normal). XAG AUSTRALIA... - Page 85 Return to the Device Menu & Tap on “Remote Controller” for Device details. Tap on “Set Base Station” for Base Station Settings. The APP will automatically detect and display the available base station nearby. Select the available base station and tap “Connect”. XAG AUSTRALIA...
- Page 86 √ Set Base Station is now Connected to a Mobile Station (Displaying Station ID such as (#XXXX). ACS2G Remote Controller is now paired with RTK Mobile Station and ready to be used as a Rover for Field Mapping. XAG AUSTRALIA...
-
Page 87: Pairing Aircraft With Gnss Xrtk4 Mobile Station
Devices are ON and displaying as Online in Device Menu On Accounts Menu, tap on “Device” to access the Device Menu. Then tap on the corresponding Aircraft for Device Detail. Tap on the “ ” for Positioning System, then taps on “RTK Base Station”. XAG AUSTRALIA... - Page 88 When the Connection is successful, it will display “Base Station setting successful”. Return to the Device Detail and confirm: • RTK Positioning is now Active • RTK Base Station is now displaying Station ID (Similar to #XXXX) • Number of Satellites Connected > 16 • Heading Accuracy < 2º XAG AUSTRALIA...
-
Page 89: Pairing Aircraft With Acs2G Remote Controller
Devices are ON and displaying as Online in Device Menu On Accounts Menu, tap on “Device” to access the Device Menu. Then tap on the corresponding Aircraft for Device Detail. On the “Universal” Information Tab, Tap on “Pair with ControlStick”. XAG AUSTRALIA... - Page 90 Select the corresponding Remote Controller, and then tap on “Pair” for Pairing. When the Pairing is completed, it will display “Pairing Successful”. Return to the Device Menu and check the status of Bind Remote Controller is now “Paired”. XAG AUSTRALIA...
-
Page 91: Set As Operation Device
Devices are ON and displaying as Online in Device Menu On Accounts Menu, tap on “Device” to access the Device Menu. Then tap on the corresponding Aircraft for Device Detail. On the “Universal” Information Tab, tap on “Set as Operation Device”. XAG AUSTRALIA... - Page 92 The corresponding aircraft is now set as an operation device and is available for operation. Ⓝ Notes Maximum of 2 Aircraft can be set and used for operation simultaneously. XAG AUSTRALIA...
-
Page 93: Field Planning
This Section will provide step by step instructions on how to Import a Field/ HD Map and create a new field for Aerial Survey & Aerial Operations Import Field / HD Map This section is primarily for previous XAG Pilots to access Fields that had been previously planned and Maps that XAG’s related survey equipment had surveyed. Ⓝ... - Page 94 Alternatively, the user may choose to search for the fields as well. Select 1 or Several fields, then confirm to start importing the field to this Smart Device. After the field is imported, please refresh the List and find the imported field is now available. XAG AUSTRALIA...
-
Page 95: Create A New Field
Aircraft. The pilot should be cautious with the possible deviation between the satellite map and the RTK Position based aircraft. Open XAG One APP. Tap on “ ” to expand the Options menu, then Tap on “... - Page 96 Adding Point via APP: Press “ ” on APP Removing Point via APP: Press “ ” on APP Review the Map and the points added, then Tap “Confirm”. Enter & Insert Field Information, then Tap “Complete” to Save. XAG AUSTRALIA...
- Page 97 The field has now been created. Tap on “ ” to review the List of Field / HD Map / Device. The field is now available for Route Planning. XAG AUSTRALIA...
-
Page 98: Planning Via Rover Mode
” to expand the Options menu, then tap on “ ” Create a new field. Tap on “ ” to position the map to your current location. Tap on “ ” to select the Remote Controller for Manual Mapping. XAG AUSTRALIA... - Page 99 RPA. Non-Spray Zone are individual points that Non-Spraying Zone form an area that the RPA may fly over but will be restricted from application. Review the Map and the points that had been added, then Tap “Confirm”. XAG AUSTRALIA...
- Page 100 Enter & Insert Field Information, then Tap “Complete” to Save. The field has now been created. Tap on “ ” to review the List of Field / HD Map / Device, the field is now available for Route Planning. XAG AUSTRALIA...
-
Page 101: Manage Fields
Manage Fields Open XAG One APP, and tap on the “ ” for the Listing. Within the List of Fields, find and tap on the corresponding fields for additional options. Additional options include Aerial Flight, Aerial Survey, Manage fields, Share Field and more…... -
Page 102: Edit Fields
Tap on the points, then select “Delete Point” Non-Spraying Zone Add Points: Tap once between the segments and drag the “ ” to add Points Move Points: Drag the points to the appropriate location Delete Points: Tap on the points, then select “Delete Point” XAG AUSTRALIA... -
Page 103: Route Pre-Planning
Custom Route based on the points that the user had added.. Parameters Route Direction The Direction of each Flight Route Route Spacing The Spacing Distance between each Flight Route Boundary Safety Distance The Safety Distance from the Boundary Obstacle Safety Distance The Safety Distance from the Obstacles XAG AUSTRALIA... -
Page 104: Aerial Flights
Spray / Spread System had been calibrated and tested Perform Motor Test to ensure it is operating normally, and Tilt Servo Calibration is balanced. Clean and ensure the cleanness of the Dynamic Radar, PSL Camera and Terrain Sensor. XAG AUSTRALIA... - Page 105 Aerial Survey – Real Terra IMPORTANT �� Maximum acreage for RealTerra aerial survey is 6.66 ha Functions of Real Terra with Local Network Terminal is NOT yet available, and will be Warning release for use around June 2022. XAG AUSTRALIA...
- Page 106 √ Completed Setting Aircraft as Operation Device. √ Completed Pre-Flight Checklist. √ Completed Field Planning. Open XAG One APP, and tap on the “ ” Operation. The interface displays the status and the available aircraft for the Task. XAG AUSTRALIA...
- Page 107 Page 107 –108 for Spray Settings & Route Settings), then tap on Start Operation. Complete the Start Operation checklist, then swipe “start” to begin. The APP is now uploading route to the Aircraft & completing Self-check, upon completion, the aircraft will take-off in 5 seconds. XAG AUSTRALIA...
- Page 108 RPA from Entering and Exiting Routes. Disabled: APP will automatically create a yellow zone based on the current setting based on Spray & Route Settings, where there should not have any person or obstacles as it is the possible flight path. XAG AUSTRALIA...
- Page 109 APP or Remote Controller, empty liquid tank, or Low Voltage battery. Enable: The RPA will automatically optimize and travel to the Break-point and resume its flight from the breakpoint. Disable: Aircraft will operate based on the operation area and restart the tasks anew. XAG AUSTRALIA...
- Page 110 Press the Hover Button to command the UAV to Hover Switch Mode: Press and Hold the Hover Button to switch Mode. The Remote Controller will exit Manual Control and enter Autonomous Mode, the Controller will also broadcast Autonomous Mode XAG AUSTRALIA...
- Page 111 During transportation of the equipment or the aircraft is going to be idle for a long period, liquids and residues must be drained from the aircraft. • Aircraft with residues remaining within the spray system during transportation or long idle may cause liquid damage to critical module. XAG AUSTRALIA...
- Page 112 Operation with Multiple Aircraft XAG V40 / P40 / P100 Agricultural RPA features Multiple aircraft control functions, which can coordinate the operation of up to two aircraft simultaneously, enabling pilots to enhance their efficiency for multi-field or broad acreage. Swarm Operation Mode...
- Page 113 Technical Specifications V40 Agricultural UAV V40 Agricultural UAV Model 3WWDZ-15.2AH Flight Control System Super X 4 Symmetrical Motor Wheelbase 1600mm Dimensions 1790 x 830 x 700mm Empty Weight 29.8kg Rated Takeoff Weight/Maximum Takeoff Weight 45.8kg/48kg Protection Rating IP67 Flight Parameters Operating Frequency 2.4000GHz-2.4835GHz...
- Page 114 Spray Width 5~10m Peristaltic Pump Quantity Voltage Maximum System Flow Rate 10L/min Maximum flow rate (single pump) 5L/min XAG RealTerra Image Sensor 1/2.3inch 12M CMOS Sensor Lens FOV 112° 2.7mm/16.8mm (35mm Equivalent) Mechanical Shutte 1/200-1/2000s Image Format Power Optimum Operating Temperature 10~40°...
- Page 115 UAV brakes and hovers stably) Relative Speed of Safe Obstacle Avoidance ≤6m/s Terrain Sensor Model TR24S100 Voltage 5.8V Power 1.5W Sensing Mode Millimeter-wave Operating Frequency 24GHz Height Measurement Range 0.5~100m Fixed Height Range 45° (at flying speed of≤ 2m/s) Protection Rating IP67 XAG AUSTRALIA...
- Page 116 VC13180 Maximum Continuous Operating Current Maximum Operating Voltage 56.6V Foldable Propeller Model P4718 Diameter × Screw Pitch 47 x 18inch Tilt Servo Rated Voltage DC50V Operating Voltage DC25V-55V Rated Torque 150Kg·cm@50V Rated Current 0.5A@50V No Load Speed 400°/second XAG AUSTRALIA...
- Page 117 Warranty Period 12 Months Power Adapter Dimensions 101mm x 86mm x 37mm Weight Approx. 335g Power Input DC 40 ~ 54V (B13960S Battery Adaptor) Power Output DC 12V/3A Power Operating Temperature 0° - 50° C IP Rating IP54 XAG AUSTRALIA...
- Page 118 Mesh Network Supported Voice Broadcast Supported GPS: L1/L2 GLONASS: L1/L2 RTK Operating Frequency BDS: B1/B2 Galileo: E1/E5b Positioning Accuracy Vertical: < 5.0cm + 1ppm (RMS) (With strong RTK Signal) Horizontal: < 7.5cm + 1ppm (RMS) Warranty Details 12 Months XAG AUSTRALIA...
- Page 119 Operating Temperature 10° C to 45° C Charging Temperature 10° C to 40° C Storage Temperature 10° C to 30° C IP Rating IP65 XAG V40 2021 Compatible Aircraft XAG P40 2021 XAG P80 2021 CM12500P Compatible Chargers GC4000+ Charging Voltage 56.55V...
- Page 120 E1 / E5a / E5b QZSS L1 / L2 / L5 RTK Positioning Accuracy Horizontal ±10mm+1ppm (RMS) Vertical ±15mm+1ppm (RMS) Initialization time Typical <10 seconds Initialization Reliability >99.9% Maximum 20 Hz (Raw data) Data update rate Maximum 20 Hz (Positioning data) XAG AUSTRALIA...
- Page 121 45mm x 1166mm Capacity 7500mAh 99Wh Input 12.0 V/1 A (Type-C port) Output 14.4V/1A Operating temperature -10° - 45° C Power Button × 1, Type-C Port × 1, Port/Panel Battery Level/Status Display Panel × 1 Warranty Details 6 Months XAG AUSTRALIA...
- Page 122 The copyright of all information in this user manual (including but not limited to any text description, illustrations, photos, methods, processes, etc.) belongs to XAG Australia and is protected by copyright law. No individual or organization may imitate, extract, translate, distribute or reproduce or quote all the contents of this manual...
Need help?
Do you have a question about the V40 and is the answer not in the manual?
Questions and answers