
Related Manuals for Stinger HEIGH10 UN1810E-FT2


Summary of Contents for Stinger HEIGH10 UN1810E-FT2
- Page 1 INSTALLATION GUIDE INTEGRATED INFOTAINMENT TOUCH SCREEN SOLUTION FOR FIAT DUCATO 8 SERIES 2021-UP PART NUMBER: UN1810E-FT2 Copyright © 2023 StingerElectronics-EU.com...
-
Page 2: About This Product
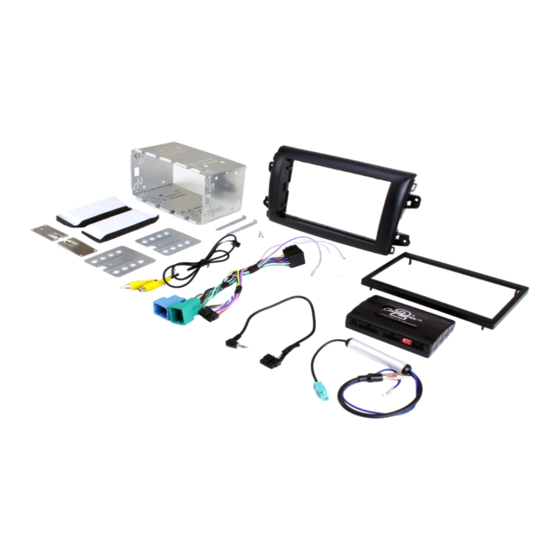
Please note: this installation kit is for facelift models, and will not work with amplified vehicles. CONTENTS • HEIGH10® unit with fitting accessories and wiring • Black double DIN fascia plate (with accessories) • Vehicle retention interface with plug-and-play harness • Vehicle specific antenna adapter • Stinger stereo patch lead • Instruction manual www.stingerelectronics-eu.com... - Page 3 FITTING GUIDE STEREO REMOVAL 1. Using a trim removal tool pry and unclip the air vents that surround the radio. There are 3 tabs located along the top edge of the vent alongside two metal lugs. One located on the top whilst the other is towards the bottom. 2.
- Page 4 FITTING GUIDE FASCIA PLATE SET-UP 1. With the HEIGH10® unit configured correctly, attach the fascia brackets to the relevant sides of the radio module using the screws within the kit. Place into the vehicle and roughly test fit with the fascia to measure whether the brackets need moving forwards/backwards.
-
Page 5: Wiring Diagram
WIRING DIAGRAM Flying Wires 12-Way/32-Way Connector Pink - Speed Pulse Connect to relevant connectors from vehicle Green - Park Brake ISO Connector Purple/White - Reverse Gear Connect to aftermarket stereo Aftermarket Camera RCA Connector Connect camera input to female phono connector (optional) Male Yellow RCA Connector Connect to aftermarket radio... - Page 6 USER GUIDE EXAMPLE STEERING WHEEL CONTROL DIAGRAM The following diagram, though based on careful research, is an example only. Individual steering wheel control configurations may differ. The Infodapter will retain several of the vehicle’s original steering wheel control functions including moving up and down between tracks, adjusting the volume and picking up or hanging up calls.
-
Page 7: Vehicle Settings
INFODAPTER MENU Once the CTUFT03 has been installed into the vehicle successfully, simply hold the ‘Speech’ button (Fig.8) on the steering wheel to access the ‘Configuration Menu’. Note: In the case that the vehicle does not feature phone buttons, the ‘Source’ button will act as Infodapter enter/exit button. -
Page 8: Picture Settings
INFODAPTER MENU SCREEN SIZE/POSITION Allows the user to setup the Infodapter display screen to Infodapter Settings the exact size of the aftermarket head unit being fitted. Screen Size & Position Picture Settings PICTURE SETTINGS Preferences Allows the user to adjust the Brightness, Contrast and Installer Menu Saturation levels of the Infodapter menus/parking <... - Page 9 E-Mail: stinger.eu@aampglobal.com Mon - Fri 9am - 5.30pm GMT If you would like to download a digital copy of this manual, or any other product, then please visit the www.Stinger- Electronics-EU.com website. This manual is considered correct at the time of printing but is subject to change. For the latest manuals & updates, refer to our website.
Need help?
Do you have a question about the HEIGH10 UN1810E-FT2 and is the answer not in the manual?
Questions and answers