Table of Contents
Advertisement
Available languages
Available languages
Advertisement
Chapters
Table of Contents

Subscribe to Our Youtube Channel
Related Manuals for Respekta KM4400-28


Summary of Contents for Respekta KM4400-28
- Page 1 Bedienungs- & Installationsanleitung Glaskeramik-Kochfeld Mod. No.: Installation- & User’s Instruction Ceramic Glass Hob ˃ KM 4400-28 ˃ KM 5500-28 ˃ KM 7700-28 NEG-Novex Großhandelsgesellschaft für Elektro- und Haustechnik GmbH, Chenover Str. 5, D-67117 Limburgerhof 202107_001_NEG...
-
Page 2: Table Of Contents
Inhalt 1 : ALLGEMEINE INFORMATIONEN ............de-3 Lesen der Bedienungsanleitung ..........de-3 2 : ALLGEMEINE SICHERHEITSVORSCHRIFTEN ......... de-7 Wichtige Hinweise ..............de-7 Hinweise zum Umweltschutz ..........de-13 3 : TECHNISCHE DATEN UND EIGENSCHAFTEN ......de-14 Technische Daten ..............de-14 Elektrischer Schaltplan............de-20 4 : NUTZUNGSBESTIMMUNGEN ............ - Page 3 de-2...
-
Page 4: Allgemeine Informationen
Telefon/Fax: 00 49 6236. 46 32 0 E-Mail info@neg-novex.de WebSite www.respekta.de 1.1.3 Kundendienst Bei technischen Fragen zu Ihrem Gerät wenden Sie sich bitte an dem Kundendienst Ihres Händlers. Bevor Sie den Kundendienst anrufen, notieren Sie sich bitte: - Modellnummer de-3... - Page 5 1.1.4 Einleitung und Sicherheit Bevor Sie die das Gerät installieren und/oder benutzen, lesen Sie bitte sorgfältig die Anweisungen in dieser Anleitung. So können Sie sich mit Ihrem neuen Gerät vertraut machen. Bewahren Sie diese Unterlage griffbereit auf, damit Sie sie jederzeit nachschlagen und sie an eventuelle Nachbesitzer weitergeben können.
- Page 6 1.1.5 Identifikation des Geräts Keramik / Ceramic Kochfeld Mod. KM 4400-28 220-240V~/380-415V~ 50Hz TOTAL 6000 W kg 7.8 Serien Nr. MBR-YYYYMMDD00001 NEG-Novex Großhandelsgesellschaft für Elektro- und Haustechnik GmbH, Chenover Str. 5,D-67117 Limburgerhof Abb. 1.1 Auf dem Kennschild sind folgende Daten angegeben: A - Modell CE-Kennzeichnung C - Gewicht...
- Page 7 CE-Konformitätserklärung Der Hersteller der hier beschriebenen Geräte, auf welche sich diese Erklärung bezieht, erklärt hiermit in alleiniger Verantwortung, dass diese die einschlägigen, grundlegenden Sicherheits-, Gesundheits- und Schutzanforderungen der hierzu bestehenden EG Richtlinien erfüllen, und dass die entsprechenden Prüfprotokolle, insbesondere die vom Hersteller oder seinem Bevollmächtigten ordnungsgemäß ausgestellte CE-Konformitätserklärung zur Einsichtnahme der zuständigen Behörden vorhanden sind und über den Geräteverkäufer angefordert werden können.
-
Page 8: Allgemeine Sicherheitsvorschriften
2 : ALLGEMEINE SICHERHEITSVORSCHRIFTEN Wichtige Hinweise GEFAHR: Es besteht Brandgefahr, wenn die Reinigung nicht gemäß den Anweisungen in diesem Handbuch durchgeführt wird. GEFAHR: Brandgefahr durch Selbstentzündung von Öl- und Fettdämpfen Vermeiden Sie die Wiederverwendung von Öl, da gebrauchtes Öl organische Rückstände enthalten kann, die eine Selbstentzündung wahrscheinlicher machen GEFAHR: Legen Sie keine brennbaren Produkte oder mit brennbaren Produkten getränkte Gegenstände in, auf oder in die Nähe des Geräts. - Page 9 ACHTUNG: Stellen Sie sicher, dass Sie das richtige Kabel für den Anschluss an das Stromnetz verwenden. Stellen Sie sicher, dass das Gerät korrekt montiert ist. Wenn ungeeignete Netzkabel oder freiliegende Netzstecker verwendet werden, kann der Anschluss überhitzt werden. Stellen Sie sicher, dass nicht locker oder verdreht ist. Stellen Sie sicher, dass ein Schutz installiert ist, der das direkte Berühren der Kabel verhindert.
- Page 10 ACHTUNG: Reinigung und Wartung dürfen nicht von unbeaufsichtigten Kindern durchgeführt werden. ACHTUNG: Kinder dürfen nicht mit dem Gerät spielen. ACHTUNG: Bewahren Sie das Verpackungsmaterial außerhalb der Reichweite von Kindern auf. ACHTUNG: Entfernen Sie vor dem ersten Gebrauch alle Verpackungsmaterialien, Aufkleber und Schutzfolien (falls vorhanden). ACHTUNG: Halten Sie Kinder und Haustiere während des Betriebs oder während des Abkühlens vom Gerät fern.
- Page 11 ACHTUNG: Dieses Gerät ist ausschließlich zum Kochen bestimmt. Jede andere Verwendung, wie z. B. das Beheizen eines Raumes, gilt als nicht bestimmungsgemäß. ACHTUNG: Seien Sie aufgrund des Gewichts des Kochfelds besonders vorsichtig, wenn Sie es installieren oder bewegen. Tragen Sie immer Schutzhandschuhe und Sicherheitsschuhe.
- Page 12 WICHTIGER HINWEIS: Nachdem Sie das Kochfeld aus der Verpackung genommen haben, überprüfen Sie es auf Unversehrtheit. Wenn das Produkt beschädigt ist, verwenden Sie es nicht und wenden Sie sich an das RESPEKTA-Service-Netz. Kochen Sie nicht auf einem zerbrochenen oder gesprungenen Kochfeld. Trennen Sie das Gerät sofort von der Stromversorgung (Wandschalter) und wenden Sie sich an...
- Page 13 HINWEIS: Kratzer oder dunkle Flecken auf der Oberfläche beeinträchtigen die Funktionalität des Kochfelds nicht. HINWEIS: Verwenden Sie einen geeigneten Schaber, um das Glas zu reinigen. HINWEIS: Das Kochfeld ist nur für den Gebrauch im Haushalt bestimmt. Die in dieser Unterlage beschriebenen Geräte sind nicht für die gewerbliche Nutzung bestimmt.
-
Page 14: Hinweise Zum Umweltschutz
Hinweise zum Umweltschutz 2.2.1 Verpackung Das Verpackungsmaterial ist zu 100 % wiederverwertbar. Beachten Sie bei der Entsorgung die örtlichen Vorschriften. WICHTIGER HINWEIS: Das Verpackungsmaterial (Plastikbeutel, Teile aus Polystyrol usw.) stellt eine Gefahrenquelle für Kinder dar. Bewahren Sie das Verpackungsmaterial deshalb außerhalb der Reichweite von Kindern auf. 2.2.2 Entsorgung WICHTIGER HINWEIS: Entsorgen Sie Ihr Altgerät gemäß... -
Page 15: Technische Daten Und Eigenschaften
3 : TECHNISCHE DATEN UND EIGENSCHAFTEN Technische Daten 3.1.1 Modell KM 4400-28 590.00 mm Abb. 3.1 Modell Nr. KM 4400-28 Identifikation Produkts/ respekta Marke Produktfamilie Einbaukochfeld Produktbeschreibung Elektrokochfeld, 60 cm Kochfeldtyp (Elektro/Gas/ elektrisch Kombiniert) Heizart (Massivplatten/Strahlung/ Strahlungsplatten Induktion) Kochfeldausführung (Edelstahl/... - Page 16 Eigenschaften Modell Nr. KM 4400-28 Spannung/Frequenz V/Hz 220-240V~/380-415V~ 50Hz Nennleistung Watt 6000 Länge des Netzkabels Gesamtlänge 120, Aussenlänge 100 Netzkabel (mit/ohne) Stecker Kabel im Lieferumfang enthalten Breite des Kochfelds Anzahl der Heizzonen Vordere Heizzone (links) Watt 1800W Hintere Heizzone (links) Watt 1200W Hintere Heizzone (rechts)
- Page 17 3.1.2 Modell KM 5500-28 590.00 mm Abb. 3.2 Modell Nr. KM 5500-28 Identifikation Produkts/ respekta Marke Produktfamilie Einbaukochfeld Produktbeschreibung Elektrokochfeld, 60 cm Kochfeldtyp (Elektro/Gas/ elektrisch Kombiniert) Heizart (Massivplatten/Strahlung/ Strahlungsplatten Induktion) Kochfeldausführung (Edelstahl/ Glaskeramik Glas/Glaskeramik) de-16...
- Page 18 Eigenschaften Modell Nr. KM 5500-28 Spannung/Frequenz V/Hz 220-240V~/380-415V~ 50Hz Nennleistung Watt 6600 Länge des Netzkabels Gesamtlänge 120, Aussenlänge 100 Netzkabel (mit/ohne) Stecker Kabel im Lieferumfang enthalten Breite des Kochfelds Anzahl der Heizzonen Vordere Heizzone (links) Watt 1100W / mit Doppelzone 2200W Hintere Heizzone (links) Watt 1200W...
- Page 19 3.1.3 Modell KM 7700-28 770.00 mm Abb. 3.3 Modell Nr. KM 7700-28 Identifikation Produkts/ respekta Marke Produktfamilie Einbaukochfeld Produktbeschreibung Elektrokochfeld, 70cm Kochfeldtyp (Elektro/Gas/ elektrisch Kombiniert) Heizart (Massivplatten/Strahlung/ Strahlungsplatten Induktion) Kochfeldausführung (Edelstahl/ Glaskeramik Glas/Glaskeramik) de-18...
- Page 20 Eigenschaften Modell Nr. KM 7700-28 Spannung/Frequenz V/Hz 220-240V~/380-415V~ 50Hz Nennleistung Watt 7000 Länge des Netzkabels Gesamtlänge 120, Aussenlänge 100 Netzkabel (mit/ohne) Stecker Kabel im Lieferumfang enthalten Breite des Kochfelds Anzahl der Heizzonen Vordere Heizzone (links) Watt 1100W / mit Doppelzone 2200W Hintere Heizzone (links) Watt 1200W...
-
Page 21: Elektrischer Schaltplan
Elektrischer Schaltplan KM 4400-28 KM 5500-28 KM 7700-28 Abb. 3.4 de-20... -
Page 22: Nutzungsbestimmungen
4 : NUTZUNGSBESTIMMUNGEN Nützliche Ratschläge GEFAHR: Lassen Sie den Topf bei eingeschaltetem Kochfeld niemals unbeaufsichtigt, da das Fett Feuer fangen könnte. ACHTUNG: Vor Wartungs- und Reinigungsarbeiten muss das Gerät von der Stromversorgung getrennt werden. WICHTIGER HINWEIS: Entfernen Sie eventuell verbliebene Schutzfolien von dem Glaskeramik-Kochfeld. - Page 23 4.1.1 Betrieb der elektrischen Kochplatte Das Glaskeramik-Kochfeld ist mit einem Mikrocomputer ausgestattet, der verschiedene Arten von Kochanforderungen erfüllen kann. Es verfügt über ein Heizelement mit mikroautomatischer Steuerung und Multi-Power-Einstellung. Das Glaskeramik-Kochfeld basiert auf der Infrarot-Heiztechnologie, die Wärme abstrahlt, um die Speisen zu erwärmen.
- Page 24 Während des Kochens muss sich der Topf in der Mitte der Kochplatte befinden. Abb. 4.2 HINWEIS: Heben Sie die Töpfe immer an und stellen Sie sie vorsichtig auf das Glaskeramikkochfeld. Lassen Sie sie nicht verrutschen, sonst könnten sie das Glas zerkratzen.
- Page 25 HINWEIS: Verschließen Sie den Topf oder die Pfanne immer mit einem ausreichend großen Deckel. HINWEIS: Verwenden Sie einen für die Menge der zuzubereitenden Speisen geeigneten Topf. Wenn Sie einen großen, aber nur teilweise gefüllten Topf verwenden, verbrauchen Sie unnötigerweise viel mehr Energie. 4.1.4 Verwendung der Tasten (Touch Controls) Die Tasten reagieren auf Berührung, es ist nicht nötig, sie zu drücken.
-
Page 26: Verwendung Des Elektrischen Kochfeldes
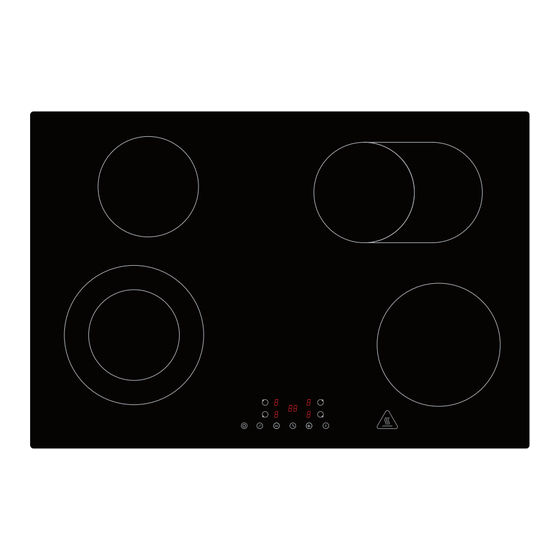
Verwendung des elektrischen Kochfeldes 4.2.1 Anordnung der Kochzonen KM 4400-28 Abb. 4.5 1 - Vordere Kochzone links (1800W) 2 - Hintere Kochzone links (1200W) 3 - Hintere Kochzone rechts (1800W) 4 - Vordere Kochzone rechts (1200W) 5 - Touchscreen-Bedienfeld de-25... - Page 27 KM 5500-28 Abb. 4.6 1 - Kochzone vorne links (1100W)/ mit Doppelkochzone (2200W) 2 - Hintere Kochzone links (1200W) 3 - Hintere Kochzone rechts (1000W)/ mit ovaler äußerer Zone (2000W) 4 - Vordere Kochzone rechts (1200W) 5 - Touchscreen-Bedienfeld de-26...
- Page 28 KM 7700-28 Abb. 4.7 1 - Kochzone vorne links (1100W)/ mit Doppelkochzone (2200W) 2 - Hintere Kochzone links (1200W) 3 - Hintere Kochzone rechts (1000W)/ mit ovaler äußerer Zone (2000W) 4 - Vordere Kochzone rechts (1600W) 5 - Touchscreen-Bedienfeld de-27...
- Page 29 4.2.2 Bedienfeld Ein-/Ausschalten, Auswahl der Kochzone und der Heizstufe 1 - Tasten zur Auswahl der Kochzone auf der linken Seite 2 - Tasten zur Auswahl der Kochzone auf der rechten Seite 3 - Tasten für die Heizstufe (+/-) / Tasten für die Timereinstellung (+/-) 4 - Tastensperre (Kindersicherung) 5 - ON-OFF-Taste (Kochfeld ein/aus) 6 - Timer-Taste...
- Page 30 4.2.3 Starten des Kochvorgangs 1 - Drücken Sie die Einschalttaste ON/OFF (5), die Anzeigen auf dem Bedienfeld zeigen "-". Ein kurzer Piepton bestätigt, dass das Gerät eingeschaltet ist. Alle Elemente auf dem Bedienfeld leuchten für eine Sekunde auf und schalten sich dann aus, was anzeigt, dass sich das Kochfeld im Standby-Modus befindet.
- Page 31 4 - Drücken Garstufeneinstelltasten "+/-" (3), um die Garstufe einzustellen. Die Display angezeigte Leistungs-/ Garintensitätsstufe variiert von 1 bis 9 (0, Kochzone ist ausgeschaltet). Je höher die Stufe, desto größer ist die Garintensität. HINWEIS: Wenn Sie keine Garstufe eingestellt haben, schaltet sich das Gerät nach einer Minute automatisch aus.
- Page 32 3 - Schalten Sie das gesamte Kochfeld durch Drücken der Taste ON/OFF (5) aus. Abb. 4.15 ACHTUNG: Vorsicht heißen Oberflächen Der Buchstabe "H" zeigt an, welche Kochstelle noch heiß ist. Er schaltet sich aus, sobald die Oberfläche auf eine sichere Temperatur abgekühlt ist. Kann auch als Energiesparfunktion genutzt werden, wenn Sie mehr Töpfe erhitzen wollen und dafür die noch heiße Kochzone nutzen.
- Page 33 Einschalten der Doppelkochzone 1 - Drücken Auswahltaste Doppelkochzone oder stellen Sie die Kochintensitätsstufe z. B. auf "6", (siehe Abb.4.12 zur Einstellung der Kochintensität). Abb. 4.18 2 - Die Anzeige der Kochintensitätsstufe blinkt, dann drücken Sie die Doppelkochzonentaste , nach 5 Sekunden hört die Anzeige auf zu blinken, die Doppelkochzonenfunktion ist aktiv, die Kochintensitätsstufe zeigt abwechselnd "6"...
- Page 34 4.2.6 Tastensperre (Kindersicherung) Die Bedienelemente können gesperrt werden, um eine unabsichtliche Benutzung zu verhindern (damit z. B. Kinder nicht versehentlich die Kochzonen einschalten können). Wenn die Bedienelemente gesperrt sind, kann keine der Tasten außer der EIN/AUS-Taste aktiviert werden. So sperren Sie die Bedienelemente Drücken Sie die Bediensperrtaste , auf der Timeranzeige erscheint "Lo".
- Page 35 4.2.8 Verwendung des Timers Sie können den Timer auf zwei verschiedene Arten verwenden: - Sie können ihn als Minutentimer verwenden. In diesem Fall schaltet der Timer keine Kochzone nach Ablauf der eingestellten Zeit aus. - Sie können ihn als Ausschalttimer verwenden, um eine oder mehrere Kochzonen nach Ablauf der eingestellten Zeit auszuschalten.
- Page 36 3 - Stellen Sie die Uhrzeit ein, indem Sie die Taste "+" drücken (z. B. 5). Abb. 4.22 4 - Drücken Sie die Timer-Taste erneut, dann blinkt "0" auf dem Display. Abb. 4.23 5 - Stellen Sie die Zeit durch Drücken der Taste "+" ein (z.B.
- Page 37 7 - Der Summer ertönt 30 Sekunden lang und die Timer-Anzeige zeigt "- - " an, wenn die eingestellte Zeit abgelaufen ist. Abb. 4.26 Stellen Sie den Timer ein, um eine oder mehrere Kochzonen auszuschalten: 1 - Drücken Sie die Auswahltaste der Kochzone, z. B. für die Sie den Timer einstellen möchten.
- Page 38 4 - Drücken Sie die Timer-Taste erneut, dann blinkt "0" auf dem Display. Abb. 4.29 5 - Stellen Sie die Zeit durch Drücken der Taste "+" ein (z.B. 2), jetzt ist der Timer auf 25 Minuten eingestellt. Abb. 4.30 6 - Wenn die Zeit eingestellt ist, beginnt der Countdown sofort.
- Page 39 7 - Wenn die Zeit abgelaufen ist, schaltet sich die entsprechende Kochzone automatisch aus. HINWEIS: Die anderen Kochzonen sind weiterhin in Betrieb, wenn sie zuvor eingeschaltet wurden. Abb. 4.33 Wenn der Timer auf mehr als eine Kochzonen eingestellt ist: 1 - Beim Einstellen des Timers für mehrere Kochzonen schalten sich die roten Punkte der jeweiligen Kochzonen ein.
- Page 40 Annullieren des Timers 1 - Drücken Sie die Wahltaste der Kochzone (1 oder 2), deren Timer Sie annullieren möchten. 2 - Drücken Sie die Timer-Taste, die Anzeige blinkt. 3 - Drücken Sie die Taste "-“, um den Timer auf "00" einzustellen, der Timer wird annulliert. Abb.
-
Page 41: Installation
5 : INSTALLATION Zubehörliste Artikel Abbildung Befestigungsbügel (Beutel Lieferumfang enthalten- die Form des Bügels kann je nach Modell variieren). Dichtungsband (vormontiert). Vorbereitende Arbeiten 5.2.1 Sicherheitsanweisungen für die Installation Vor dem Einbau des Kochfelds: WICHTIGER HINWEIS: Installieren Sie die Geräte nur an einem geeigneten Ort. WICHTIGER HINWEIS: Stellen Sie sicher, dass die Arbeitsfläche eben und nivelliert ist und dass sich keine baulichen Hindernisse innerhalb des für die Installation benötigten Raums befinden. - Page 42 WICHTIGER HINWEIS: Wenden Sie sich im Zweifelsfall an die Baubehörde, um sich über die örtlichen Vorschriften zu informieren. WICHTIGER HINWEIS: Verwenden Sie hitzebeständige, leicht zu reinigende Oberflächen (z. B. Keramikfliesen) für die Wandflächen um das Kochfeld herum. WICHTIGER HINWEIS: Stellen Sie sicher, dass das Netzkabel nicht durch Küchenschranktüren oder Schubladen verläuft.
-
Page 43: Installationsanleitung
Installationsanleitung 5.3.1 Abmessungen des Arbeitsplattenausschnitts Schneiden Sie die Arbeitsplatte gemäß den in der Zeichnung angegebenen Maße zu. Für die Installation und den Gebrauch muss ein Mindestabstand von 50 mm (X) um den Ausschnitt eingehalten werden, wie in der Abbildung gezeigt wird. Die Dicke der Arbeitsplatte muss mindestens 30 mm betragen Verwenden Sie ein hitzebeständiges Material, um Verformungen der Arbeitsplatte zu vermeiden, die durch die Wärmestrahlung des Kochfelds verursacht werden könnten. - Page 44 5.3.2 Montageanleitung Wichtig: Der Abstand zwischen dem Boden des Kochfelds und der Oberseite eines sich darunter befindenden Möbelstücks oder Geräts (3) muss mindestens 50 mm betragen. WICHTIGER HINWEIS: Wenn das Kochfeld über einem Backofen installiert ist, stellen Sie sicher, dass der Backofen über eine Belüftung verfügt. Abb.
- Page 45 Die Haltebügel befinden sich in einem mitgelieferten Beutel. Passen Sie die Position der Bügel an die unterschiedlichen Dicken der Arbeitsplatte an. a) a) b) b) Abb. 5.3 a) - Version 1 b) - Version 2 HINWEIS: Die Abmessungen des Arbeitsplattenausschnitts finden Sie im vorherigen Abschnitt „Abmessungen des Arbeitsflächenausschnitts“.
- Page 46 WICHTIGER HINWEIS: Stellen Sie sicher, dass das Kochfeld gut belüftet ist und der Luftein- und -austritt nicht behindert wird. Achten Sie darauf, dass das Kochfeld immer in einwandfreiem Zustand ist. WICHTIGER HINWEIS: Der Sicherheitsabstand zwischen dem Kochfeld und eventuell darüber platzierten Möbelstücken muss mindestens 760 mm betragen. WICHTIGER HINWEIS: Der Sicherheitsabstand zwischen dem Kochfeld und einer Dunstabzugshaube muss mindestens 650 mm betragen.
-
Page 47: Anschluss Des Kochfelds An Das Stromnetz
Anschluss des Kochfelds an das Stromnetz Prüfen Sie vor dem Anschluss des Kochfelds an das Stromnetz, dass: GEFAHR: Verwenden Sie keine Adapter, Reduzierstücke oder Abzweigungen, um das Kochfeld an das Stromnetz anzuschließen, da dies zu Überhitzung und Feuer führen kann. Das Netzkabel darf auf keinen Fall heiße Teile berühren und muss so verlegt werden, dass es an keiner Stelle eine Temperatur von 75°C überschreitet. - Page 48 Anschlussverfahren: 220-240V~ 380-415V 3N~ 380-415V~ Abb. 5.5 1) - Blau 2) - Grau 3) - Grün-Gelb 4) - Schwarz 5) - Braun de-47...
-
Page 49: Wartung
6 : WARTUNG Reinigung und Pflege Vergewissern Sie sich vor der Durchführung von Wartungs- oder Reinigungsarbeiten, dass das Kochfeld ausgeschaltet ist. Bei: Art des Eingriffs: WICHTIGE HINWEISE Tägliche 1. Schalten Sie die Stromversorgung • Wenn das Kochfeld ausgeschaltet Verschmutzung des Kochfelds aus. ist, ist die Anzeige „heiße Oberfläche“... - Page 50 Bei: Art des Eingriffs: WICHTIGE HINWEISE Überlaufen von Entfernen Sie diese Spritzer immer • Entfernen Sie Flecken, die durch kochenden sofort mit einem Fischmesser, Spatel aufgelöste zuckerhaltige Flüssigkeiten oder für Glaskeramik-Kochfelder Speisen oder übergekochte und verschütten geeigneten Schaber, aber seien Sie Speisen verursacht wurden,...
-
Page 51: Störungssuche
7 : STÖRUNGSSUCHE Störungsbehebung Störung Mögliche Ursachen Abhilfe Das Kochfeld schaltet Keine Stromversorgung. Stellen Sie sicher, dass das Kochfeld sich nicht ein. an das Stromnetz angeschlossen und eingeschaltet ist. Überprüfen Sie den Hauptstromschalter in Ihrer Wohnung. Wenn Sie alles überprüft haben und das Problem weiterhin besteht, wenden Sie sich an einen qualifizierten Techniker. - Page 52 Contents 1 : GENERAL INFORMATION ..............en-3 Reading the manual ..............en-3 2 : GENERAL SAFETY RULES ..............en-7 Important information ..............en-7 Environmental Protection ............en-13 3 : TECHNICAL DATA AND FEATURES ..........en-14 Technical data ................. en-14 Wiring diagram ................ en-20 4 : HOW TO USE ..................
- Page 53 en-2...
-
Page 54: General Information
00 49 6236. 46 32 0 E-mail info@neg-novex.de WebSite www.respekta.de 1.1.3 Assistance service If you have any technical questions regarding your unit, please contact your retailer’s customer service. Before calling customer service, make sure you have the following information with you:... - Page 55 1.1.4 Introduction and safety Before installing and/or using the appliance, carefully read the instructions contained in this manual. This will help you familiarise yourself with your new unit. Keep this document handy so that you can refer to it at any time and pass it on to any subsequent owners.
- Page 56 1.1.5 Appliance identification Keramik / Ceramic Mod. KM 4400-28 Kochfeld 220-240V~/380-415V~ 50Hz TOTAL 6000 W kg 7.8 Serien Nr. MBR-YYYYMMDD00001 NEG-Novex Großhandelsgesellschaft für Elektro- und Haustechnik GmbH, Chenover Str. 5,D-67117 Limburgerhof Fig. 1.1 The following data are shown on the nameplate: A - Model CE Marking C - Weight...
- Page 57 CE declaration of conformity The manufacturer of the appliances described here, to which this declaration refers, declares under his sole responsibility that these appliances comply with the basic safety, health and protection requirements of the relevant EC directives, and that the related test reports, in particular the EC declaration of conformity duly issued by the manufacturer or his authorised representative, are available for inspection by the competent authorities and can be requested through the vendor of the equipment.
-
Page 58: General Safety Rules
2 : GENERAL SAFETY RULES Important information DANGER: There is a risk of fire if cleaning is not performed according to the instructions in this manual. DANGER: Risk of fire due to spontaneous combustion of oil and fat fumes. Avoid reusing oil, as used oil may contain organic residues which make spontaneous combustion more likely. - Page 59 CAUTION: Make sure to use the correct cable for connection to the power supply. Make sure that the appliance is installed correctly. If unsuitable power cords or exposed power plugs are used, the connection may overheat. Make sure the power cord is not loose or tangled. Make sure that a guard is installed that prevents direct contact with the cables.
- Page 60 CAUTION: Children must not play with the appliance. CAUTION: Keep all packing materials out of the reach of children. CAUTION: Remove all packing material, stickers and protective film (if any) before using the first time. CAUTION: Keep children and pets away from the appliance during operation or while it cools down.
- Page 61 CAUTION: Due to the weight of the hob, pay special attention during installation or handling. Always wear safety gloves and safety footwear. CAUTION: Do not use the unit with wet, damp hands or if you have come into contact with water. CAUTION: Melted plastic, plastic films must be immediately removed from the hob.
- Page 62 WARNING: Once the hob has been removed from the packaging, check its conditions. If the product is damaged, do not use the product and contact the RESPEKTA service network. Do not cook on a broken or cracked hob. If the hob surface is broken or cracked, immediately disconnect the appliance from the mains (wall switch) and contact a qualified technician.
- Page 63 NOTE: The hob is for domestic use only. The appliances described in this document are not intended for commercial use. They are designed for domestic use only. NOTE: This appliance complies with electromagnetic safety standards. NOTE: In order to obtain the Warranty, make sure you can provide the warranty card and the purchase receipt, otherwise the Warranty will not be offered.
-
Page 64: Environmental Protection
Environmental Protection 2.2.1 Packaging The packing materials are 100% recyclable. Follow local regulations for their disposal. WARNING: Packing material (plastic bags, polystyrene parts, etc.) is a source of danger for children. Keep packing material out of the reach of children. 2.2.2 Disposal WARNING: Dispose of the old appliance in accordance with legal regulations. -
Page 65: Technical Data And Features
3 : TECHNICAL DATA AND FEATURES Technical data 3.1.1 Model KM 4400-28 590.00 mm Fig. 3.1 Model no. KM 4400-28 Product identification / Brand respekta Product family Built-in hob Product description Electric hob, 60 cm Type (electric/gas/ electric combination) Type of heating (solid plates/... - Page 66 Features Model no. KM 4400-28 Voltage / Frequency V/Hz 220-240V~/380-415V~ 50Hz Nominal power Watt 6000 Power cord length total length 120, external length 100 Power cord (with/without) plug cord included Hob width No. heating zones Front heating area (left) Watt 1800W Rear heating area (left) Watt...
- Page 67 3.1.2 Model KM 5500-28 590.00 mm Fig. 3.2 Model no. KM 5500-28 Product identification / Brand respekta Product family Built-in hob Product description Electric hob, 60 cm Type (electric/gas/ electric combination) Type of heating (solid plates/ radiation plates radiation/induction) Hob finish (stainless steel/glass/...
- Page 68 Features Model no. KM 5500-28 Voltage / Frequency V/Hz 220-240V~/380-415V~ 50Hz Nominal power Watt 6600 Power cord length total length 120, external length 100 Power cord (with/without) plug cord included Hob width No. heating zones Front heating area (left) Watt 1100W / with dual zone 2200W Rear heating area (left) Watt...
- Page 69 3.1.3 Model KM 7700-28 770.00 mm Fig. 3.3 Model no. KM 7700-28 Product identification / Brand respekta Product family Built-in hob Product description Electric hob, 70 cm Type (electric/gas/ electric combination) Type of heating (solid plates/ radiation plates radiation/induction) Hob finish (stainless steel/glass/...
- Page 70 Features Model no. KM 7700-28 Voltage / Frequency V/Hz 220-240V~/380-415V~ 50Hz Nominal power Watt 7000 Power cord length total length 120, external length 100 Power cord (with/without) plug cord included Hob width No. heating zones Front heating area (left) Watt 1100W / with dual zone 2200W Rear heating area (left) Watt...
-
Page 71: Wiring Diagram
Wiring diagram KM 4400-28 KM 5500-28 KM 7700-28 Fig. 3.4 en-20... -
Page 72: How To Use
4 : HOW TO USE Preliminary advice DANGER: When the hob is in operation, never leave the dish unattended as the fat could catch fire. CAUTION: Before carrying out any maintenance or cleaning operation, the appliance must be disconnected from the power supply. WARNING: Remove any protective film that may be left on the ceramic glass hob. - Page 73 4.1.1 Operation of electric hotplate The ceramic glass hob has a microcomputer that can meet a variety of culinary needs, with a heating resistance with micro-automated control and multi-power selection. The ceramic glass hob is based on infrared heating technology, which radiates heat in order to heat the food.
- Page 74 The dish should be in the middle of the hotplate during cooking. Fig. 4.2 NOTE: Always lift the cookware and place it gently on the ceramic glass hob. Do not slide them, or they could scratch the glass. Fig. 4.3 4.1.3 Energy savings Follow these practical tips to save energy in your cooking activities.
- Page 75 NOTE: Always cover the pot or pan with an appropriately sized lid. NOTE: Use a dish size suitable for the amount of food to be prepared. If you use an excessively large pot for a small amount of food, you will unnecessarily consume considerably more energy.
-
Page 76: Using The Electric Hob
Using the electric hob 4.2.1 Arrangement of cooking panels KM 4400-28 Fig. 4.5 1 - Front left hotplate (1800W) 2 - Rear left hotplate (1200W) 3 - Rear right hotplate (1800W) 4 - Front right hotplate (1200W) 5 - Touch screen control panel en-25... - Page 77 KM 5500-28 Fig. 4.6 1 - Front left hotplate (1100W)/ with dual zone (2200W) 2 - Rear left hotplate (1200W) 3 - Rear right hotplate (1000W)/ with oval dual zone (2000W) 4 - Front right hotplate (1200W) 5 - Touch screen control panel en-26...
- Page 78 KM 7700-28 Fig. 4.7 1 - Front left hotplate (1100W)/ with dual zone (2200W) 2 - Rear left hotplate (1200W) 3 - Rear right hotplate (1000W)/ with oval dual zone (2000W) 4 - Front right hotplate (1600W) 5 - Touch screen control panel en-27...
- Page 79 4.2.2 Control panel On/off, selection of hotplate and cooking intensity level 1 - Left cooking zone selection buttons 2 - Right cooking zone selection buttons 3 - Cooking intensity level buttons (+/-) / timer setting buttons (+/-) 4 - Control lock button (child safety lock) 5 - ON-OFF button (hob on/off) 6 - Timer button 7 - Dual cooking area button (only for KM 5500-28 - KM7700-28 models)
- Page 80 4.2.3 Starting the cooking process 1 - Press the ON/OFF button (5), the control panel indicators show "-". A short beep confirms that the unit is switched on. All control panel elements light up for one second and then go out, indicating that the hob is in stand-by mode.
- Page 81 4 - Press the cooking level buttons "+/-" (3) to set the desired cooking level. The cooking power/ intensity level indicated on the display ranges from 1 to 9 (0 means the hotplate is off). The higher the value, the greater the cooking intensity.
- Page 82 3 - Turn off the entire hob by pressing the ON/OFF button (5). Fig. 4.15 CAUTION: Beware of hot surfaces The letter "H" indicates which hotplate is still hot to the touch. It goes out as soon as the surface has cooled down to a safe temperature.
- Page 83 Activate the dual cooking area 1 - Press the selection button with the dual cooking area, , set the cooking intensity level to, for example, "6" (see Fig. 4.12) to set the cooking intensity. Fig. 4.18 2 - The cooking intensity level indicator starts flashing; now press the button for the dual cooking area , after 5 seconds the indicator stops flashing.
- Page 84 4.2.6 Control lock button (child safety lock) The controls can be locked to prevent unwanted use (so that children, for example, cannot accidentally switch on the cooking zones). When the control buttons are locked, no buttons will be activated except the ON/OFF button. To lock the controls Press the control lock button , "Lo"...
- Page 85 4.2.8 Using the timer You can use the timer in two different ways: - It can be used as a minute timer. In this case, the timer will not switch off any cooking zone after the set time has elapsed. - It can be used as an off timer to switch off one or more cooking zones when the time runs out.
- Page 86 3 - Set the time by pressing the "+" button (e.g. 5). Fig. 4.22 4 - Press the timer control again, then "0" will flash on the display. Fig. 4.23 5 - Set the time by pressing the "+" button, (e.g. 2), now the timer is set to 25 minutes.
- Page 87 7 - The buzzer sounds for 30 seconds and the timer indicator shows "- -" when the set time has elapsed. Fig. 4.26 Set the timer to switch off one or more hotplates: 1 - Press the selection button for the hotplate e.g. for which you wish to set the timer.
- Page 88 4 - Press the timer control again, then "0" will flash on the display. Fig. 4.29 5 - Set the time by pressing the "+" button, (e.g. 2), now the timer is set to 25 minutes. Fig. 4.30 6 - When the time is set, the countdown begins immediately.
- Page 89 7 - When the time has elapsed, the corresponding hotplate switches off automatically. NOTE: The other hotplates will continue to operate if previously turned on. Fig. 4.33 If the timer is set for several hotplates: 1 - When setting the timer for several hotplates, the red dots for the relevant hotplates light up. The display shows the timer that expires first.
- Page 90 Cancelling the timer 1 - Press the selection button for the hotplate (1 or 2) for which you wish to cancel the timer. 2 - Press the timer button, the indicator flashes. 3 - Press the "-" button to set the timer to "00": the timer is cancelled.
-
Page 91: Installation
5 : INSTALLATION List of accessories Item Image Fixing brackets (bag supplied - the shape of the bracket may vary depending on the model). Sealing tape (pre-assembled). Preliminary operations 5.2.1 Safety instructions for installation Before installing the hob: WARNING: Install the units only in suitable places. WARNING: Check that the work surface is flat and level and that there are no structural obstructions within the space required for installation. - Page 92 WARNING: If in doubt on local regulations, contact the building authorities. WARNING: Use heat-resistant and easy-to-clean finishes (such as ceramic tiles) for the wall surfaces around the hob. WARNING: Make sure the power cord does not pass through kitchen cabinet doors or drawers.
-
Page 93: Instructions For Installation
Instructions for installation 5.3.1 Size of work surface cutout area Cut out the work surface according to the dimensions indicated in the drawing. For installation and use, a minimum space of 50 mm (X) must be maintained around the cutout as shown in the illustration. The thickness of the worktop must be at least 30 mm. - Page 94 5.3.2 Installation instructions Important: The distance between the base of the hob and the upper part of any cabinet or appliance below it (3) must be at least 50 mm. WARNING: If the hob is installed on top of an oven, make sure that the oven has ventilation.
- Page 95 The fixing brackets are inside a bag supplied. Adjust the position of the brackets to suit different thicknesses of the work surface. a) a) b) b) Fig. 5.3 a) - Version 1 b) - Version 2 NOTE: The cut dimensions of the worktop can be found in the previous section “Size of work surface cutout area”.
- Page 96 WARNING: Make sure that the hob is well ventilated and that the air inlet and outlet are not blocked. Make sure the hob is always in good condition. WARNING: The safe distance between the hob and any cabinet above it must be at least 760 mm.
-
Page 97: Connection Of Hob To Mains
Connection of hob to mains Before connecting the hob to the mains, check the following: DANGER: Do not use adapters, reducers or branches to connect the hob to the mains, as they could cause overheating and fire. The power cord must never touch hot parts and must be arranged in such a way as to not exceed a temperature of 75°C at any point. - Page 98 Connection method: 220-240V~ 380-415V 3N~ 380-415V~ Fig. 5.5 1) - Blue 2) - Grey 3) - Green-Yellow 4) - Black 5) - Brown en-47...
-
Page 99: Maintenance
6 : MAINTENANCE Cleaning and care Before carrying out any maintenance or cleaning work, make sure that the hob is switched off. In case of: Method of intervention: WARNINGS Everyday dirt on the 1. Turn off power to the hob. •... - Page 100 In case of: Method of intervention: WARNINGS Spills of boiling liquids Please always remove these • Remove stains caused by loose, and melted sugar on splashes immediately with a fish sugary foods or overcooked foods ceramic glass knife, spatula or scraper suitable for as soon as possible.
-
Page 101: Troubleshooting
7 : TROUBLESHOOTING Troubleshooting Problem Possible causes Remedy The hob does not turn No power. Make sure that the hob is connected to the mains and that it is switched on. Check the main power switch of your home. If you have checked everything and the problem persists, contact a qualified technician.
Need help?
Do you have a question about the KM4400-28 and is the answer not in the manual?
Questions and answers