Table of Contents
Advertisement
Quick Links
Advertisement
Table of Contents

Related Manuals for Labomed AXIUS


Summary of Contents for Labomed AXIUS
- Page 1 AXIUS Centre Pole User Manual To ensure proper use of this instrument as well as to avoid injury while operating instrument, Understanding this manual completely before use is highly recommended. Axius Part No: 6137120-795 Issue: 1.0 Printed On: June 10, 2023...
- Page 2 The information contained in this document was accurate at the time of publication. Specifications are subject to change without prior notice. LABOMED reserve the right to make changes to the product described in this user manual without notice and without incorporating those changes in any products already sold.
-
Page 3: Table Of Contents
Positioning on the ceiling………………………………………………………………………………….. 5.3.3 Mounting the column…………………………………………………………………………………………. Installing the support arms………………………………………………………………………………………………… 18-19 5.4.1 Kit for bracket……………………………………………………………………………………………………… 20-21 Installing the cladding………………………………………………………………………………………………………… 22-23 24-25 Floor plans…………………………………………………………………………………………………………………………… Installation height of Axius………………………………………………………………………………………………… Startup…………………………………………………………………………………………………………………………………………….. Accessories………………………………………………………………………………………………………………………………………. 27 Axius Part No: 6137120-795 Issue: 1.0 Printed On: June 10, 2023... -
Page 4: Introduction & Intended Use
The Axius provides all devices within an easy reach of the doctor and positioned ergonomically around the patient, AXIUS is a well-engineered center of command and comfort which helps Doctors work for long hours in arduous procedures by fully organized work space helps reduce the user’s work fatigue and allows... -
Page 5: User Intsructions
Axius 2. User Instructions 2.1. User Guide Requirement Read all the instructions prior to first startup to avoid misuse and prevent damage. 2.1.1. Abbreviations Abbreviation Explanation Ifu Instructions for Use CI Care instructions AI Assembly instructions TI Technician’s instructions SC Safety checks... -
Page 6: Terms And Conditions Of Warranty
Claims from this warranty can only be asserted when the transfer form (copy) belonging to the product has been sent to Labomed, and the original can be presented by the operator or user. 2.4 Transportation and storage Note Labomed shall not be held liable for damage arising from transportation. -
Page 7: Information On The Packaging: Storage And Transportation
Axius User Instructions (continued) 3. Do not use a damaged product. 2.4.1. Information on the packaging: Storage and transportation Note Please keep the packaging in case you need to return the product for servicing or repair. The symbols printed on the outside are for transportation and storage, and have the following... -
Page 8: Packed Items
Any waste which is generated must be recycled or disposed of in strict compliance with all applicable national regulations in a manner which is safe both for people and the environment. If you have any questions regarding proper disposal of the Labomed product, please contact the Labomed branch. -
Page 9: Safety
Axius 3. Safety 3.1. Description of safety instructions 3.1.1. Warning symbol Warning symbol 3.1.2. Structure DANGER The introduction describes the type and source of the hazard. This section describes potential consequences of non-compliance. ▶ The optional step includes necessary measures for hazard prevention. -
Page 10: Safety Inctructions
As a matter of principle, the Labomed AXIUS Column is not an electric medical device. According to the intended use, the AXIUS is a „bearing system for devices, both medical and non -medical, which are used for dental treatment at the working space of a dentist“. -
Page 11: Product Description
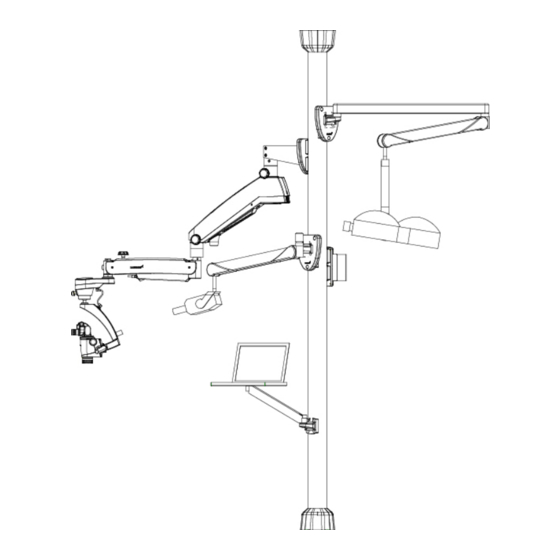
Axius 4. Product Description The Axius support system consists of a column and a range of optional adapters for the mounting of dental components. Configuration options Microscope Part No Microscope adapter – Prima 6137160-800 Microscope adapter – Magna 6129002-805 OT light kit... -
Page 12: Intended Use - Proper Use Indications For Use
Product Description (continued) 4.1 Intended use – Proper use Indications for use: The Labomed Axius support system is a mounting column exclusively for mechanical connections conforming dental accessories in any dental operatory. Proper use: Application of and compliance with the general guidelines and/or national laws, national regulations, and the rules of technology applicable to this product for start-up and use of the Labomed product for the intended purpose are to be applied and complied with. - Page 13 Axius Product Description (continued) Axius 0.000.0000 2023-05-00000000 Labotech Microscopes India Pvt. Ltd. LABOMED 19-HSIIDC, Industrial Estate, Ambala Cantt – 133 006 Haryana (INDIA) Type Device type Year of Manufacture – Serial number Model Number CE Mark Read and take note of the content of accompanying...
-
Page 14: Installation
Axius 5. Installation 5.1 Fastening to floor CAUTION Watch out for under-floor heating and cables when drilling. Special fasteners must be used for floors made of wood, hollow blocks, etc. These are not included in the scope of delivery. The technician is responsible for properly installing the unit with suitable fasteners. - Page 15 Axius Installation (continued) CAUTION Deviation from vertical Damage and injury Do not exceed a maximum deviation from the vertical - 1 mm per 1 m of height. Align the column with the four fastening nuts ⑤ and the four counter nuts ⑥. Check the alignment with a spirit level.
-
Page 16: Positioning On The Ceiling
Axius Installation (continued) 5.3.2 Positioning on the ceiling Push the equalising rod with the ceiling plate ④ upward towards the ceiling and affix it lightly with the four wedges ⑨. If there is a false ceiling, now draw the cutout ⑤ with Ø 180 mm and saw it out. - Page 17 Axius Installation (continued) Note In an installation in the presence of a false ceiling, the direction of the fastening straps of the ceiling plate can be selected freely. Remove the four wedges again and drive the tube into the column.
- Page 18 Axius Installation (continued) 5.3.3 Mounting the column B. False ceiling at the level of the pull-out rod 4. Profile piece…………. 6137160-116 5. Allen screws………… SS-188 C. False ceiling at the level of the profile column Axius Part No: 6137120-795 Issue: 1.0...
-
Page 19: Installing The Support Arms
Axius Installation (continued) 5.4 Installing the support arms Currently, the following fasteners are available for fastening to the support system: Microscope adapter…………………………………. 6137160-800 Adapters/kits for support arms are available for the following units: 6137160-860 OT light kit 6137160-874 Xray arm kit ... - Page 20 User spirit level to align the support arms during the assembly on the column such as to be vertical. The following heights (upper edge of fastening) and relative positions of the various Labomed assemblies are recommended where these are to be combined with a dental unit from Labomed: Assembly for Height...
-
Page 21: Kit For Bracket
Axius Installation (continued) 5.4.1 Kit for angle bracket The following kits are available as angle bracket for the fastenings of support arm: Adapter Microscope (Prima) – 6137160-800 Xray arm adapter – 6137160-872 Adapter microscope (Magna) – 6129002-805 Bracket for monitor - 6137160-003 Use: For shifting the mounting point if mounting areas are used doubly. - Page 22 Axius Installation (continued) 184.9 Adapter assembly kit for Microscope (Part No.) CAUTION Loose screws Damage and injury The tightening torque for all screws of size M8 or larger is 10 Nm! Screws situated on the inside can be tightened using an Allen key or an open-ended spanner (SW 6 mm).
-
Page 23: Installing The Cladding
Axius Installation (continued) 5.5 Installing the cladding Saw the four cladding profiles for the column to size according to the onsite conditions, and snap them in. Note Cover the saw cuts on the ceiling and floor fastening by approximately 30 mm and on the arm systems by approximately 2 mm. - Page 24 Axius Installation (continued) If there is a surface mounted connector ⑥, saw the cover parts for the floor according to the on-site conditions. Plug the two cover parts into each other about the floor fastening on the floor and affix them with two countersunk-head screws M4x10.
-
Page 25: Floor Plans
Axius Installation (continued) CAUTION Improper installation Injury and damage After the installation, check the support system for secure footing and ability to bear load. 5.6 Floor plans External Contour cap Using the Paper template provided, mark the positions of the three... - Page 26 Installation (continued) Floor Plans On consultation with the dentist measurement "A" can be increased by amount "B" if required. The measurement of 550 mm indicates the minimum distance. "C" 660 mm recommendation LABOMED. 1900 2400 - 3900 1675 2512 Axius Part No: 6137120-795 Issue: 1.0...
-
Page 27: Installation Height Of Axius
Axius Installation (continued) 5.7 Installation heights of Axius Installation heights recommended by Labomed, however, the heights can be determined individually according to the desired configuration. 6 Startup Perform an electrical safety check according to IEC 62353 (DIN VDE 0751-1). -
Page 28: Accessories
Axius Accessories Microscope Part No Microscope adapter – Prima 6137160-800 Microscope adapter – Magna 6129002-805 OT light kit 6137160-860 Operating light adapter 6137160-863 Operating light arm 6137160-862 X-Ray arm kit 6137160-874 X-ray arm 6137160-871 X-Ray arm adapter 6137160-872 X-Ray unit kit...
Need help?
Do you have a question about the AXIUS and is the answer not in the manual?
Questions and answers