
Related Manuals for THOMSON THS811


Summary of Contents for THOMSON THS811
- Page 1 THS811 Digitaler High Defi nition Satelliten Receiver Bedienungsanleitung User Manual www.thomsonstb.net...
- Page 4 This product has been manufactured and sold under the responsibility of STRONG Group. THOMSON and the THOMSON logo are trademarks of Technicolor (S.A.) or its affiliates and are used under license by STRONG Group. Represented by STRONG Ges.m.b.H. • Franz-Josefs-Kai 1 • 1010 Vienna • Austria Email: support_at@thomsonstb.net...
- Page 5 If degraded picture quality is observed while viewing copy-protected pay-per-view programmes, connect the set-top box directly to the TV set. Do not connect through a VCR. THOMSON declares that this item complies with the basic requirements and other relevant regulations of directives CE 2004/108/EC and 73/23/EC, RoHS 2002/95/EC Subject to alterations.
-
Page 6: Table Of Contents
TABLE OF CONTENT 1.0 INTRODUCTION 1.1 Safety Instructions 1.2 Storage 1.3 Equipment Set-up 1.4 Accessories 1.5 Usage of external USB devices 2.0 YOUR RECEIVER 2.1 DEFAULT PIN-CODE: 0000 2.2 Front Panel 2.3 Rear Panel 2.4 Remote Control 2.5 Installing the batteries 2.6 Using the remote control 3.0 CONNECTIONS 3.1 Basic connection using an HDMI cable... -
Page 7: Introduction
1.0 INTRODUCTION 1.1 Safety Instructions DO NOT INSTALL YOUR RECEIVER: • In a closed or poorly ventilated cabinet; directly on top of or under any other equipment; on a surface which might obstruct the ventilation slots. DO NOT EXPOSE THE RECEIVER OR ITS ACCESSORIES: •... -
Page 8: Accessories
• It is advised not to store important information on USB storage devices used with the receiver. Always make backups of data on your USB storage device before using it with this receiver. THOMSON will not take responsibility for any loss of information or circumstances caused by loss of information. -
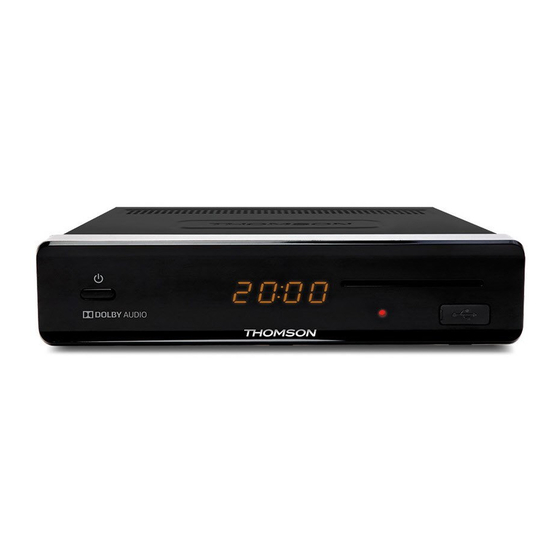
Page 9: Rear Panel
6. USB To connect your USB storage device NOTE: 5 min after switching the receiver to standby it enters the deep sleep mode. Within this time the receiver is able to start up quickly. Starting up from deep sleep takes approx. 1 min. 2.3 Rear Panel Fig. -
Page 10: Installing The Batteries
26. 4 Starts recording the current broadcast, pressing once again opens the recording time to enter 27. u Opens the HDD Manager in viewing mode. In Multimedia and HDD Manager starts playback of the selected file 28. 7 8 During playback mode jumps to the previous / next file 29. -
Page 11: Connecting Multiple Fixed Antennas Via Diseqc 1.0 Switch
Connect one end of a good quality coaxial audio cable to the S / PDIF output of your receiver and the other end to the coaxial audio input of your home theatre, amplifier or any other device supporting digital audio. Connect the IR extender plug into the IR sensor jack of the receiver Plug the power adapter jack to the receiver and the other end to a suitable wall outlet. -
Page 12: Satellite Selection
5.0 QUICK GUIDE TO USING YOUR RECEIVER We at THOMSON understand that you can’t wait to enjoy your new HD receiver. The following quick guide will make you familiar with the basic operation of this device. We do, however, advice you to read the user manual available on our website: www . -
Page 13: Operation
NOTE: 5 min after switching the receiver to standby it will enter the deep sleep mode. Within this time the receiver is able to start up quickly. Starting up from deep sleep takes approx. 1 min. 6.0 OPERATION In viewing mode, several features are available to make watching TV a true pleasure. This chapter describes these features. -
Page 14: Selection Of Audio Language
current and next programme with the tu buttons. The recording progress banner shows the elapsed and complete recording time. Settings for the display duration can be set in menu 7.1.3 System Settings. *Programme information is displayed when available. Availability depends on the broadcast. 6.3 Selection of audio language Some channels support a choice of different audio formats and/or languages. -
Page 15: Instant Recording
Press BLUE to display programme information for the next day and YELLOW to get back one day. Simply press RED to set a timer for the selected event. A message will be shown, where you have the possibility to change the type between Record and Turn ON. Below you can change the Timer type to: Once, Daily, Weekly, Weekends, Weekdays. -
Page 16: Playback Of Recording
Timeshift only works correctly when a fast USB storage device such as a USB2.0 HDD is connected to the receiver. Distorted picture and/or audio during Timeshift indicate a too slow USB device speed. THOMSON cannot guarantee for USB devices used. Especially when Timeshift is activated at channels with high data rate (High quality SD/HD), THOMSON cannot guarantee an accurate playback of the Timeshift file. - Page 17 LNB Power Here you can change the LNB power with tu if necessary. Press OK to open the list of available transponders for the chosen satellite, in Transponder order to check your reception or align the antenna. Press the RED button SAT Edit to rename the chosen satellite and press the GREEN button Add TP to add a new transponder to this satellites database.
- Page 18 After you have adjusted the settings for the preferred scan process, move to Scan selected satellite with pq and then select the search method with tu. You can select between following procedures: Scan selected satellite Scanning the selected satellite. Search All Sat Scanning the selected satellite.* Search TP Scanning the selected transponder.
- Page 19 OSD transparency: Defines the transparency of menus and banner. Press tu to choose between 25%, 50%, 75% and fifty-fifty. When all settings have been made, press to leave the System Settings menu. When returning to viewing mode the receiver informs with a message that it saves your settings. 7.1.3.1 HDMI In this submenu you can set following parameters: TV Ratio...
-
Page 20: Update & Info
Either use OK for a list with all available languages or tu to select a language. Subtitle Language When available, DVB subtitles will be displayed in the selected language. After all settings are adjusted following to your preference, choose Save with pq and press OK. The receiver returns to the menu. - Page 21 The OTA (Over the Air) function allows you to search for software updates available on satellite. Please ask your local THOMSON dealer or visit our website www.thomsonstb.net for information. After pressing OK on OTA Software Update to execute your receiver will start looking for new software.
-
Page 22: Conditional Access
7.3 Conditional Access Your receiver is equipped with a smart card slot which allows access to Irdeto encrypted services. Depending on your smart card you can read different information that might also be asked from your broadcaster in order to give the most effective support. The programmes that can be descrambled are determined by the smart card respectively the subscription which you use. -
Page 23: Channel Manager
The master PIN of your smart card can only be changed via the broadcaster! 7.4 Channel Manager In this menu you can manage channels and configure favourites or playback recorded files from a connected USB storage device. The menu consists of the following sub-menus: TV Channels, Radio Channels, TV Programme Guide and HDD Manager and Multimedia Manager. - Page 24 The format function will delete all recordings, data and information from your USB device. THOMSON will not take any responsibility for damaged or lost data on the USB device. Please make a backup copy of important data on your USB device before using it with your receiver.
- Page 25 The format function will delete all recordings, data and information from your USB device. THOMSON will not take any responsibility for damaged or lost data on the USB device. Please always backup or copy important data from your USB device before using it with your receiver.
-
Page 26: Timer
A selected file will be immediately shown in preview mode. Press OK to playback in fullscreen mode. For pictures the displayed options in the info banner vary depending on the selected repeat mode: Press the RED Option button to adjust the functions for playback (in preview and fullscreen mode). Use the BLUE Rotate button to turn the picture in another direction. -
Page 27: Troubleshooting
If the receiver does not work properly after checking it, please contact your local service line or THOMSON dealer. Alternatively you can send a support mail via our website: www.thomsonstb.net. NEVER open or disassemble your receiver. This may cause a dangerous situation and will void the warranty. - Page 28 Symptom Cause Remedy No access to Expired subscription. Check your current subscription status in scrambled services Smart card awaiting new Conditional Access Irdeto CA System Product authorisation. List Status together with your service provider. No subscription for the When receiver was powered off/disconnected selected channel.
-
Page 29: Specifications
Multimedia Audio playback: MP3* Picture view: JPG, JPEG, BMP* *THOMSON cannot guarantee the playback of all files although extensions are listed, as it depends on file size, codec, bit rate and resolution Connectors SAT IN SAT OUT HDMI TV SCART (RGB, CVBS, Audio L/R output with volume control) Digital audio S / PDIF coaxial USB 2.0 port, Type A: 5 V/1 A (max.) supported... - Page 30 SPECIFICATIONS...
Need help?
Do you have a question about the THS811 and is the answer not in the manual?
Questions and answers