Table of Contents
Advertisement
Quick Links
Advertisement
Table of Contents

Related Manuals for VIVA FITNESS T255


Summary of Contents for VIVA FITNESS T255
- Page 1 VIVA FITNESS TREADMILL OWNER’S MANUAL ITEM NO. T255...
- Page 2 WARNING Read all instruction carefully before use this product. Retain this owner’s manual for the future’s reference: ----When using this treadmill, keep attaching the safety pull pin rope to your clothes. ----When you are running, keep your hand swinging natural, stare frontward, never look adown at your feet.
- Page 3 IMPORTANT SAFETY PRECAUSTION 1. Plug the power cord of the treadmill directly into a dedicated grounded circuit. This product must be grounded. If it has breakdown, grounding provides a path of least resistance for electric current to reduce the risk of electric shock. 2.
-
Page 4: Assembly Steps
16. If you observe any damage or wear on the mains plug or on any section of the mains lead then please have these replaced immediately by a qualified electrician – do not attempt to change or repair these yourself. 17. - Page 5 ASSEMBLY STEP THREE: 1. Firstly, connect the computer linking wire(69) with the extension wire(12); then lock the computer bracket(66) on the upright tubes (14,15) with allen pan head bolt(13) and serrated lock washer(5). Finally, lock all the screws installed before tightly. 2.
- Page 6 When you fold the machine: Put your hands on place A, lift up the machine, then push it to the direction of the arrow, stop it when you hear the sound from the cylinder (63). When you unfold the machine Grasp the place A by your hands, knick the place B of cylinder(63) by your right foot, push the running board to the level of place C ,then the running board will get down...
-
Page 7: Grounding Methods
GROUNDING METHODS This product must be grounded. If it should malfunction or breakdown, grounding provides a path of least resistance for electric current to reduce the risk of electric shock. This product is equipped with a cord having an equipment-grounding conductor and a grounding plug. The plug must be plugged into an appropriate outlet that is properly installed and grounded in accordance with all local codes and ordinances. - Page 8 POWER RUNNING SURFACE 460X1400 AS ORDER INPUT CURRENT SIZE(mm) 72KG SPEED RANGE 1.0-18KM/H NET WEIGHT 120KG 0-15% MAX WEIGHT INCLINE Operation Instructions I Description to windows and keys 1. LCD windows will display the following functions: A. Speed window: display speed data.
- Page 9 B. Time/ heart rate window: display time/ heart rate data. Display heartbeat in the operation process first. C. Distance/ calorie/ incline windows: display distance/ calorie/ incline data. Display in turn in operation process. Press "Mode” to switch the display. Incline will be displayed first for section change; incline will be displayed first for stop;...
- Page 10 H. When the set time reduces to zero or when the set calorie reduces to zero, or the set distance reduces to zero, the buzzer will make short alarm “Bi-Bi-Bi”, the speed window will display END; 5s later, the machine will return to the standby state and the buzzer will make long alarm “Bi-Bi”;...
- Page 11 Time section Set time/ 20 =running time for each section Program Speed Incline Speed Incline Speed Incline Speed Incline Speed Incline Speed Incline Speed Incline Speed Incline Speed Incline Speed Incline Speed Incline Speed Incline Speed Incline Speed Incline VII Customized program: In addition to 14 built-in programs, the treadmill also has 3 customized programs to support the customized setting based on the user’s specific situation: U01, U02 and U03.
- Page 12 choose the parameters which you want to set (F1-gender,F2-age,F3- height,F4-weight),press ‘SPEED+’,’SPEED-’,you could set these parameters. t will show F5 when you finish, hold the pulse, then enter into physique test to check if the figures are match with yours. FAT is a measurement for connections of height and weight of people. It’s not pointed to body proportion. FAT is suit for any man or woman, and it will provide basis for adjusting human’s weight with other figures for health.
- Page 13 XIV Cautions: 1. Please check whether power supply is connected and whether safety lock is effective before using the treadmill. 2. In case of any abnormality in the use process, please remove the safety lock and the treadmill will rapidly slow down till stop;...
- Page 14 Check whether the connector of yes, change Communicational failure between the meter and the controller connector. the meter and the controller, and the has broken down. drive cannot receive signal from the meter. Check whether the joint has Pull the joint and plug been plugged in well.
- Page 15 Press the button of Lifting motor fails in learning controller seconds relearn again. Over-current protection Check whether the controller Change electric match with the standard of machine or controller electric engine. and retest. Check whether motor Re-plug motor interface of the drive is loose. interface properly.
-
Page 16: Exercise Instructions
Check whether the wire between Change the wire Communicational failure between the meter and the controller is the meter and the controller, and the broken down meter cannot receive the signal from the drive. Check whether the socket is Re-plug the socket and plugged in well. - Page 17 This stage is to let your Cardio-vascular System and muscles wind down. This is a repeat of the warm up exercise e.g. reduce your tempo, continue for approximately 5 minutes. The stretching exercises should now be repeated, again remembering not to force or jerk your muscles into the stretch. As you get fitter you may need to train longer and harder.
- Page 18 Picture A: If the belt has drifted to the RIGHT Picture B:If the belt has drifted to the LEFT WARNING: ALWAYS UNPLUG THE TREADMILL FROM THE ELECTRICAL OUTLET BEFORE CLEANING OR SERVICING THE UNIT. CLEANING General cleaning or the unit will greatly prolong the treadmill. Keep treadmill clean by dusting regularly. Be sure to clean the exposed part of the deck on either side of the walking belt and also the side rails.
-
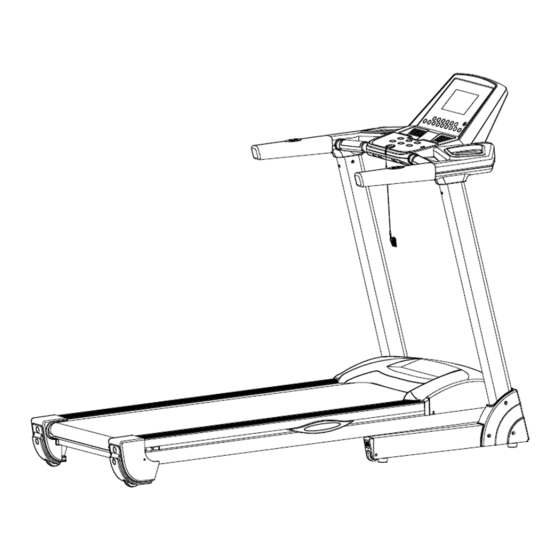
Page 19: Exploded Drawing
EXPLODED DRAWING... -
Page 20: Parts List
PARTS LIST... - Page 21 Description No. Description BOTTOM FRAME RUNNING BELT FRONT ROLLER CROSS PAN HEAD SCREW M6*15 SOCKET HEAD CAP BOLT M6*45 ALLEN PAN HEAD BOLT M8*50 BELT SERRATED LOCK WASHERφ8*1.2 HEX BOLT M8*55 SPRING WASHER φ8 TRANSPORT WHEEL NYLON NUT M8 FLAT WASHERφ8*1.5 TRANSPORT WHEEL CAP MOTOR PROTECTIVE PLUG...
- Page 22 POWER CORD BUCKLE SCREW CIRCUIT BREAKER LIGHT SENSOR BRACKET SILICON CUSHION INDUCTANCE (OPTIONAL) EDGINGS FILTER (OPTIONAL) RUNNING BOARD AMPLIFIER BOARD (OPTIONAL) COUNTERSUNK HEAD BOLT M6*25 AUDIO JACK (OPTIONAL) CONNECTING WIRE COUNTERSUNK HEAD BOLT M6*30 (OPTIONAL) COUNTERSUNK HEAD TAPPING SPEAKER PLATEN (OPTIONAL) SCREW ST4*16 WASHERφ24*φ5.2*4 LOUDSPEAKER (OPTIONAL)
Need help?
Do you have a question about the T255 and is the answer not in the manual?
Questions and answers