
Related Manuals for VIVA FITNESS T940


Summary of Contents for VIVA FITNESS T940
- Page 1 Please read all precautions and instructions in this manual before in detail before using this equipment. Save this manual for future reference.
- Page 2 Contents Safety Caution Assembly instruction Operation guide 7-12 Program chart Suggested stretches 14-15 Maintenance 16-17 Exploded drawing Part list Trouble shooting guides Carton size (mm) 1810*770*1250 Voltage 220V-240V 50/60HZ Fold size (mm) 975*720*1375 Motor power AC 3.0CHP/6.0HPP Running area (mm) AMPS 580*1500 Gross weight...
- Page 3 SAFETY CAUTIONS When using this product, basic precautions should always be followed, including the following: Please read the instruction carefully before starting to use this product. Danger – To reduce the risk of electric shock: 1. Always unplug this product from the electrical outlet immediately after using and before cleaning.
- Page 4 SAFETY CAUTIONS GROUNDING INSTRUCTIONS The products must be grounded first. If malfunction or breakdown occurs, grounding will provide a path of least resistance for electric current to reduce the risk of electric shock. The product is equipped with a cord having an equipment-grounding conductor and a grounding plug.
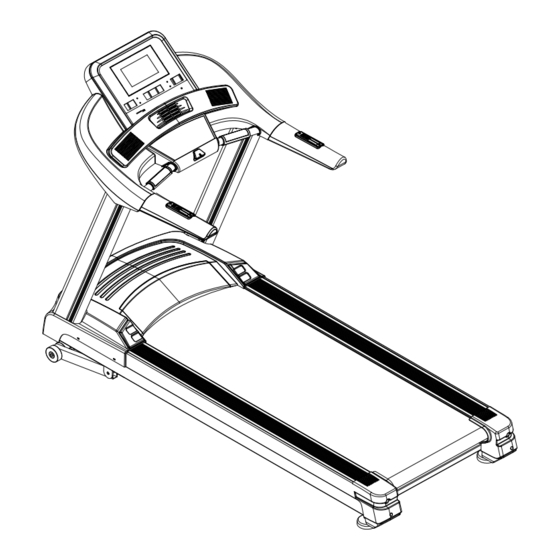
- Page 5 ASSEMBLY INSTRUCTIONS When you open the package you will find all parts of the treadmill, shown as the pictures Description Q’ty Main frame Left upright Right upright Console Bolt Washer Wrench 5# & Wrench 6# Screw driver and wrench Lubricant...
- Page 6 ASSEMBLY INSTRUCTIONS Step 1 : 1. Open the carton box and place the main frame on flat floor. Use Screw driver and wrench (9) to open the motor cover. Step 2 : 1.Insert the left upright (2) and right upright (3) into the main frame (1), and use the 5# wrench (8) to fasten the left &...
- Page 7 ASSEMBLY INSTRUCTIONS Step 4: NOTE: For your safety and comfort, please check if all screws are fastened Congratulation! A brand new motorized treadmill has been successful assembled!
- Page 8 OPERATION GUIDE GENERAL SAFETY TIPS A. Practice mounting and dismounting your treadmill before beginning your workout. B. Attach the Safety Key to the Computer (the treadmill will not operate without the Safety Key). Clip the other end of the Safety Key to your clothing before exercising to ensure the treadmill will stop if the user accidentally walks off the Treadmill.
- Page 9 OPERATION GUIDE DISPLAY FUNCTION DISTANCE: Accumulates total workout distance from 0.0 to 99.90 kilometers. TIME: Accumulates total workout time from 0:00 to 99:00 minutes, displays all ERRO messages. CALORIE: Accumulates the user's calorie consumption from 0 to 999 Cal. PULSE: When pulse is detected by grasping both stainless steel pick-ups on front handrails, it will display your current heart rate in beats per minute from 40 to 250.
- Page 10 OPERATION GUIDE 7. During your workout in any mode, when you press STOP button, the treadmill will be paused, belt movement and incline will be slow down, if you want to resume your workout, press START button and all previous data will resume counting, treadmill belt will begin movement after a 3 seconds count-down.
- Page 11 OPERATION GUIDE STEP 1: Attach the Safety key to wake display up; the treadmill then will be on start/ready status, the SCAN window will display MANUAL. STEP 2: Press MODE button, the manual program will be selected, and the TIME window will blink and display 30:00 minutes as lasting time, the SCAN window will display TIME COUNT, press INCLINE +/- buttons to set the desired value, you can set count-down TIME from 10:00 to...
- Page 12 OPERATION GUIDE BODY FAT SCALE This function is to estimate your body fat according to the basic information of you body condition. This estimate is not exact and persons with medical conditions and/or a specific need for accurate body fat value should not rely on the estimations provided.
- Page 13 OPERATION GUIDE USING THE AUDIO FUNCTION As the figure shows, plug one end of the audio cable to the audio jack on computer, and then plug the other end of the audio cable to MP3 player. The speaker on the computer will then play the music from MP3 player.
- Page 14 Program chart BUILD-IN PROGRAM CHART SPEED CHANGES Level 1 SPEED(KM/H) INCLINE Level 2 SPEED(KM/H) INCLINE Level 3 SPEED(KM/H) INCLINE Level 4 SPEED(KM/H) INCLINE Level 5 SPEED(KM/H) INCLINE Level 6 SPEED(KM/H) INCLINE Level 7 SPEED(KM/H) INCLINE Level 8 SPEED(KM/H) INCLINE Level 9 SPEED(KM/H) INCLINE Level 10...
- Page 15 SUGGESTED STRETCHES A successful exercise program consists of a warm-up, aerobic exercise, and a cool-down. Do the entire program at least two and preferably three times a week, resting for a day between workouts. After several months, you can increase your workouts to four or five times per week.
- Page 16 SUGGESTED STRETCHES 4. Shoulder Lift Lift your right shoulder up toward your ear for one count. Then lift your left shoulder up for one count as you lower your right shoulder. 5. Toe Touch Slowly bend forward from your waist, letting your back and Shoulders relax as you stretch toward your toes.
- Page 17 MAINTENANCE WARNING! Before performing any maintenance to your treadmill, always unplug the power cord from the surge protector. CLEANING: Routine cleaning of your TREADMILL will extend the life of your treadmill. WARNING! To prevent electrical shock, be sure the power to the treadmill is OFF and the unit is unplugged from the wall electrical outlet before attempting any cleaning or maintenance.
- Page 18 MAINTENANCE Running beltte nsion adjustment The treadmill has been adjusted and passed QC inspection before leaving the factory. If there is phenomenon of bias running of the belt ,the possible reasons might be: A. The frame is not stably laid B.
- Page 19 EXPLODED DRAWING...
- Page 20 PART LIST DESCRIPTION DESCRIPTION Main frame Side rail Incline frame Side rail Console Upright cover Left upright Belly pan Right upright Motor belt Bolt M10*40 cushion Bolt M10*55 Foot adjust kit Bolt M12*45 Move wheel Bolt M12*90 Handrail foam Bolt M8*15 Running board Bolt M8*30 Running belt...
- Page 21 TROUBLE SHOOTING ERROR CODE SYMPTOM No sensor information, Check the all wires to make sure contact well. The motor wire take off. No speed sensor information. Over load Safety off.
Need help?
Do you have a question about the T940 and is the answer not in the manual?
Questions and answers