Table of Contents
Advertisement
Quick Links
Scandinavian complex "Kitty"
1 - 1484*70*20 Front base
1 pc.
3 - 1200*50*20 Side Base
2 pcs.
5 - 1440*50*20 Rope ladder side 2
1 pc.
7 - 1440*50*20 Ladder with 5 steps side 2
1 pc.
9 - 1440*50*20 Ladder with 3 steps side 2
1 pc.
11 - 1440*50*20 Ladder with 7 steps side 2
1 pc.
13 - 1440*50*20 Plywood Ladder side 2
1 pc.
15 - 1484*50*20 Upper ladder side 2
1 pc.
18 - Rope
ladder
1 pc.
a - Flat head
b - Flat head
35 mm screw
30 mm screw
94 pcs. +
12 pcs. +
5 pcs. spare
2 pcs. spare
ASSEMBLY DETAILS
19 - Long nog
21 pcs.
c - Flat head
17 mm dull nut
12 pcs. +
2 pcs. spare
2 - 1484*70*20 Back base
1 pc.
4 - 1440*50*20 Rope ladder side 1
1 pc.
6 - 1440*50*20 Ladder with 5 steps side 1
1 pc.
8 - 1440*50*20 Ladder with 3 steps side 1
1 pc.
10 - 1440*50*20 Ladder with 7 steps side 1
1 pc.
12 - 1440*50*20 Plywood Ladder side 1
1 pc.
14 - 1484*50*20 Upper Ladder side 1
1 pc.
16 - 452*50*20
Upper ladder lintel
2 pcs.
20 - Long nog
with holes
8 pcs.
d - Screw 30 mm
16 pcs. +
2 pcs. spare
17 - Sidewall
2 pcs.
21 - Plywood
4 pcs.
e - 4 mm hex key
2 pcs.
Advertisement
Table of Contents

Related Manuals for Montessori Furniture Wood and Hearts Kitty


Summary of Contents for Montessori Furniture Wood and Hearts Kitty
- Page 1 Scandinavian complex "Kitty" ASSEMBLY DETAILS 1 - 1484*70*20 Front base 2 - 1484*70*20 Back base 1 pc. 1 pc. 3 - 1200*50*20 Side Base 4 - 1440*50*20 Rope ladder side 1 2 pcs. 1 pc. 5 - 1440*50*20 Rope ladder side 2 6 - 1440*50*20 Ladder with 5 steps side 1 1 pc.
- Page 2 Pic. 1 Lay the Bases (1) and (2) on the floor as shown in the Pic. 1. Mark the position of holes in the middle. Round grooves in the Side bases (3) should look outside. Screw the parts (1), (2) and (3) with screws (a), using hex key (e). Pic.
- Page 3 Pic. 3 Assemble the Ladder with 5 steps as shown in the Pic. 3. Take the sides of the Ladder (6, 7) and 5 long nogs (19). Screw the parts together with screws (a), using hex key (e). Pic. 4 Assemble the Ladder with 3 steps as shown in the Pic.
- Page 4 Pic. 5 Pic. 5 Assemble the Ladder with 7 steps as shown in the Pic. 5. Take the sides of the Ladder (10, 11) and 7 long nogs (19). Screw the parts together with screws (a), using hex key (e). Pic.
- Page 5 Pic. 7 Assemble the Plywood ladder as shown in the Pic. 7. Take the sides of the Ladder (12, 13) and plywood with long nogs. Screw the parts together with screws (a), using hex key (e). Pic. 8 Assemble the Upper ladder. Start with Upper ladder side (14), and both Upper ladder lintels (16), Sidewalls and 6 long nogs (19).
- Page 6 Pic. 9 Connect the Sidewalls (17) to Lintels (16) using screws (b), nuts (c) and both hex keys (e) as shown in the Pic. 9. Pic. 10 Assmeble the Rope Ladder and Plywood Ladder with Sidewall (17) using screws (b), nuts (c) and both hex keys (e). Screw the Rope Ladder and Plywood Ladder with Upper Ladder with screws (a), using hex key (e).
- Page 7 Pic. 11 Assemble the Ladder with 5 steps with Upper Ladder side 1 (14) with screws (a), using hex key (e). See Pic. 11. Pic. 12 Assemble the Ladder with 3 and 7 steps with Sidewall (17) using screws (b), nuts (c) and both hex keys (e).
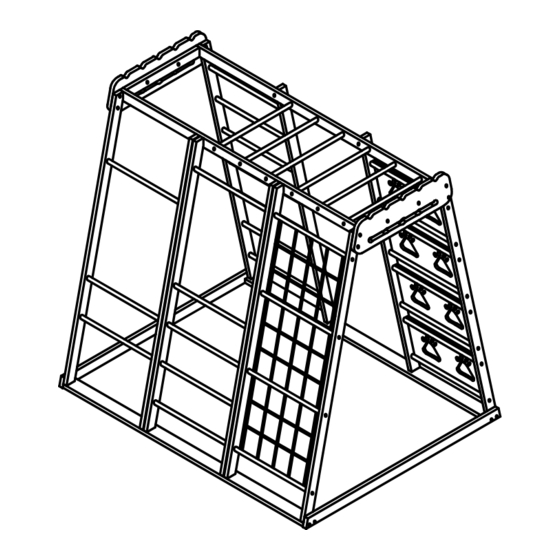
- Page 8 Pic. 13 Assemble the Vertical Ladders with Front (1) and Back (2) base using screws (a) and hex key (e). See Pic. 13. To be used for its intended purpose only and under the direct supervision of an adult! All the responsibility for children’s injuries received during games on the furniture lies on adults watching after them.
Need help?
Do you have a question about the Wood and Hearts Kitty and is the answer not in the manual?
Questions and answers