Advertisement
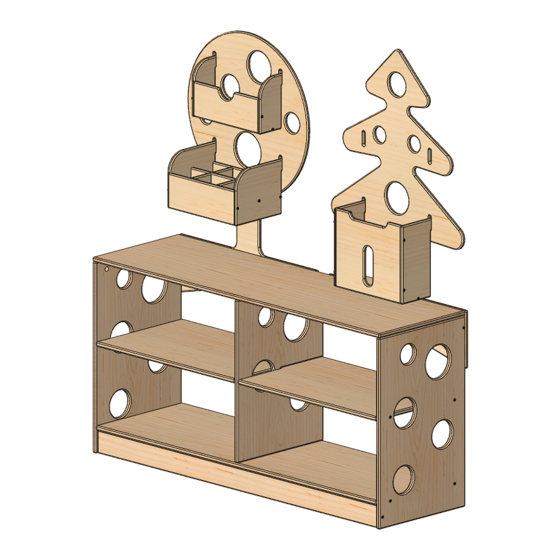
Shelf "Trees ans Houses" narrow 1
1 - Upper cover
1000
1 pc.
6 - Shelf
976
1 pc.
11 - Right sidewall
of the drawer 1
1 pc.
16 - Base plank of
the drawer 2
228
1 pc.
21 - Right sidewall of
the drawer 3
1 pc.
26 - Set of Minifixes*
6 pcs.
*Eccentric ties are already installed into the details
ASSEMBLY DETAILS
2 - Left sidewall
1 pc.
7 - Decor 1
1 pc.
12 - Base plank of
the drawer 1
228
2 pcs.
17 - Long lintel
1 pc.
22 - Lower rail
976
1 pc.
27 - Screwdriver
1 pc.
3 - Right sidewall
1 pc.
8 - Decor 2
1 pc.
13 - Left sidewall of
the drawer 2
1 pc.
18 - Short lintel
2 pcs.
23 - Upper rail
976
1 pc.
4 - Lower base
976
1 pc.
9 - Facade of
the drawer 1
1 pc.
14 - Right sidewall
of the drawer 2
1 pc.
19 - Lower plank of
the drawer 3, 1 pc.
228
1 pc.
24 - Confirmat
screws 5x40
40 pcs.
5 - Middle wall
1 pc.
10 - Left sidewall of
the drawer 1
1 pc.
15 - Facade of
the drawer 2
1 pc.
20 - Left sidewall of
the drawer 3
1 pc.
25 - 3 mm Hex key
1 pc.
Advertisement
Table of Contents

Related Manuals for Montessori Furniture Wood and Hearts Trees ans Houses


Summary of Contents for Montessori Furniture Wood and Hearts Trees ans Houses
- Page 1 Shelf "Trees ans Houses" narrow 1 ASSEMBLY DETAILS 3 - Right sidewall 4 - Lower base 5 - Middle wall 1 - Upper cover 2 - Left sidewall 1000 1 pc. 1 pc. 1 pc. 1 pc. 1 pc. 6 - Shelf 7 - Decor 1 8 - Decor 2 9 - Facade of...
- Page 2 Pic. 1 Take the right sidewall (3) and using the confirmat screws (24) and hex key (25) attach the lower base (4) and lower rail (22). Fix the details 4 and 22 wih he confirmat screw (24). See Pic.1. Pic. 2 Attach the left sidewall (2) to the previously assembled construction.
- Page 3 Pic. 4 Install the shelf (6) into the groove of the middle wall (5) and fix it with the confirmat screws (24). See Pic.4. Install the dowel from minifixes (26) Pic. 5 Install the dowels from minifixes (26) into the upper cover (1) using the screwdriver (27).
- Page 4 Pic. 7 Install the upper cover (1) onto the previously assebmled construction and using the screwdriver (27) close the eccentriv ties located on the sidewalls (2,3) and middle wall (5) by turning them 180 degrees clockwise. See Pic.7. Pic. 8 Attach the decor details (7,8) to the previously assembled construction using the confirmat screws (24).
- Page 5 Pic. 10 Take one of the sidewalls (20 or 21) ans using the confirmat screws (24) attach the lower planks (12) to it. Then locate the short lintels (18) on the lower plank (19) and install the longer lintel (17). Fix the construction with the confirmat screws (24) and attach it to one of the sidewalls (21 or 20).
Need help?
Do you have a question about the Wood and Hearts Trees ans Houses and is the answer not in the manual?
Questions and answers