Table of Contents
Advertisement
Quick Links
1 - Stand with
2 - Stand for
the door
minifixes
1 pc.
3 pcs.
6 - Shelf
7 - Sink
2 pcs.
1 pc.
11 - 4mm hex key
12 - Plastic lock
1 pc.
1 pc.
*eccentric ties are already installed into the details
Insert the dowels from minifixes (15)
Pic. 1
Take the stand with the door (1) and using the screwdriver (14) and
self-tapping screws (13), attach the lick (12). Also install the dowels
from minifixes (15) using the screwdriver (14). See Pic.1.
Kitchen "Light"
ASSEMBLY DETAILS
3 - Common stand
40
40
2 pcs.
8 - Upper faucet part
40
1 pc.
13 - Self-tapping
screw 2.5x12
4 pcs.
1
12
4 - Upper panel
5 - Tabletop
1 pc.
1 pc.
9 - Faucet base
10 - Screw 6.3x40
30
1 pc.
20 pcs.
14 - Screwdriver
15 - Set of minifixes*
1 pc.
8 pcs.
13
Advertisement
Table of Contents

Related Manuals for Montessori Furniture Wood and Hearts Kitchen Light


Summary of Contents for Montessori Furniture Wood and Hearts Kitchen Light
- Page 1 Kitchen "Light" ASSEMBLY DETAILS 1 - Stand with 2 - Stand for 3 - Common stand 4 - Upper panel 5 - Tabletop the door minifixes 1 pc. 3 pcs. 2 pcs. 1 pc. 1 pc. 6 - Shelf 7 - Sink 8 - Upper faucet part 9 - Faucet base 10 - Screw 6.3x40...
- Page 2 Pic. 2 Take one of the shelves (6) and using the screwdriver (14) and self-tapping screws (13) attach the lock (12). See Pic.2. Insert the dowels from minifixes (15) Pic. 3 Take the stands for minifixes (2) and using the screwdriver (14) install the dowels from minifixes (15).
- Page 3 Pic. 4 Take the stand with the door (1) and attach the upper panel (4) and stand for minifixes (2). Close the eccentric ties (15) located on the upper panel (4) using the screwdriver (14) clockwise. See Pic.4. Pic. 5 Attach to other stands for minifixes (2) with upper panel (4).
- Page 4 Pic. 6 Take the shelves (6) and using the screws (10) and hex key (11), attach the common stand (3) and the received structure of stands and upper panel (1,2,4). See Pic.6. Pic. 7 Attach the common stand (3) and previously assembled construction of stands and upper panel (2,4) to the construction assembled in previous step using the screws (10) and hex key (11).
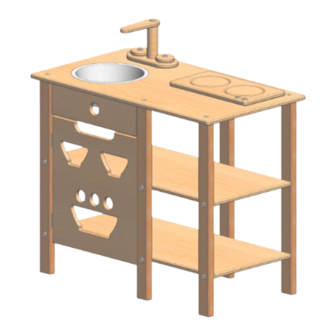
- Page 5 Pic. 8 Attach the tabletop (5) to the received structure using the screws (10) and hex key (11). Then join the faucet parts (8,9) together with the screws and attach the assembled faucet to the tabletop (5). See Pic.8. Pic. 9 Install the sink (7) onto the ready kitchen construction.
Need help?
Do you have a question about the Wood and Hearts Kitchen Light and is the answer not in the manual?
Questions and answers