Advertisement
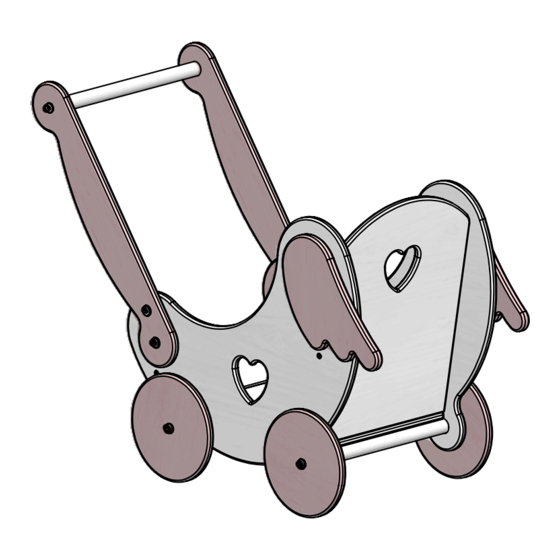
1 - Left sidewall
2 - Right sidewall
1 pc.
1 pc.
6 - Long nog
7 - Short nog
2 pcs.
1 pc.
11 - 3 mm Hex key
12 - 4 mm Hex key
1 pc.
2 pcs.
10
11
Pic. 1
Take the left sidewall (2) and using the confirmat screws (10) and 3 mm
hex key (11), attach the base (3), front and back planks (4,5). See Pic.1.
"Angel" Doll stroller
ASSEMBLY DETAILS
3 - Base
1 pc.
8 - Handle
2 pcs.
13 - Self-tapping
screw 6.3х40
6 pcs.
2
11
4 - Front plank
280
250
1 pc.
9 - Wheel
4 pcs.
14 - Erickson nut
4 pcs.
10
5 - Back plank
250
1 pc.
10 - 5x40 Confirmat
150
screw
12 pcs.
15 - M6x16 screw
4 pcs.
4
3
5
Advertisement
Table of Contents

Related Manuals for Montessori Furniture Wood and Hearts Angel


Summary of Contents for Montessori Furniture Wood and Hearts Angel
- Page 1 "Angel" Doll stroller ASSEMBLY DETAILS 1 - Left sidewall 2 - Right sidewall 3 - Base 4 - Front plank 5 - Back plank 1 pc. 1 pc. 1 pc. 1 pc. 1 pc. 6 - Long nog 7 - Short nog 8 - Handle 9 - Wheel 10 - 5x40 Confirmat...
- Page 2 Pic. 2 Take the previously assembled construction and attach the right sidewall (1) using the confirmat screws (10). See Pic.2. Pic. 3 Take the Erickson nut (14), screws (15) and 4 mm hex keys (12). Screw the handle (8) to one of the sidewalls. Then take the self-tapping screw (13) and attach the short nog (7) to the handle (8) with its help.
- Page 3 Pic. 5 Assemble the wheels: take the long nog (6) and using the self-tapping screw (13) and hex key (12), fix the wheel (9). See Pic. 5. Pic. 6 Install the assembled whhel details onto the main construction and attach the wheels (9) with the self-tapping screws (13) and hex key (12).
Need help?
Do you have a question about the Wood and Hearts Angel and is the answer not in the manual?
Questions and answers