Advertisement
Quick Links
1. Left sidebeam
with leg
1 pc.
5 - Left plank under
slats
1 pc.
9 - Foot plank
1 pc.
13 - Bedhead
1 pc.
17 - Shelf
1 pc.
b - Flat head screw
M6x25
5 pcs.
f - Self-tapping screw
5x50
6 pcs.
j - 3 mm hex key
1 pc.
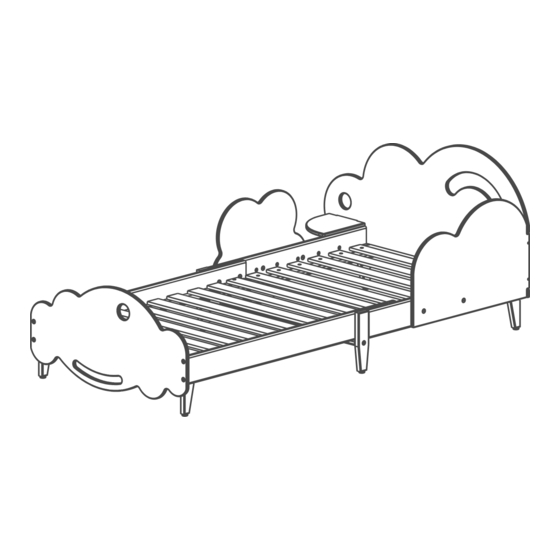
Bed "Cloud"
ASSEMBLY DETAILS
2 - Right sidebeam
with leg
1 pc.
6 - Right plank under
slats
1 pc.
10 - Slats plank
2 pcs.
14 - Big side cloud
1 pc.
18 - Lag
633
700
6 pcs.
c - Flat head screw
M6x30
8 pcs.
g - Self-tapping screw
3.5x35
10 pcs.
k - 4 mm hex key
2 pcs.
3 - Right sidebeam
without leg
1 pc.
7 - Sidebeam connector
1 pc.
11 - Leg #1
2 pcs.
15 - Small side cloud
1 pc.
19 - Slats
1 pc.
d - Self-tapping screw
6.3x40
10 pcs.
h - Self-tapping screw
3.5x25
16 pcs.
l - Screwdriver
1 pc.
4 - Left sidebeam
without leg
1 pc.
8 - Bedhead plank
1 pc.
12 - Leg #2
2 pcs.
16 - Front cloud part
1 pc.
a - Blind nut M6x15
5 pcs.
e - Confirmat screws
5x40
6 pcs.
i - Wooden dowel 8x30
8 pcs.
m - Leveling
6 pcs.
Advertisement

Related Manuals for Montessori Furniture Cloud


Summary of Contents for Montessori Furniture Cloud
- Page 1 11 - Leg #1 12 - Leg #2 1 pc. 2 pcs. 2 pcs. 2 pcs. 13 - Bedhead 14 - Big side cloud 15 - Small side cloud 16 - Front cloud part 1 pc. 1 pc. 1 pc. 1 pc.
- Page 2 с с с с Pic. 1 Insert the wooden dowel (i) into the sidebeams with legs (1, 2). Connect the leg (11) to the beam (1) using the hex key (k). Connect the leg (12) to the beam (2) using the hex key (k). Screw the levelings (m) into the parts as shown on Pic.1.1 Pic.
- Page 3 Pic. 3 Insert the wooden dowels (i) into the right and left sidebeams with legs (1, 2). Screw the beams (1) and (2) with the screws (d) and a hex key (k). Pic. 4 Connect the bedhead (13) to the previously assembled construction with the screws (d) and a hex key (k).
- Page 4 Pic. 5 Screw the big and small cloud parts (14, 15) to the previously assembled construction with the screws (b) and nuts (a) using both hex keys (k). Connect the bedhead (13) and the big could part (14) with the confirmat screws (e) and a hex key (j).
- Page 5 Pic. 7 Screw the foot plank (9) to the foot with the screws (g) and a screwdriver (l). Screw the front lound part (16) to the assembled construction with the screws (d) and a hex key (k). с Pic. 8 Put one assembled construction on the other as shown in the Pic.8.
- Page 6 Pic. 9 Screw the lags (18) with the screws (h) as shown in the picture with the screwdriver (l). Connect the slats (19) with the screws (h) as shown on the picture using the screwdriver (l). The products is meant for indoor use only. To be used for its intended purpose only and under the direct supervision of an adult! All the responsibility for children’s injuries received during...
Need help?
Do you have a question about the Cloud and is the answer not in the manual?
Questions and answers