Sage the Dual Boiler BES920 - Espresso Machine 2200W Manual
- Quick manual (216 pages) ,
- Instruction booklet (34 pages) ,
- Quick manual (184 pages)
Advertisement
- 1 KNOW YOUR NEW APPLIANCE
-
2
OPERATING YOUR NEW APPLIANCE
- 2.1 BEFORE FIRST USE
- 2.2 FIRST USE
- 2.3 START UP
- 2.4 AUTO OFF
- 2.5 LCD INTERFACE
- 2.6 GENERAL OPERATION
- 2.7 STEAM
- 2.8 HOT WATER
- 2.9 LCD PROGRAMMING FUNCTIONS
- 2.10 SHOT DURATION
- 2.11 SHOT VOLUME
- 2.12 EXTRACTION TEMPERATURE
- 2.13 AUTO START
- 2.14 SET CLOCK
- 2.15 CLEAN CYCLE
- 2.16 ADVANCED ESPRESSO FUNCTIONS
- 2.17 ACCESS ADVANCED MENU
- 2.18 ADVANCED FEATURES
- 2.19 ALERTS
- 3 COFFEE MAKING TIPS & PREPARATION
- 4 CARE & CLEANING
- 5 TROUBLESHOOTING
- 6 Documents / Resources
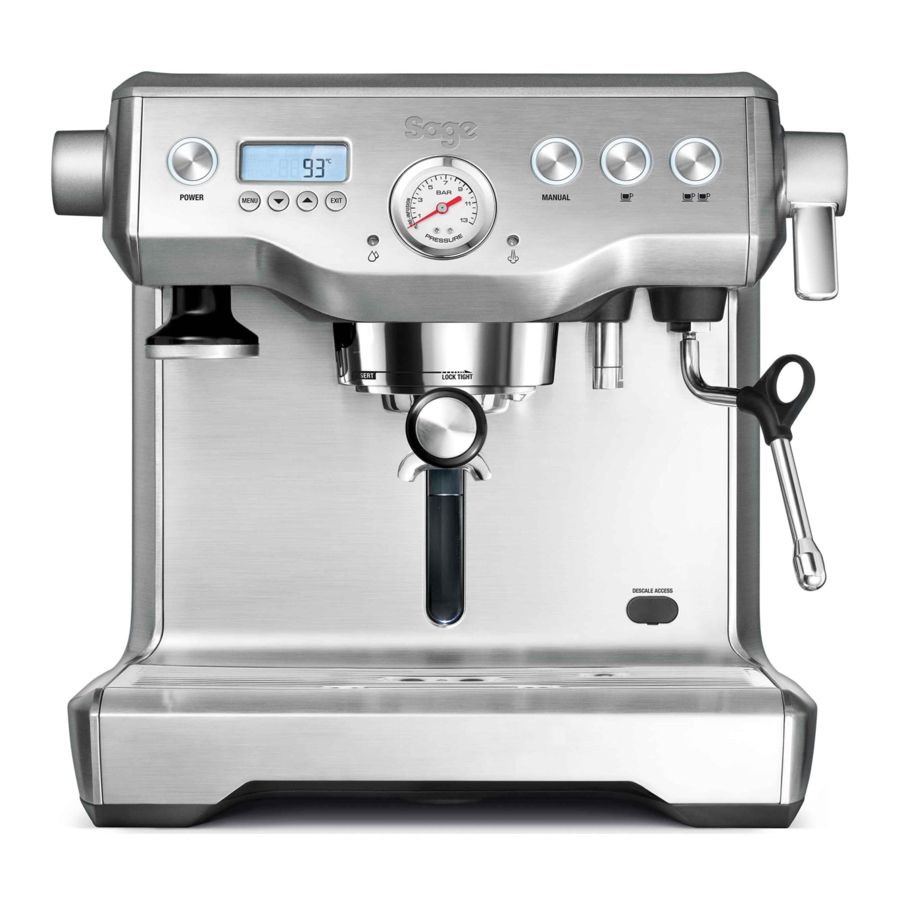
KNOW YOUR NEW APPLIANCE

- Top fill 2.5 litre removable water tank with integrated water filter and backlit level indicator.
- POWER button
- Backlit LCD interface displays current settings and simplifies programming functions.
- MENU access and DISPLAY mode buttons
- Espresso pressure gauge monitors extraction pressure.
- Integrated & removable 58mm tamper
- Actively heated 58mm group head with embedded element for thermal stability during extraction.
- 58mm full stainless steel portafilter
- Convection heated 6 cup warming tray
- Manual and programmable 1 & 2 cup volume controls
- Easy to operate steam lever for instant and continuous steam.
- Dedicated hot water outlet delivers instant hot water for long blacks & pre-heating cups.
- 360° swivel action steam wand with 3 hole tip for a silkier texture.
- De-scale access point
- Integrated tool storage tray
- Drop down swivel foot for easy manoeuvrability.
- Removable drip tray with Empty Me! indicator.
NOT SHOWN
15 bar Italian pump
Dual stainless steel boilers
Electronic PID temperature control
Over pressure valve
Low pressure pre-infusion
Power save mode powers down and switches machine off.
Safety thermal cut-out protection
ACCESSORIES

- Stainless steel frothing jug
- Single & dual wall filter baskets (1 & 2 cup)
- Water filter holder with filter
- Cleaning disc
- Allen key
- Cleaning tool
- Espresso cleaning tablets
- Water hardness test strip
- Razor precision dosing tool
LCD INTERFACE
Display Modes
- Shot Temp
- Shot Clock Timer
- Clock
Programmable Functions
- Shot Temp
- Shot Volume – 1 & 2 cup
- Pre-Infusion
- Auto Start
OPERATING YOUR NEW APPLIANCE

Both the STEAM LEVER and HOT WATER dial must be in the CLOSED position for the machine to enter START UP mode.
BEFORE FIRST USE
Machine Preparation
Remove and discard all labelling and packaging materials attached to your espresso machine. Ensure you have removed all parts and accessories before discarding the packaging.
Clean parts and accessories (water tank, portafilter, filter baskets, jug) using warm water and a gentle dish washing liquid and rinse well.
Conditioning the Water Filter
- Remove filter from the plastic bag and soak in a cup of water for 5 minutes.
- Rinse filter under cold running water.
- Wash the stainless steel mesh in the plastic filter compartment with cold water.
- Insert the filter into the filter holder.
- Set Date Dial 2 months ahead.
- To install filter, push down to lock into place.
- Slide the water tank into position and lock into place.
 NOTE
NOTE
To purchase water filters visit sageappliances.com.
FIRST USE
Initial Start Up
- Fill tank with cold tap water.
- Dip Water Hardness Test Strip into water tank for 1 second & set aside.
- Check Steam Lever and Hot Water dial are in the CLOSED position.
- Press POWER On.
- A pumping sound will be heard indicating empty boilers are being filled with water for the first time.
- Machine will prompt you to set water hardness. Refer for test strip for your water hardness. Use the Arrow UP or Arrow DOWN keys to select water hardness 1–5. Press Menu to set. Machine will beep to confirm selection.
- Machine will reach operating temperature and go into STANDBY mode.
Flushing The Machine
When the machine has reached STANDBY mode, run the following 3 steps:
- Press 2 Cup button to run water through group head.
- Run Hot Water for 30 seconds.
- Activate Steam for 10 seconds.
TIP
You can manoeuvre your machine about the bench using the drop down swivel foot located under the drip tray.
START UP
Press the POWER button to switch the machine ON. The POWER button will flash and the LCD screen will display the current espresso boiler temperature.
When the machine has reached operating temperature, the POWER button light will stop flashing and the MANUAL, 1 CUP and 2 CUP buttons will illuminate.

The machine is now in STANDBY mode ready for use.
NOTE
You will not be able to select 1 CUP, 2 CUP or CLEANING CYCLE during START UP.
AUTO OFF
The machine will turn off completely if not used for a continuous 20 minutes period.
LCD INTERFACE
Display modes
3 modes can be displayed on the LCD screen: Shot Temp, Shot Clock or Clock.
Press UP or DOWN arrow to change the display mode between shot clock & clock. Shot temp will be displayed during an extraction.
- Shot Temp
Displays selected extraction temperature (default set at 93°C), but can be changed from 86°C - 96°C. See 'Extraction Temperature'.
![]()
- Shot Clock
Temporarily displays duration of last espresso extraction in seconds.
![]()
- Clock
Temporarily displays current time (default set at 12.00am if time has not been set).
![]()


GENERAL OPERATION
1 CUP
Press 1 CUP once to extract a single shot of espresso at the pre-programmed duration (30secs). The extraction will start using the low pressure pre-infusion.

The machine will stop after 1 CUP volume has been extracted and will return to STANDBY mode.
2 CUP
Press 2 CUP button once to extract a double shot of espresso at the pre-programmed duration (30secs).
The extraction will start using the low pressure pre-infusion.

The machine will stop after 2 CUP volume has been extracted and will return to STANDBY mode.
MANUAL
The MANUAL button allows you to control the espresso pour volume to suit your preference.
Press MANUAL button once to start the espresso extraction. The extraction will start using the low pressure pre-infusion.
Press MANUAL button again to stop extraction.

NOTE
To stop an extraction at any time, press the 1 CUP, 2 CUP or MANUAL button and the machine will return to STANDBY mode.
STEAM
For instant steam, move STEAM LEVER to OPEN position. The Steam LED will be On.

To turn STEAM off, move STEAM LEVER to CLOSED position. The machine will return to STANDBY mode.

Pressurised steam can still be released, even after machine has been switched off.
Children must always be supervised.
HOT WATER
For instant hot water, rotate the HOT WATER dial to OPEN position. The Hot Water LED will be On.

To turn HOT WATER off, rotate the HOT WATER dial to CLOSED position.
The machine will return to STANDBY mode.
NOTE
You cannot run hot water and extract espresso at the same time.
LCD PROGRAMMING FUNCTIONS
To program the machine, press MENU button once. The LCD will display all programming functions. Continue to press MENU button to select your desired function.

At any stage during programming, press EXIT to return to STANDBY mode.
NOTE
The MENU button is disabled when the machine is extracting espresso or delivering hot water.
SHOT DURATION
1 CUP Duration Programming
Press MENU button until SHOT VOL icon flashes and 1 CUP is displayed on the LCD screen.
Press 1 CUP button to start water flow from the group head.
Press 1 CUP again once required extraction duration has been reached.
The machine will beep twice to indicate the new 1 CUP duration has been set.

2 CUP Duration Programming
Press MENU button until SHOT VOL icon flashes and 2 CUP is displayed on the LCD screen.
Press 2 CUP button to start water flow from the group head.
Press 2 CUP again once required extraction duration has been reached.
The machine will beep twice to indicate the new 2 CUP duration has been set.
NOTE
1 & 2 cup volumes use duration to control espresso volume as default setting. Access the Advanced Menu if you wish to use Volumetric controls for these volumes.
SHOT VOLUME
1 CUP Volume Programming
Press MENU button until SHOT VOL icon flashes and 1 CUP is displayed on the LCD screen.
Dose & tamp the portafilter with ground coffee. Press 1 CUP button to start espresso extraction. Press 1 CUP again once desired volume of espresso has been extracted.
The machine will beep twice to indicate the new 1 CUP volume has been set.

2 CUP Volume Programming
Press MENU button until SHOT VOL icon flashes and 2 CUP is displayed on the LCD screen.

Dose & tamp the portafilter with ground coffee. Press 2 CUP button to start espresso extraction. Press 2 CUP again once desired volume of espresso has been extracted.
The machine will beep twice to indicate the new 2 CUP volume has been set.
EXTRACTION TEMPERATURE
Press MENU button until SHOT TEMP icon flashes. The LCD will display the current shot temperature setting.

Press UP or DOWN arrow to adjust SHOT TEMP to the desired setting (range 86°C – 96°C).

The new SHOT TEMP setting will be displayed on the LCD screen.
The optimum temperature will depend on the origin of the coffee beans, their freshness and degree of roast.
We recommend a temperature range of between 90°C-95°C for optimal flavour.
Press EXIT button. Machine will beep once to confirm setting.
AUTO START
To use AUTO START, first ensure clock has been set.
NOTE
Clock must first be set prior to activating the auto start feature.
Auto Start ON/OFF
Press MENU button until AUTO START icon flashes and the current Auto Start setting (ON or OFF) is displayed on the LCD screen.

Press UP or DOWN arrow to set the AUTO START to ON or OFF.

If AUTO START is ON, the LCD will display a Clock icon.

Press MENU button and the current Auto Start time will be displayed on the LCD screen.

Press UP or DOWN arrow to adjust AUTO START to the desired time. (default AUTO START time set at 7:00am).
Press EXIT button. Machine will beep once to confirm setting.
SET CLOCK
Press MENU button until SET CLOCK icon flashes. The current Clock Time will be displayed on the LCD screen.

Press UP or DOWN arrow to adjust the time.

Press EXIT button. Machine will beep once to confirm setting.
CLEAN CYCLE
Press MENU button until CLEAN CYCLE icon flashes and PUSH is displayed on the LCD screen.
To start the CLEAN CYCLE press the illuminated MANUAL button.

The CLEAN CYCLE icon will flash and the machine will start to countdown from 370 seconds.

The machine will return to STANDBY when the cleaning cycle has ended.
ADVANCED ESPRESSO FUNCTIONS
Press & Hold - 1 CUP
Press & hold 1 CUP to bypass the pre-infusion phase and deliver water to the group head at the full 9 bar pressure. Release button to stop extraction. This function can be used when purging the group head.
Press & Hold - 2 CUP
Press & hold 2 CUP to bypass the pre-infusion phase and deliver water to the group head at the full 9 bar pressure. Release button to stop extraction. This function can be used when purging the group head.
Press & Hold - MANUAL
Press & hold the MANUAL button to deliver water to the group head at low pre-infusion pressure. When MANUAL button is released, water will continue at the full 9 bars of pressure. Press MANUAL button again to stop extraction.
This function can be used to manually control the pre-infusion duration.
ACCESS ADVANCED MENU
To access the Advanced Menu:
With machine OFF, press and hold the 1 CUP button, then press the POWER button.

Resetting default settings
The machine has the following default settings:
- Temperature – 93°C
- Pre-Infusion – Duration Pr07
- Pre-Infusion – Power PP60
- Steam temperature – 135°C
- Auto Start – OFF
- Audio – LO
- Water Hardness – 3
- Espresso Volume durations – 30/30 secs
To reset machine to original default settings, first enter Advanced Menu. rSEt will be displayed on the LCD. Press the MENU button to reset the machine to the default settings. The machine will beep 3 times to confirm.

The machine will then prompt you to set the water hardness. Select your water hardness using the UP & DOWN arrows & press MENU to confirm or press EXIT to return to STANDBY mode.

Temperature Unit - ˚C/˚F (SEt)

Temperature Unit will be displayed on the LCD screen as SEt. Press MENU to Select.
Use UP and DOWN arrows to select desired temperature unit. Press MENU to set.
Machine will beep once to confirm selection. Press EXIT to return to STANDBY mode.
Steam Temperature (StEA)

Adjust Steam Temperature to control the pressure of the steam being delivered. Lower steam temperature to texture smaller volumes of milk or have more control. Raise steam temperature to texture larger volumes of milk. Press MENU to Select STEAM. Use UP and DOWN arrows to select required steam temperature.
Press MENU to set.
Machine will beep once to confirm selection.
Machine Audio (Snd)

Machine Audio refers to the volume level of the 'beeps' heard.
- HI - high volume
- LO - low volume
- OFF - volume off
Press the MENU button to select Audio.
Press UP or DOWN arrows to select desired volume. Press MENU to set. Machine will beep once to confirm selection.
Volumetric Control (vOL)

Use this function to set Duration or Volume to control the espresso output.
Press the MENU button to select. Use the UP or DOWN arrows to select FLo or SEc. Press MENU to set. Machine will beep once to confirm selection.
ADVANCED FEATURES
Pre-Infusion Programming
With machine in STANDBY mode, press UP and DOWN arrows together to enter Pre-Infusion programming mode.
Press MENU button to move between Pre-infusion Duration and Power.
Pre-Infusion Duration
The LCD will display the current Pre-Infusion Duration.
Press UP or DOWN arrow to vary time.

We recommend a range of between 5 - 15secs as being optimum.
Pre-Infusion Power
The LCD will display current Pre-Infusion Power.
Press UP or DOWN arrows to vary power.

We recommend a range of between 55–65 as being optimum. Press EXIT to confirm setting and return to STANDBY mode.
ALERTS
STEAM LED Flashing At START UP
The machine will not enter START UP mode when the STEAM LEVER is in the OPEN position and the STEAM LED is flashing.
Move the STEAM LEVER to the CLOSED position for the machine to enter START UP mode.
HOT WATER LED Flashing At START UP
The machine will not enter START UP mode when the HOT WATER dial is in the OPEN position and the HOT WATER LED is flashing.
Move the HOT WATER dial to the CLOSED position for the machine to enter START UP mode.
HOT WATER LED Flashing
The HOT WATER LED will flash when the HOT WATER function has been operating for longer than 1 minute.
Move the HOT WATER dial to CLOSED position for machine to enter STANDBY mode.
FILL TANK
The machine will detect a low water level. The FILL TANK icon will be displayed on the LCD screen.

If FILL TANK icon is displayed, add water to tank until machine returns to STANDBY mode.
CLEAN ME!
The machine will detect when 200 extractions have been carried out since the last clean cycle.
The CLEAN ME! icon will be displayed on the LCD screen the next time the machine enters START UP mode.

For information on how to clean the machine, refer to the CLEAN CYCLE instructions.
COFFEE MAKING TIPS & PREPARATION
PRE-HEATING
Heating your cup or glass
A warm cup will help maintain the coffee's optimal temperature. Pre-heat your cup by rinsing with hot water from the Hot Water outlet and place on the cup warming tray.
Heating the portafilter and filter basket
A cold portafilter and filter basket can reduce the extraction temperature enough to significantly affect the quality of your espresso. Always ensure the portafilter and filter basket are pre-heated with hot water from the Hot Water outlet before initial use.
NOTE
Always wipe the filter basket dry before dosing with ground coffee as moisture can encourage channelling where water bypasses the ground coffee during extraction.
SELECTING FILTER BASKET
SINGLE WALL Filter Baskets
Use Single Wall filter baskets when grinding fresh whole coffee beans.
Single Wall filter baskets allow you to experiment with grind, dose and tamp to create a more balanced espresso.

- Use the 1 cup filter basket when brewing single cups and the 2 cup filter basket when brewing two cups, stronger single cups or mugs.
DUAL WALL Filter Baskets
Use Dual Wall filter baskets if using pre-ground coffee.
Dual Wall filter baskets regulate the pressure and help to optimise the extraction regardless of the grind, dose, tamp pressure or freshness.

- Use the 1 cup filter basket when brewing single cups and the 2 cup filter basket when brewing two cups, stronger single cups or mugs.
THE GRIND
When grinding coffee beans, the grind size should be fine but not too fine. The grind size will affect the rate at which the water flows through the ground coffee in the filter basket and the taste of the espresso.
If the grind is too fine (looks like powder and feels like flour when rubbed between fingers), the water will not flow through the coffee even when under pressure. The resulting espresso will be OVER EXTRACTED, dark in colour and bitter in flavour.
If the grind is too coarse the water will flow through the ground coffee in the filter basket too quickly. The resulting espresso will be UNDER EXTRACTED lacking in colour and flavour.
COFFEE DOSE AND TAMPING
- Wipe coffee basket with a dry cloth.
- Using Single Wall filter baskets, grind enough coffee to fill the coffee basket.
- Tap the portafilter several times to collapse and distribute the coffee evenly in the filter basket.
- Tamp down firmly (using approx. 15 – 20kgs of pressure). The amount of pressure is not as important as consistent pressure every time.

- As a guide to dose, the top edge of the metal cap on the tamper should be level with the top of the filter basket AFTER the coffee has been tamped.

TRIMMING THE DOSE
- Insert the Razor dosing tool into the coffee basket until the shoulders of the tool rest on the rim of the basket. The blade of the dosing tool should penetrate the surface of the tamped coffee.
- Rotate the Razor dosing tool back and forth while holding the portafilter on an angle over the knock box to trim off excess coffee grinds. Your coffee filter basket is now dosed with the correct amount of coffee.
![]()
- Wipe excess coffee from the rim of the filter basket to ensure a proper seal is achieved in the group head.

NOTE
If the extraction is too fast, make the grind finer & repeat above steps.
If the extraction is too slow, make the grind coarser and repeat above steps.
PURGING THE GROUP HEAD
- Before placing the portafilter into the group head, run a short flow of water through the group head by pressing and holding the 1 CUP button. This will purge any ground coffee residue from the group head and stabilise the temperature prior to extraction.
INSERTING THE PORTAFILTER
Place the portafilter underneath the group head so that the handle is aligned with the INSERT position. Insert the portafilter into the group head and rotate the handle towards the centre until resistance is felt.
EXTRACTING ESPRESSO
- Place pre-warmed cup(s) beneath the portafilter and press the 1 CUP or 2 CUP button for the required volume.
- As a guide, the espresso will start to flow after 8-10 seconds (infusion time) and should be the consistency of dripping honey.
- If the espresso starts to flow after less than 6 seconds you have either under dosed the filter basket and/or the grind is too coarse. This is an UNDER EXTRACTED shot.
- If the espresso starts to drip but doesn't flow after 15 seconds, the grind is too fine. This is an OVER EXTRACTED shot.
A great espresso is about achieving the perfect balance between sweetness, acidity and bitterness.
The flavour of your coffee will depend on many factors, such as the type of coffee beans, degree of roast, freshness, coarseness or fineness of the grind, dose of ground coffee and tamping pressure.
Experiment by adjusting these factors just one at a time to achieve the taste of your preference.
EXTRACTION GUIDE
| GRIND | SHOT TIME | |
| OVER EXTRACTED BITTER • ASTRINGENT | TOO FINE | OVER 40 SEC |
| BALANCED | OPTIMUM | 25-35 SEC |
| UNDER EXTRACTED UNDERDEVELOPED • SOUR | TOO COARSE | UNDER 20 SEC |
TEXTURING MILK
- Always start with fresh cold milk.
- Fill the jug just below the "V" at the bottom of the spout.
- Position the steam tip above the drip tray and lift the steam lever to purge the steam wand of any condensed water.
- Insert the steam tip 1-2cm below the surface of the milk close to the right hand side of the jug at the 3 o'clock position.
- Lift the steam lever.
- Keep the tip just under the surface of the milk until the milk is spinning clockwise, producing a vortex (whirlpool effect).
- With the milk spinning, slowly lower the jug. This will bring the steam tip to the surface of the milk & start to introduce air into the milk. You may have to gently break the surface of the milk with the tip to get the milk spinning fast enough.
- Keep the tip at or slightly below the surface, continuing to maintain the vortex. Texture the milk until sufficient volume is obtained.
- Lift the handle of the jug to lower the tip beneath the surface, but keep the vortex of milk spinning. The milk is at the correct temperature (60-65°C) when the jug is hot to touch.
- Move the steam lever to the CLOSED position BEFORE taking the tip out of the milk.
- Set the jug to one side, lift the steam lever to purge out any residual milk from the steam wand and wipe steam wand with a damp cloth.
- Tap the jug on the bench to collapse any bubbles.
- Swirl the jug to "polish" and re-integrate the texture.
- Pour milk directly into the espresso.
- The key is to work quickly, before the milk begins to separate and the crema dissipates.
HINTS & TIPS
- Always use freshly ground coffee for a superior flavour and body.
- Use freshly roasted coffee beans, with a roasted-on date and use within 2 weeks of roasted-on date.
- Store coffee beans in a cool, dark and dry container. Vacuum seal if possible.
- Buy coffee beans in small batches to reduce the storage time and store no more than one week's supply at any time.
- Grind beans immediately before brewing as ground coffee quickly loses its flavour and aroma.
CARE & CLEANING
CLEANING CYCLE
- CLEAN ME! will be displayed on LCD to indicate when a cleaning cycle is required (approx. 200 shots).
- Insert the supplied cleaning disc, followed by 1 cleaning tablet into the 1 CUP filter basket.
- Insert the portafilter and lock into group head.
- Ensure the water tank is filled with cold tap water.
- Ensure the drip tray is empty & inserted.
- Press MENU button until CLEAN CYCLE icon flashes and PUSH is displayed on the LCD screen
- To start the Clean Cycle press the illuminated MANUAL button.

- The CLEAN CYCLE icon will flash and the machine will start to countdown from 370 seconds.
- When the cleaning cycle has finished, remove the portafilter and ensure the tablet has completely dissolved. If the tablet has not dissolved, repeat the steps above, without inserting a new tablet.
- Rinse the filter basket and portafilter thoroughly before use.

INSTALLING WATER FILTERS
- Soak filter in a glass of water for 5 minutes.
- Rinse the filter and mesh under running water.
- Assemble filter into filter holder.
- Set replacement date forward 2 months.
- Install filter holder into water tank.
- Insert water tank into the machine.
Ensure the latch is locked into position. - Replacing the water filter after three months or 40L will reduce the need to descale the machine. The limitation of 40L is based on water hardness level 4. If you are in level 2 area, you can increase this to 60L.
NOTE
To purchase water filters visit sageappliances.com.
CLEANING THE STEAM WAND
- Wipe the steam wand with a damp cloth & purge directly after texturing the milk.
- If the any of the holes in the tip of the steam wand become blocked, ensure the STEAM LEVER is in the CLOSED position and clean using the pin on the end of the cleaning tool.
- If steam wand remains blocked, remove the tip using the integrated spanner in the cleaning tool and soak in hot water. Screw tip back onto the steam wand using the integrated spanner in the cleaning tool.
CLEANING THE FILTER BASKETS AND PORTAFILTER
- The filter baskets and portafilter should be rinsed under hot water directly after use to remove all residual coffee oils.
If the holes in the filter baskets become blocked, dissolve a cleaning tablet in hot water and soak filter basket and portafilter in solution for approx. 20 minutes. Rinse thoroughly.
CLEANING THE SHOWER SCREEN
- The group head interior and shower screen should be wiped with a damp cloth to remove any ground coffee particles.
- Periodically run hot water through the machine with the filter basket and portafilter in place, without ground coffee, to rinse out any residual coffee.
CLEAR WATER BACK-FLUSH
- Insert the cleaning disc into the 1 cup filter basket.
- Insert portafilter into the group head.
- Press the 1 CUP button to build pressure in the basket.
- Repeat several times to remove residual coffee oils in the espresso water paths.
CLEANING THE DRIP & STORAGE TRAY
- The drip tray should be removed, emptied and cleaned after each use or when the drip tray indicator is showing Empty Me!
- Remove grill from the drip tray.
Wash the drip tray in warm soapy water.
The Empty Me! indicator can also be removed from the drip tray. - The storage tray can be removed and cleaned with a soft, damp cloth (do not use abrasive cleansers, pads or cloths which can scratch the surface).
CLEANING THE OUTER HOUSING & CUP WARMING TRAY
- The outer housing and cup warming tray can be cleaned with a soft, damp cloth. Polish with a soft, dry cloth. Do not use abrasive cleaners, pads or cloths which can scratch the surface.
NOTE
Do not clean any of the parts or accessories in the dishwasher.
DESCALE (dESC)
NOTE
Even if you used the provided water filter, we recommend you to descale if there is scale build-up in the water tank.
Only descale via the descale menu.
- Prepare for Descale
- Empty the drip tray and insert into position.
- Turn the machine off and allow to cool for at least 4 hours. With the machine off, press and hold the 1 CUP button, then press and hold the POWER button together for 3 seconds. rSEt will appear on the LCD.

- Press UP or DOWN arrow to the 'dESC' then press MENU to confirm.
![]()
- Empty Boilers
- Remove the grey silicone cover on the lower front panel marked DESCALE ACCESS.

- Place a cloth over the drip tray to prevent steam escaping.

- Use a flat head screw driver to rotate the right valve counter-clockwise SLOWLY until fully open. As the valve opens, steam may be released.
- Remove the grey silicone cover on the lower front panel marked DESCALE ACCESS.


NOTE
If there's no water released into the drip tray, press and hold the 1 CUP button for 3 seconds. This will release water from the boiler.
When the water is completely empty, close the valve by rotating screws clock-wise until seated. Do not overtighten screws to avoid damages to the valves.

- Repeat the above process on the left valve.
- Empty the drip tray, use caution as the drip tray may be hot.
- Empty water tank, remove water filter.
- Dissolve 1 sachet of Sage Descaler™ into 1 litre of warm water. Pour solution into the water tank.
NOTE
If water tank has not been removed, replaced or is empty, "FILL TANK" will appear on the LCD.
- Begin Descale
- Press 1 Cup button and the LCD screen will show countdown time (20 minutes).

During this time, the machine will fill boilers with descale solution and heat to temperature. There may be some water flow through the group head during this time.
Allow the countdown timer to reach 0 as this allows solution sufficient time to dissolve scale build up. However you can proceed to the next step at any time by pressing the 1 Cup button. - Place a cloth over the drip tray to stop steam escaping.
- Empty boilers by repeating steps 2c and 2d.
- Empty drip tray and insert back to place.
- Empty water tank then rinse and fill with clean water to the MAX line. Lock water tank back into position.
- Press 1 Cup button and the LCD screen will show countdown time (20 minutes).
- Flush Boilers
- Press 1 Cup button and the LCD screen will show countdown time (20 minutes).

During this time, the machine will fill boilers with fresh clean water and heat to temperature. You can proceed to the next step at any time by pressing the 1 Cup button. - Place a cloth over the drip tray to stop steam escaping.
- Empty boilers by repeating steps 2c and 2d.
- Empty drip tray and insert back to place.
- Empty water tank then rinse and fill with clean water to the MAX line. Lock water tank back into position.
- Press 1 Cup button and the LCD screen will show countdown time (20 minutes).
- Repeat Step 4 Flush Boilers
We recommend flushing boilers again to ensure any residual descale solution is released from the boilers.
Press POWER button to escape the Descale mode. The descale process is now complete and ready to use.

TROUBLESHOOTING
| PROBLEM | POSSIBLE CAUSES | WHAT TO DO |
| The Hot Water LED flashes when the machine is turned On. |
| Turn the Hot Water dial to the CLOSED position. |
| The Steam LED flashes when the machine is turned On. |
| Move the Steam Lever to the CLOSED position. |
| Water does not flow from the group head. |
| Allow time for the machine to reach operating temperature. The POWER light will stop flashing when machine is ready. |
| Fill Tank. | |
| Push water tank in fully and close the latch. | |
| FILL TANK displayed on LCD, but water tank is full. |
| Push water tank in fully and close the latch. |
| No Steam or Hot Water. |
| Ensure the machine is plugged in, switched On at the power outlet and the POWER button is On. |
| No Hot Water. |
| Fill water tank. |
| No Steam. |
| Use the pin on the cleaning tool to clear the holes. If the steam wand continues to be blocked remove the tip of the steam wand using the spanner in the cleaning tool and soak in hot water. |
| The machine is 'On' but ceases to operate. | Turn machine Off. Wait for 60 minutes and turn machine back On. If problem persists please contact Sage Customer Service or go to sageappliances.com | |
| Steam pouring out of group head. | Turn machine Off. Wait for 60 minutes and turn machine back On. If problem persists please contact Sage Customer Service or go to sageappliances.com | |
| Espresso just drips from the portafilter spouts. |
| Use slightly coarser grind. |
| Lower dose of coffee using the RAZOR™ dosing tool. | |
| Use the fine pin on the provided cleaning tool to clear the outlet hole(s) on the underside of the filter basket. If it continues to be blocked, dissolve a cleaning tablet in hot water and soak filter basket and portafilter in the solution for approx. 20 minutes. Rinse thoroughly. | |
| Espresso runs out too quickly. |
| Use slightly finer grind. |
| and/or |
| Increase dose of coffee and use the RAZOR dosing tool to trim off excess coffee after tamping. |
| Pressure gauge not reaching 9 bar. |
| Tamp between 15-20kgs of pressure. |
| If the above suggestions do not help, check the machine. Place an EMPTY Dual Wall filter basket into the portafilter (either 1 CUP or 2 CUP). Press the MANUAL button. If the pressure gauge reads over 5 bar the machine is OK. Ensure correct dose by using the RAZOR dosing tool. If the dose is correct, make the grind finer. If the pressure gauge reads below 5 bar, contact Sage Customer Service Centre. | ||
| Coffee not hot enough. |
| Rinse cups under hot water outlet and place on cup warming tray. |
| Heat milk until side of the jug becomes hot to touch. | |
| No crema. |
| Buy freshly roasted coffee with a roasted-on date. |
| Ensure you use Dual Wall Filter Baskets with pre-ground coffee. | |
| Espresso runs out around the edge of the portafilter. |
| Ensure portafilter is rotated to the right until the handle is past the centre and is securely locked in place. Rotating past the centre will not damage the silicone seal. |
| and/or |
| Clean excess coffee from the rim of the filter basket to ensure a proper seal in group head. |
| Portafilter comes out of the group head during an extraction. |
| Always ensure filter basket and portafilter are dried thoroughly before filling with coffee, tamping and inserting into the group head. |
| Trim coffee dose using the RAZOR dosing tool after tamping. | |
| Unable to set auto start time. |
| Set clock. |
| E1, E2 or E3 error message on LCD screen. |
| Contact Sage Customer Service or go to sageappliances.com |
| Coffee puck is sticking to the shower screen. |
| |
| Pumps continue to operate / Steam is very wet / Hot water outlet leaks. |
| We recommend using cold, filtered water. We do not recommend using water with no/low mineral content such as de-mineralised or distilled water. If problem persists please contact Sage Customer Service or go to sageappliances.com |

Documents / Resources
References
Download manual
Here you can download full pdf version of manual, it may contain additional safety instructions, warranty information, FCC rules, etc.
Download Sage the Dual Boiler BES920 - Espresso Machine 2200W Manual
Advertisement


Need help?
Do you have a question about the the Dual Boiler BES920 and is the answer not in the manual?
Questions and answers