Sage the Bambino BES450 / SES450 - Semi-automatic Espresso Machine 1600W Manual
- Quick manual (176 pages) ,
- Quick manual (152 pages) ,
- Quick manual (24 pages)
Advertisement
- 1 Components
- 2 Device Features
- 3 Assembly
-
4
Functions
- 4.1 FIRST USE
- 4.2 STANDBY MODE
- 4.3 FILLLING THE WATER TANK
- 4.4 FILTER BASKETS
- 4.5 THE GRIND
- 4.6 COFFEE DOSE AND TAMPING
- 4.7 PURGING THE GROUP HEAD
- 4.8 INSERTING THE PORTAFILTER
- 4.9 EXTRACTING ESPRESSO
- 4.10 PRE-PROGRAMMED SHOT VOLUME
- 4.11 PROGRAMMING COFFEE VOLUME
- 4.12 MANUAL PRE-INFUSION AND SHOT VOLUME
- 4.13 MANUAL MILK TEXTURING
- 4.14 STEAM WAND MANUAL PURGE
- 4.15 STEAM WAND BLOCKED
- 4.16 HOT WATER OPERATON
- 4.17 EXTRACTION TIPS
-
5
Care & Cleaning
- 5.1 CLEAN & DESCALE CYCLE
- 5.2 TO PERFORM A CLEAN & DESCALE CYCLE
- 5.3 CLEANING THE STEAM WAND
- 5.4 GROUP HEAD RINSE
- 5.5 CLEANING THE FILTER BASKETS AND PORTAFILTER
- 5.6 CLEANING THE SHOWER SCREEN
- 5.7 CLEANING THE DRIP TRAY
- 5.8 CLEANING THE OUTER HOUSING
- 5.9 STORING YOUR MACHINE
- 5.10 RESET FACTORY ESPRESSO VOLUME SETTINGS
- 5.11 REPLACING THE WATER FILTER
- 6 Troubleshooting
- 7 Documents / Resources
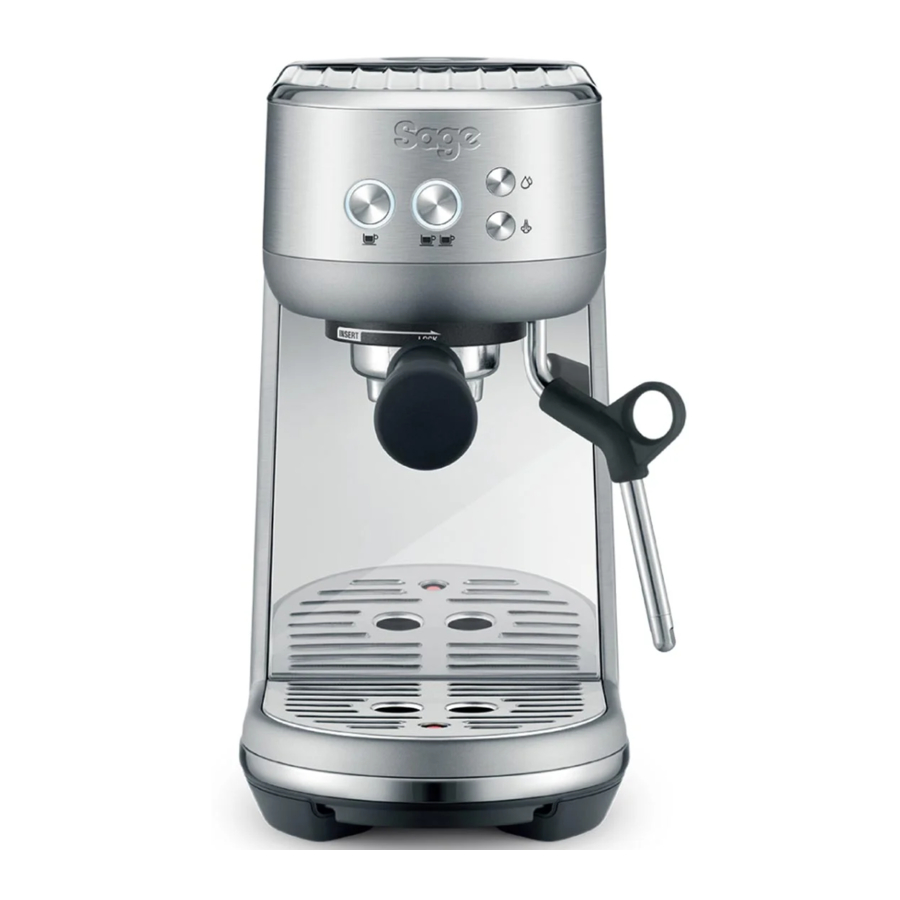
Components

- 1.4L (47 fl.oz) removable water tank
- Control panel
1 CUP, 2 CUP, hot water, steam buttons - Group head
- 54mm aluminum portafilter
![]()
NOT dishwasher safe - Steam wand grip
- Steam wand
- Removable drip tray grid
- Removable drip tray with full indicator
ACCESSORIES

- Stainless steel milk jug
- 54mm tamper
(Note: Do not submerge in water or any liquid) - Descaling Powder
- Steam tip and basket cleaning tool
(Located under the water tank) - Dual wall filter baskets (1 cup & 2 cup)
- Single wall filter baskets (1 cup & 2 cup)
- Water filter holder with filter
Rating Information
220–240V ~50–60Hz 1300–1600W
Device Features
COMPACT FOOTPRINT
Cafe quality coffee in a compact machine.
MANUAL MILK TEXTURING
Manually textures milk from silky smooth latté to creamy cappuccino.
THERMOJET TECHNOLOGY
Innovative heating system achieves ideal extraction temperature in 3 seconds.
PID TEMPERATURE CONTROL
Electronic PID temperature control for increased temperature stability.
LOW PRESSURE PRE-INFUSION
Applies low water pressure at the start of the extraction to gently expand grinds for an even extraction.
VOLUMETRIC CONTROL
Preset 1 & 2 cup volumes, manual over-ride or programmable shot volumes.
INSTANT HOT WATER
Hot water outlet via the steam wand for making long blacks and pre-heating cups.
Assembly
BEFORE FIRST USE
Machine Preparation
Remove and discard all labels and packaging materials attached to your machine. Ensure you have removed all parts and accessories before discarding the packaging.
Clean the drip tray, drip tray grid, portafilter, filter baskets using warm water and a gentle dish washing liquid. Rinse well and dry thoroughly before use.
INSTALLING THE WATER FILTER
- Remove the water filter and water filter holder from the packaging.
- Set the reminder for the next month of replacement. We recommend to replace the filter after 3 months.
- Soak the filter in cold water for 5 minutes.
![]()
- Wash the filter holder with cold water.
- Insert the filter into the two parts of the filter holder. Ensure they are connected.

- Remove the water tank from the machine. Align the base of the filter holder with the adapter inside the water tank. Push down to lock into place.


Functions
FIRST USE
- Remove the water tank and fill it with potable water to the indicated MAX line. Place the water tank back firmly onto the machine.
- Ensure that the drip tray is firmly placed on the machine.
- Place a 500ml container under the portafilter and steam wand for the water drips for this first cycle.
- Plug the power cord into the power outlet, and the 1 Cup button illuminates.

- Press the 1 Cup button to begin the first use cycle.

 NOTE
NOTE
The first use cycle is to rinse the machine and prime the heating system.
STANDBY MODE
To turn off the operation and enter standby mode, press the 1 Cup and Hot Water buttons for 0.5 second simultaneously.

NOTE
Unit will enter 'standby mode' when idle or no interaction from user after 10 minutes.
FILLLING THE WATER TANK
Lift the water tank from the machine. Remove the water tank lid and add potable water to the water tank, filling to the MAX marking indicated.

Replace the water tank onto the machine, press down ensuring it is properly attached and sitting flush against the back of the machine.
NOTE
Machine LED lights will flash 6 times for 3 seconds when no water is detected in the water tank.
FILTER BASKETS
This machine includes both single and dual wall 1 Cup and 2 Cup filter baskets.
Use the 1 cup filter basket when brewing a single cup and the 2 cup filter baskets when brewing 2 cups or a stronger single cup or mug.
Adjust the grind amount and size if switching from a single basket to a double basket, or vice versa.
The provided filter baskets are designed for:
1 Cup filter basket = 8-11g
2 Cup filter basket = 16-19g
SINGLE WALL FILTER BASKETS

Single Wall filter baskets should be used when grinding fresh whole coffee beans. These allows you to experiment with grind, dose and tamp to create a more balanced espresso.
DUAL WALL FILTER BASKETS

Dual Wall filter baskets should be used when using pre-ground coffee and older beans that are past the 30 day roast date. These regulate the pressure and helps to optimise the extraction regardless of the grind, dose and tamp pressure or freshness.
THE GRIND
When grinding coffee beans, the grind size should be fine but not too fine. The grind size will affect the rate at which the water flows through the ground coffee in the filter basket and the taste of the espresso.
If the grind is too fine (looks like powder and feels like flour when rubbed between the fingers), the water will not flow through the coffee even when under pressure. The resulting espresso will be OVER EXTRACTED, dark in colour and bitter in flavour.
If the grind is too coarse, the water will flow through the ground coffee in the filter basket too quickly. The resulting espresso will be UNDER EXTRACTED and lacking in colour and flavour.
COFFEE DOSE AND TAMPING
- Insert the filter basket into the portafilter.
- Grind enough coffee to fill the filter basket.
- Tap the portafilter several times to collapse and distribute the coffee evenly in the filter basket.
- Using the tamper, tamp down firmly (approx. 15-20kgs (30-40 lbs.) of pressure).
The amount of pressure is not as important as the consistent pressure every time.
![]()

As a guide, the top edge of the cap on the tamper should be level with the top of the filter basket AFTER the coffee has been tamped.
NOTE
We recommend quality 100% Arabica beans with a 'Roasted On' date stamped on the bag, not a 'Best Before' or 'Use By' date. Coffee beans are best consumed between 5–20 days after the 'Roasted On' date. Stale coffee may pour too quickly from the portafilter spouts and taste bitter and watery.
PURGING THE GROUP HEAD
Before placing the portafilter into the group head, run a short flow of water through the group head by pressing the 1 Cup or 2 Cup button. This will stabilize the temperature prior to extraction.
INSERTING THE PORTAFILTER
Place the portafilter underneath the group head so that the handle is aligned with the INSERT position. Insert the portafilter into the group head and rotate the handle towards the centre until resistance is felt.

Place your cup/s under the portafilter on the drip tray.
EXTRACTING ESPRESSO
As a guide the espresso will start to flow after 8–12 seconds (infusion time) and should be the consistency of dripping honey.
If the espresso starts to flow after less than 7 seconds, you have either under dosed the filter basket and /or the grind is too coarse. This is an UNDER EXTRACTED shot.
If the espresso starts to drip but doesn't flow after 12 seconds, the grind is too fine. This is an OVER EXTRACTED shot.
PRE-PROGRAMMED SHOT VOLUME
1 CUP
Press the 1 Cup button for less than 1 second, the button will flash indicating that it has been selected. A preset single espresso volume of approximately 30ml will be extracted. The machine will automatically stop once the pre-set volume has been extracted.

2 CUP
Press the 2 Cup button for less than a second, the button will flash indicating that it has been selected. A preset double espresso volume of approximately 60ml will be extracted. The machine will automatically stop once the pre-set volume has been extracted.

NOTE
Pressing the corresponding 1 Cup or 2 Cup button during the programmed espresso extraction will immediately stop the extraction.
PROGRAMMING COFFEE VOLUME
Press and hold the 1 Cup and 2 Cup buttons for 2 seconds, the buttons will illuminate and flash.

To set the 1 Cup volume:
- Press the 1 Cup button for about 3 seconds to start the extraction.
- Press the 1 Cup button again to stop the extraction. The modified volume will be saved.
To set the 2 Cup volume, follow the above steps and select the 2 Cup button to start and stop the extraction.
NOTES
- If no user input after 30 seconds. Machine returns to 'ready mode'
- The modified coffee volume will be saved into memory for the next use or when the machine is re-started.
- Pressing the steam or hot water button at any stage will cancel the operation and the machine will return to ready mode without saving any coffee volume program.
MANUAL PRE-INFUSION AND SHOT VOLUME
Press and hold the 1 Cup or 2 Cup button for more than a second. After one second the pump will start at pre-infusion pressure and continue while button is pressed. Release the button to start the extraction. Press any button again to stop the extraction.
MANUAL MILK TEXTURING
- Lift the steam wand and insert into the milk jug with the steam wand tip 1-2cm (O inch) below the surface of the milk, close to the right-hand side of the jug at a 3 o'clock position.
- Press the STEAM button to begin texturing
![]()
- Keep the steam wand tip just under the surface of the milk until the milk is spinning clockwise, producing a vortex (whirlpool effect).
- With the milk spinning, slowly lower the jug. This will bring the steam wand tip to the surface of the milk and start to introduce air into the milk.
- Gently break the surface of the milk with the tip to get the milk spinning fast enough.
- Keep the steam wand tip at or slightly below the surface, continuing to maintain the vortex. Texture the milk until sufficient volume is obtained.
- Lift the jug to lower the tip beneath the surface but keep the vortex spinning. The milk is at the correct temperature (60-65°C) when the jug is hot to touch.
![]()
- When texturing is close to acceptable desired result, press any button to stop texturing.
- After the steam is released completely, remove the steam wand from the milk jug.
- Wipe the wand and tip with a clean damp cloth.


STEAM WAND MANUAL PURGE
To reduce steam wand blockages, we recommend running steam through the steam wand after milk texturing. Lower and point steam wand directly on drip tray and away from users and press the steam button to run steam to rinse steam wand, or press and hold steam button for 3 seconds, to activate the steam wand purge. This will run short water pulses through the steam wand.
NOTE
Both 1 Cup and 2 Cup buttons will blink during the steam purge function.

After pressing steam button, the steam can't stop immediately, it needs a few seconds to completely stop steam.
STEAM WAND BLOCKED
Regularly check steam performance. If the steam wand is blocked, it will immediately stop operating. See 'Cleaning the Steam Wand' for further instructions.
HOT WATER OPERATON
Hot water through the steam wand
When machine is on 'ready mode', press hot water button, and hot water flow will start through the steam wand. Press any button to stop hot water flow.

Cup temperature is at 90°C (194°F). Be careful in handling hot beverages.
EXTRACTION TIPS
A great espresso is about achieving the perfect balance between sweetness, acidity, and bitterness. The flavour of your coffee will depend on many factors, such as the type of coffee beans, degree of roast freshness, coarseness or fineness of the grind, dose of ground coffee and tamping pressure. Experiment by adjusting these factors just one at a time to achieve the taste of your preference.
| CORRECT EXTRACTION | UNDER EXTRACTION | OVER EXTRACTION | |

| 
| 
| |
| AFTER EXTRACTION | SOLUTIONS | SOLUTIONS | |
| REMOVE USED GRINDS RINSE FILTER BASKET | EXPERIMENT WITH GRIND:
| EXPERIMENT WITH GRIND:
| |
| Adjust & re-test Tamp using 15–20kgs of pressure. The top edge of cap on the tamper should be level with the top of the lter basket AFTER tamping.  | Adjust & re-test Tamp using 15–20kgs of pressure. The top edge of cap on the tamper should be level with the top of the lter basket AFTER tamping.  | ||
| GRIND | GRIND DOSE | TAMP | |
| OVER EXTRACTED BITTER • ASTRINGENT | Too fine | Too much Decrease dose | Too heavy |
| BALANCED | Optimum | 8-11g (1 Cup) 16-19g (2 Cup) | 15-20kgs (30-40 lbs.) |
| UNDER EXTRACTED UNDERDEVELOPED • SOUR | Too coarse | Too little Increase dose | Too light |


Care & Cleaning
CLEAN & DESCALE CYCLE
The Bambino Espresso machine requires regular cleaning and descaling.
When this is due, the 2 Cup button will continuously flash, indicating the machine needs cleaning and descaling.

NOTE
Pressing any of buttons will cancel the alert and return the machine to ready mode.
It is NOT recommended to ignore the clean cycle warning because after regular use, hard water can cause mineral build-up in and on many of the inner functioning components, reducing the brewing flow, brewing temperature, power of the machine, and the taste of the espresso.
Do not immerse the power cord, power plug or appliance in water or any other liquid. The water tank should never be removed or completely emptied during descaling.
TO PERFORM A CLEAN & DESCALE CYCLE
- Empty the drip tray and re-insert firmly into position on the machine.
- Fill the water tank to the DESCALE line indicated and add the descaling agent to the water.

- Place a 2 Litre (68 fl.oz) container under the group head and steam wand.
![]()
- Press the 2 Cup and Steam buttons simultaneously for 5 seconds to start descaling.
![]()


NOTE
The 2-Cup button will flash throughout the cycle.
- Once the descale solution has been used up, the descale mode will pause.
- Rinse and refill the water tank to the MAX line and empty the waste water container, then replace both parts on to the machine to proceed onto the rinse cycle.
- Press the 2 Cup button to proceed rinse cycle.
- When the rinse cycle is complete, the machine will then go into ready mode.
- Remove and empty the waste water container. Rinse the drip tray and water tank and dry thoroughly before replacing them back onto the machine.


CLEANING THE STEAM WAND
- The steam wand should always be cleaned after texturing milk. Wipe the steam wand with a damp cloth.
- If any of the holes in the tip of the steam wand become blocked, it may reduce frothing performance. Manually purge the steam wand to try and clear the holes.
- If the steam flow is very small and steam wand is still blocked, unscrew the steam wand tip using the steam tip cleaning tool, then use the tool to unblock the holes; cleaning tool is located in the back of the machine, under the water tank.
![]()

Rinse the steam tip and wipe with a clean, dry cloth. Reassemble the steam wand by screwing the steam tip back on to the steam wand. Purge the steam wand after cleaning.

GROUP HEAD RINSE
- Press '2 Cup' button to flow freshwater flush cycle.
CLEANING THE FILTER BASKETS AND PORTAFILTER
- The filter baskets and portafilter should be rinsed under hot water directly after use to remove all residual coffee oils.
- If the holes in the filter baskets become blocked, use the steam wand cleaning tool to unblock the holes.
Do not put portafilter in dishwasher.
CLEANING THE SHOWER SCREEN
- The group head interior and shower screen should be wiped with a damp cloth to remove any ground coffee particles.
- Periodically run hot water through the machine with the filter basket and portafilter in place, without any ground coffee, to rinse out any residual coffee.
CLEANING THE DRIP TRAY
The drip tray should be removed, emptied and cleaned after each use or when the drip tray indicator rises through the drip tray grid.
Remove the drip tray grid and wash both parts in warm soapy water.
CLEANING THE OUTER HOUSING
- Wipe the outer housing with a soft, damp cloth and then polish with a soft, dry cloth.
NOTE
Do not use any abrasive cleaners, pads or cloths which can scratch the surfaces of the machine.
NOTE
Do not clean any of the parts or accessories in the dishwasher.
Do not immerse the power cord, power plug, plastic tamp or machine in water or any other liquid.
STORING YOUR MACHINE
Before storing, turn the machine off, switch off and remove the power plug from the power outlet. Empty the water tank and drip tray and ensure the machine is cool, clean and dry. Store in an upright position. Do not place anything on top of the machine.
RESET FACTORY ESPRESSO VOLUME SETTINGS
- When machine is on standby mode
- Press and hold the 1 Cup and 2 Cup buttons for 10 seconds to enter Factory reset mode.
- The lights will flash 3 times to indicate that all volumes have been reset.
- Machine will then return to ready mode.
NOTE
When machine is turned on after reset, it enters directly to ready mode.
REPLACING THE WATER FILTER
The provided water filter helps prevent scale build-up in and on many of the inner functioning components. Replacing the water filter after 3 months or 40L will reduce the need to descale the machine.

Troubleshooting
| PROBLEM | POSSIBLE CAUSES | EASY SOLUTION |
| Water does not flow from the group head. No hot water. |
|
|
|
| |
|
| |
| Espresso only drips from the portafilter spouts or not at all. |
|
|
|
| |
|
| |
|
| |
|
| |
|
| |
|
| |
| Espresso runs out too quickly |
|
|
|
| |
|
| |
| Espresso runs out around the edge of the portafilter. |
|
|
|
| |
|
| |
| Small steam. |
|
|
|
| |
|
| |
|
| |
|
| |
| Pulsing/pumping sound while extracting espresso or steaming milk. |
|
|
|
| |
| Coffee not hot enough. |
|
|
| No crema. |
|
|
|
| |
|
| |
|
| |
| Water leaking |
|
|
| Water doesn't come through (the machine makes a loud noise). |
|
|
|
| |
| Machine is on but ceases to operate. |
|
|
| 2-cup coffee button flashing |
|
|
| Too much/too little espresso is being delivered to the cup. |
|
|

Documents / ResourcesDownload manual
Here you can download full pdf version of manual, it may contain additional safety instructions, warranty information, FCC rules, etc.
Download Sage the Bambino BES450 / SES450 - Semi-automatic Espresso Machine 1600W Manual
Advertisement


Need help?
Do you have a question about the the Bambino BES450 and is the answer not in the manual?
Questions and answers