Sage Dual Boiler BES920 Quick Manual
Hide thumbs
Also See for Dual Boiler BES920:
- User manual ,
- Quick manual (216 pages) ,
- Instruction booklet (34 pages)

Related Manuals for Sage Dual Boiler BES920


Summary of Contents for Sage Dual Boiler BES920
- Page 1 Dual Boiler ™ BES920/SES920 QUICK GUIDE KURZANLEITUNG GUIDE RAPIDE SNELSTARTGIDS GUIDA RAPIDA GUÍA RÁPIDA MANUAL RÁPIDO...
-
Page 2: Table Of Contents
® Know Your New Appliance RECOMMENDS Operating Your New Appliance SAFETY FIRST 18 Care & Cleaning 21 Troubleshooting At Sage we are very safety ® 24 Guarantee conscious. We design and manufacture appliances with your safety foremost in mind. We also ask that you... - Page 3 Do not use the the appliance and return the appliance for anything other entire appliance to the nearest than its intended purpose. authorised Sage Service Do not use in moving vehicles Centre for examination, or boats. Do not use outdoors. replacement or repair.
- Page 4 • Do not move the appliance whilst remote-control system. in operation. • The use of attachments not • Do not use any other sold or recommended by Sage liquid apart from cold mains/town may cause fire, electric shock water. We do not recommend or injury.
- Page 5 PAGE HEADER..WE RECOMMEND SAFETY FIRST NOTICE TO CUSTOMERS SPECIFIC INSTRUCTIONS FOR WATER FILTER REGARDING MEMORY STORAGE • Filter cartridge should be kept out of reach of children. Please note that in order to better • Store filter cartridges in a dry serve our customers, internal place in the original packaging.
-
Page 6: Know Your New Appliance
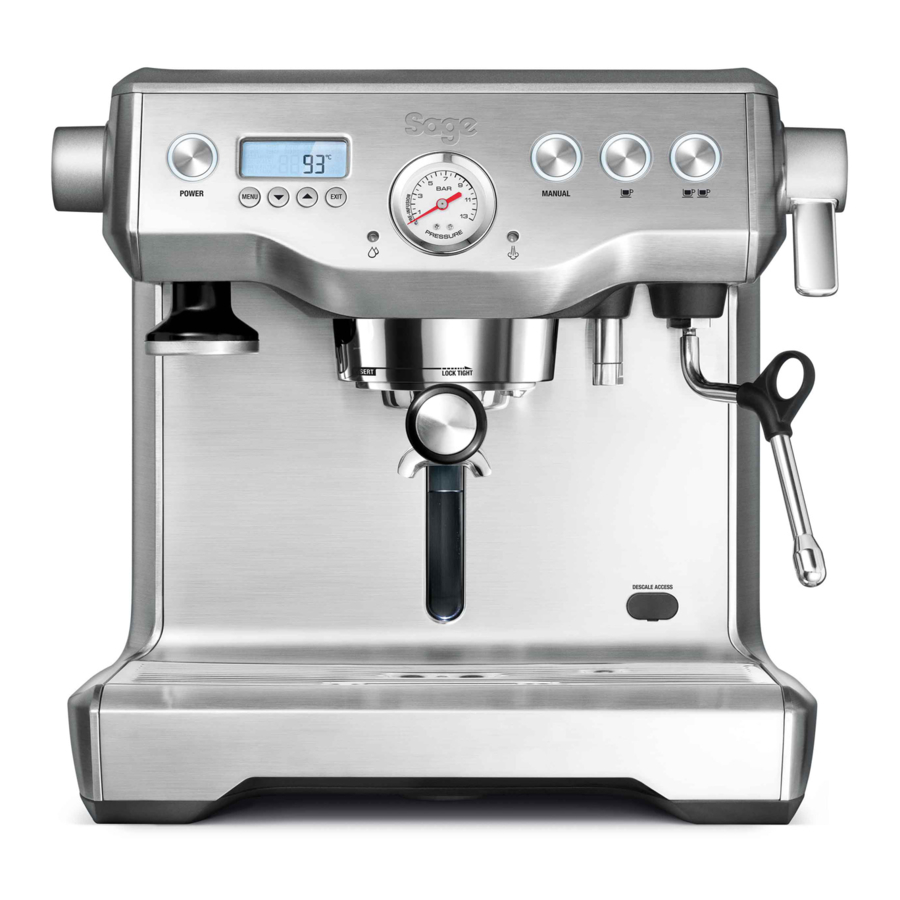
KNOW YOUR NEW APPLIANCE A. Top fill 2.5 litre removable water tank M. 360° swivel action steam wand with 3 hole tip B. POWER button N. De-scale access point C. Backlit LCD interface O. Integrated tool storage tray D. MENU access and DISPLAY mode buttons P. - Page 7 KNOW YOUR NEW APPLIANCE Single Wall Dual Wall ACCESSORIES LCD INTERFACE R. Stainless steel frothing jug • Display Modes S. Single & dual wall filter baskets • Shot Temp (1 & 2 cup) • Shot Clock Timer T. Water filter holder with filter •...
-
Page 8: Operating Your New Appliance
PAGE HEADER..OPERATING YOUR NEW APPLIANCE Flushing The Machine WARNING When the machine has reached STANDBY mode, run the following 3 steps: Both the STEAM LEVER and HOT WATER dial must be in the 1. Press 2 Cup button to run water CLOSED position for the machine through group head. - Page 9 PAGE HEADER..OPERATING YOUR NEW APPLIANCE LCD INTERFACE SELECTING FILTER BASKET Display modes SINGLE WALL Filter Baskets 3 modes can be displayed on the LCD screen: Use Single Wall filter baskets when grinding fresh Shot Temp, Shot Clock or Clock. whole coffee beans.
- Page 10 PAGE HEADER..OPERATING YOUR NEW APPLIANCE GENERAL OPERATION 1 CUP Press 1 CUP once to extract a single shot of espresso at the pre-programmed duration (30secs). The extraction will start using the low pressure pre-infusion. • As a guide to dose, the top edge of the metal cap on the tamper should be level with the top of the filter basket AFTER the coffee has been tamped.
- Page 11 PAGE HEADER..OPERATING YOUR NEW APPLIANCE EXTRACTION GUIDE HOT WATER For instant hot water, rotate the GRIND SHOT TIME HOT WATER dial to OPEN position. OVER EXTRACTED The Hot Water LED will be On. TOO FINE OVER 40 SEC BITTER • ASTRINGENT BALANCED OPTIMUM 25-35 SEC...
- Page 12 PAGE HEADER..OPERATING YOUR NEW APPLIANCE SHOT DURATION SHOT VOLUME 1 CUP Volume Programming 1 CUP Duration Programming Press MENU button until SHOT VOL icon Press MENU button until SHOT VOL flashes and 1 CUP is displayed on icon flashes and 1 CUP is displayed on the LCD screen.
- Page 13 PAGE HEADER..OPERATING YOUR NEW APPLIANCE EXTRACTION TEMPERATURE AUTO START Press MENU button until SHOT TEMP To use AUTO START, first ensure clock icon flashes. The LCD will display the current has been set. shot temperature setting. Auto Start ON/OFF Press MENU button until AUTO START icon flashes and the current Auto Start setting (ON or OFF) is displayed on the LCD screen.
- Page 14 PAGE HEADER..OPERATING YOUR NEW APPLIANCE Press MENU button and the current Auto Start time will be displayed on the LCD screen. Press EXIT button. CLEAN CYCLE Press UP or DOWN arrow to adjust Press MENU button until CLEAN CYCLE icon flashes and PUSH is displayed on the AUTO START to the desired time LCD screen.
- Page 15 PAGE HEADER..OPERATING YOUR NEW APPLIANCE ADVANCED ESPRESSO Resetting default settings FUNCTIONS The machine has the following default settings: Press & Hold - 1 CUP Temperature – 93°C Press & hold 1 CUP to bypass the pre-infusion 2. Pre-Infusion – Duration Pr07 phase and deliver water to the group head at 3.
- Page 16 PAGE HEADER..OPERATING YOUR NEW APPLIANCE Temperature Unit will be displayed on the LCD Machine Audio refers to the volume level screen as SEt. Press MENU to Select. of the ‘beeps’ heard. Use UP and DOWN arrows to select desired •...
- Page 17 PAGE HEADER..OPERATING YOUR NEW APPLIANCE ALERTS Pre-Infusion Programming With machine in STANDBY mode, press STEAM LED Flashing At START UP UP and DOWN arrows together to enter The machine will not enter START UP mode Pre-Infusion programming mode. when the STEAM LEVER is in the OPEN Press MENU button to move between position and the STEAM LED is flashing.
-
Page 18: Care & Cleaning
LCD to indicate when a cleaning cycle is required (approx. 200 shots). NOTE • Insert the supplied cleaning disc, followed by To purchase water filters visit Sage ® 1 cleaning tablet into the 1 CUP filter basket. webpage. • Insert the portafilter and lock into group head. - Page 19 PAGE HEADER..CARE & CLEANING CLEANING THE SHOWER SCREEN DESCALE (dESC) • The group head interior and shower screen NOTE should be wiped with a damp cloth to remove Even if you used the provided water filter, any ground coffee particles. we recommend you to descale if there is •...
- Page 20 Place a cloth over the drip tray to stop may be hot. steam escaping. Empty water tank, remove water filter. c) Empty boilers by repeating steps g) Dissolve 1 sachet of Sage Descaler™ into ® 2c and 2d. 1 litre of warm water. Pour solution into the d) Empty drip tray and insert back to place.
-
Page 21: Troubleshooting
The machine is ‘On’ Turn machine Off. Wait for 60 minutes but ceases to operate. and turn machine back On. If problem persists, call Sage ® Customer Service UK. Steam pouring out of Turn machine Off. Wait for 60 minutes group head. - Page 22 OK. Ensure correct dose by using the RAZOR™ dosing tool. If the dose is correct, make the grind finer. If the pressure gauge reads below 5 bar, contact Sage Customer ® Service Centre. Coffee not hot enough.
- Page 23 Unable to set auto • Clock not set. Set clock. start time. E1, E2 or E3 error • An error that cannot Contact Sage Customer ® message on LCD be reset by the user Service Centre UK. screen.
-
Page 24: Guarantee
During this guarantee period Sage Appliances will repair, replace, or refund any defective product (at the sole discretion of Sage Appliances). All legal warranty rights under applicable national legislation will be respected and will not be impaired by our guarantee. - Page 25 Smart Grinder ™ BCG820/SCG820 QUICK GUIDE KURZANLEITUNG GUIDE RAPIDE SNELSTARTGIDS GUIDA RAPIDA GUÍA RÁPIDA MANUAL RÁPIDO...
-
Page 26: Safety First
CONTENTS • Before using the first time 2 Sage Recommend Safety First ® ensure your electricity supply 5 Getting To Know Your New Appliance is the same as shown on 6 Operating Your New Appliance the label on the underside of 11 Care, Cleaning &... - Page 27 If damaged and maintenance • Do not move the appliance other than cleaning is whilst in operation. required please contact Sage • Do not touch hot surfaces. Customer Service or go to Allow the appliance to cool sageappliances.com down before moving or •...
- Page 28 WE RECOMMEND SAFETY FIRST The symbol shown indicates that this appliance should not be disposed of in normal household waste. It should be taken to a local authority waste collection centre designated for this purpose or to a dealer providing this service. For more information, please contact your local council office.
-
Page 29: Getting To Know Your New Appliance
GETTING TO KNOW YOUR NEW APPLIANCE A. Bean Hopper Lid B. Bean Hopper C. Hardened Stainless Steel Conical Burrs D. Backlit LCD Screen E. GRIND AMOUNT / PROGRAM Dial SHOTS / CUPS Button G. Grind Outlet H. Grind Tray Grind Size Dial J. -
Page 30: Operating Your New Appliance
220–240V outlet and switch Power ‘ON’. ENERGY SAVING FEATURE The grinder will automatically switch off if not used after 5 minutes. STEP 1: ASSEMBLING YOUR SAGE SMART Insert the appropriate portafilter cradle size. Insert GRINDER ™ your portafilter into the cradle. - Page 31 OPERATING YOUR NEW APPLIANCE STEP 2: NOTE Selecting your SHOTS / CUPS If the Grind Size Dial is tight, run the grinder by pressing the START / PAUSE / CANCEL Select the desired amount of ground coffee button while turning the Grind Size Dial. This required by pressing the SHOTS / CUPS button.
- Page 32 10 seconds. • Press again within this time to resume grinding the remaining dose. SHOTS CUPS START PAUSE CANCEL FEATURES OF YOUR SAGE GRIND AMOUNT SHOTS CUPS START PAUSE SMART GRINDER™ PRO Automatic Grinding PROGRAM...
- Page 33 OPERATING YOUR NEW APPLIANCE ADJUSTING YOUR GRIND AMOUNT Program Function Once you have set your required dose, Increasing the Grind Amount you can program this time into the number To increase the grind amount selected, turn the of shot(s) currently displayed on the LCD. GRIND AMOUNT dial to the right.
- Page 34 OPERATING YOUR NEW APPLIANCE ADJUSTING CONICAL BURRS Some types of coffee may require a wider grind range to achieve an ideal extraction or brew. A feature of your Smart Grinder™ Pro is the ability to extend this range with an adjustable upper burr. We recommend making only one adjustment at a time.
-
Page 35: Care, Cleaning & Storage
CARE, CLEANING & STORAGE CARE, CLEANING & STORAGE NOTE 1. Empty beans from the hopper Do not use alkaline or abrasive cleaning and grind out any excess beans agents, steel wool or scouring pads, as (see below). these can damage the surface. 2. -
Page 36: Troubleshooting
TROUBLESHOOTING PROBLEM POSSIBLE CAUSE WHAT TO DO Grinder does • Grinder not plugged in. • Plug power cord into power outlet. not start after • Grinder has overheated. • Remove power plug from power outlet. pressing START / Leave for 20 minutes to cool down •... -
Page 37: Guarantee
2 years from the date of purchase against defects caused by faulty workmanship and materials. During this guarantee period Sage Appliances will repair, replace, or refund any defective product (at the sole discretion of Sage Appliances). - Page 38 BRG Appliances Limited Unit 3.2, Power Road Studios, 114 Power Road, London, W4 5PY UK Landline: 0808 178 1650 Mobile (National Rate): 0333 0142 970 www.sageappliances.com Registered in England & Wales No. 8223512 Registered in Germany No. HRB 81309 (AG Düsseldorf) Registered in France No.
Need help?
Do you have a question about the Dual Boiler BES920 and is the answer not in the manual?
Questions and answers