Sage Duo-Temp Pro BES810 / SES810 Manual
- Quick manual (32 pages) ,
- Quick manual (120 pages) ,
- Quick manual (16 pages)
Advertisement
- 1 GETTING TO KNOW YOUR NEW APPLIANCE
- 2 OPERATING YOUR NEW APPLIANCE
-
3
CARE & CLEANING
- 3.1 Coffee does not run through
- 3.2 Coffee runs out too quickly
- 3.3 Coffee is too cold
- 3.4 No crema
- 3.5 Coffee runs out around the edge of the portafilter
- 3.6 Coffee drips from the portafilter spouts
- 3.7 Machine is making a loud and continuous pumping noise
- 3.8 No steam is generated
- 3.9 No hot water
- 3.10 Milk is not smooth after texturing
- 3.11 Machine is not working
- 4 SAGE RECOMMENDS SAFETY FIRST
- 5 Documents / Resources
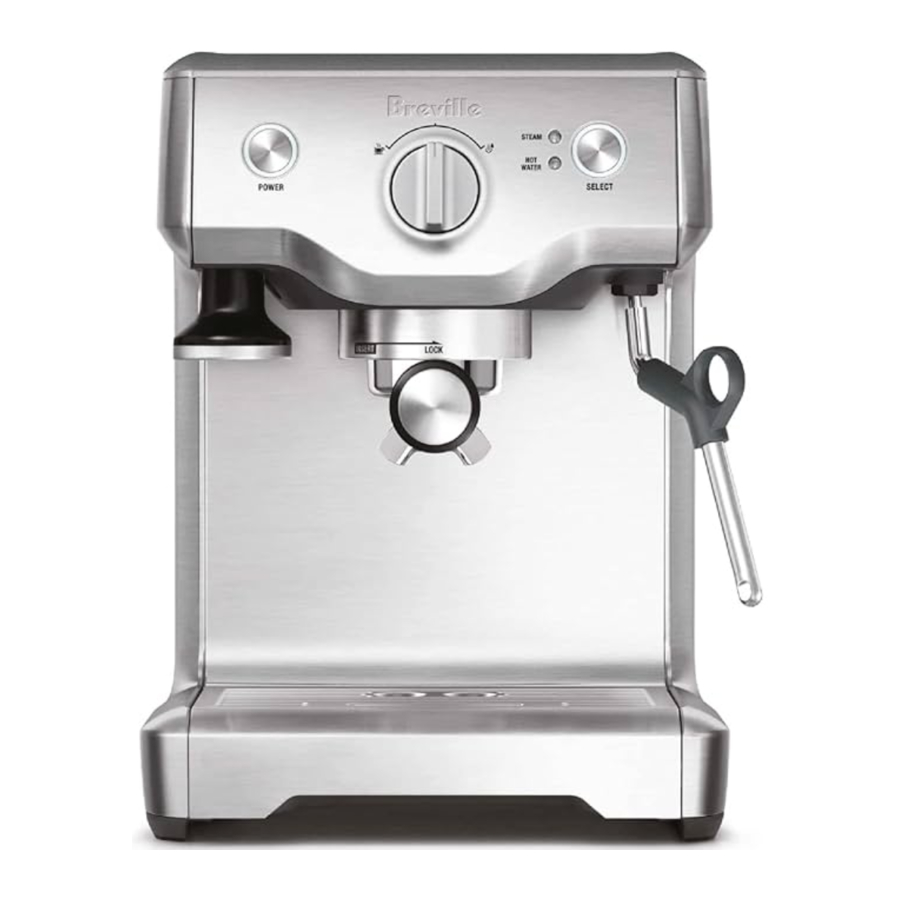
GETTING TO KNOW YOUR NEW APPLIANCE

- POWER button
- Integrated removable tamper
- Group head
- 54mm stainless steel portafilter
- Drip tray full indicator
- Removable drip tray
- Cup warming tray
- SELECT button for steam or hot water
- Control Dial for espresso, steam and hot water
- Swivel steam wand
NOT SHOWN
- Storage tray located behind the drip tray for storage of accessories
CUSTOM DESIGNED ACCESSORIES
- Razor™ Precision Dose Trimming Tool
- Single wall filter baskets for freshly ground coffee
- Advanced dual wall filter baskets for pre-ground coffee
- Water filter
- Stainless steel milk jug
CLEANING ACCESSORIES
- Cleaning tool
- Silicon cleaning disk
- Cleaning tablets
OPERATING YOUR NEW APPLIANCE
BEFORE FIRST USE
Conditioning the Water Filter
- Remove filter from the plastic bag and soak in a cup of water for 5 minutes.
- Rinse filter under cold running water.
- Wash the stainless steel mesh in the plastic filter compartment with cold water. Insert the filter into the filter holder.

- Set the dial date 3 months ahead.
- To install filter, push down to lock into place.
- Slide the water tank into position and lock into place.

NOTE
Do not clean any of the parts or accessories in the dishwasher.
FIRST USE
Initial Start Up
- Fill tank with water.
- Press POWER button.
- The machine will reach operating temperature and go into 'Standby' mode.
Flushing the Machine
It is recommended to complete a water flushing operation, without ground coffee, to ensure the machine has been conditioned.
When the machine has reached 'Standby' mode, run the following 2 steps.
- Turn the Control Dial to the 'Espresso' position for 30 seconds.
- Turn the Control Dial to the 'Steam' position to activate steam for 10 seconds.
- Repeat this cycle several times.
FILLING THE WATER TANK
- Fill the water tank with cold tap water to the maximum mark on the side of the tank and slide the water tank back into position at the back of the machine.
- Plug the power cord into power outlet and switch On at power point.
- Press the POWER button. The POWER button surround will flash while the machine is heating. When the correct temperature has been reached, all the button surrounds on the control panel will illuminate.
SELECTING THE FILTER BASKET
Single Wall Filter Baskets
The Single Wall filters (1 & 2 CUP) are designed to be used with freshly ground coffee and allow you to experiment with grind, dose, and tamp to create a more balanced espresso.

Dual Wall Filter Baskets
The Dual Wall filters (1 & 2 CUP) are designed to be used with pre-ground coffee and regulate the pressure to help optimise extraction and crema regardless of the grind, dose or tamp pressure.

COFFEE PREPARATION
Dosing & Tamping the Ground Coffee
Insert the correct Filter Basket into the portafilter. Fill the Filter Basket with ground coffee, tap down to collapse the coffee, then using the integrated tamper, tamp down firmly.
It's important to apply consistent pressure every time.
- As a guide to dose, the top edge of the metal cap on the tamper should be level with the top of the filter basket AFTER the coffee has been tamped.

- Wipe excess coffee from the rim of the filter basket to ensure a proper seal in the group head is achieved.

TRIMMING THE DOSE
The Razor™ precision dose trimming tool allows you to trim the puck to the right level for a consistent extraction.

The Razor™ precision dose trimming tool allows you to trim the puck to the right level for a consistent extraction.
Dose the Portafilter with freshly ground coffee and tamp down with between 15-20kg of pressure.

Insert the Razor™ into the coffee basket until its shoulders rest on the rim of the filter basket.
Rotate the Razor™ dosing tool back and forth while holding the portafilter on an angle over the knock box to trim off excess coffee.
EXTRACTING ESPRESSO
Insert the Portafilter into the Group Head & lock into position. Turn the Control Dial to the 'Espresso' position. After a few seconds, coffee will begin to brew into the cup.
When sufficient coffee has flowed into the cup, turn the Control Dial to 'Standby'. Sage® recommends approx. 30 sec of extraction.

The metal parts of the portafilter will be very hot.

EXTRACTION GUIDE
| GRIND | DOSE | TAMP | SHOT TIME | |
OVER EXTRACTED BITTER
| TOO FINE | TOO MUCH USE RAZOR TO TRIM | 15-20KG | OVER 40 SEC |
| BALANCED | OPTIMUM | 8-11g (1 CUP) 16-19g (2 CUP) | 15-20KG | 25-35 SEC |
UNDER EXTRACTED UNDERDEVELOPED
| TOO COARSE | TOO LITTLE INCREASE DOSE & USE RAZOR TO TRIM | 15-20KG | UNDER 20 SEC |
TEXTURING MILK
- Before inserting the steam wand into the milk, it is recommended to purge the steam wand.
- Set the Control Dial to the 'Steam' position.
![]()
- The 'Steam' LED will illuminate.
- Pause the steam by returning the dial back to the 'Standby' position.
- Insert the steam tip below the surface close to the right hand side of the jug at the 3 o'clock position and set the Control Dial to the 'Steam' position.
- Keep the tip just under the surface until the milk is spinning clockwise, producing a vortex (whirlpool effect).

- With the milk spinning, slowly lower the jug, keeping the tip at or slightly below the surface, until the desired temperature is reached.
- To stop the steam set the Control Dial to the 'Standby' position and remove the jug.
![]()
- Wipe the steam wand with a damp cloth.


HOT WATER
To use the Hot Water function:
- Press the 'SELECT' button and the Hot Water LED will illuminate.
- Turn the Control Dial to 'Steam'.
To turn the hot water off, turn the Control Dial to the 'Standby' position.
CARE & CLEANING
INSTALLING / REPLACING THE FILTER IN THE WATER TANK
- Set current month
![]()
- Remove filter from bag and soak for 5min
![]()
- Assemble water filter parts
![]()
- Ensure parts are connected
![]()
- Install filter in tank
![]()
- Install water tank
![]()


 Replace filter after 90 days or after 40L

The water filter provided helps to prevent scale build up which over time can affect the performance of your machine, potentially causing blockages and heating problems.
Replacing the water filter every three months will reduce the mineral build up in the machine.
If you live in a hard water area, we recommend you change the water filter more frequently.
PORTAFILTER CLEANING
Periodically run water through the machine with the portafilter in place, but without any ground coffee, to rinse out any residual coffee particles.
MACHINE CLEANING
After regular use, residual grinds and oil build up in the machine can affect coffee extraction. We recommend performing a cleaning cycle every 2-3 months using the cleaning tablet provided.
To perform a cleaning cycle:
- Insert the silicon disk into the portafilter.
- Place the cleaning tablet on the silicon disk (position in the centre).
- Insert the portafilter into the group head and rotate to right to lock in position.
- Ensure Power On / Off button is on.
- Turn the dial to the 'Espresso' position for 20 seconds.
- Turn the dial back to the 'Standby' position.
- Repeat steps 5-6 three times or until the cleaning tablet is dissolved.
DESCALING
Even if you are correctly using the water filter provided, we recommend you to descale when you see scale build-up in the water tank. Visit Sage® webpage to purchase "the Descaler".
- Ensure the Control Dial is in the 'Standby' position, the machine is switched off.
- Remove the filter holder.
- Empty one sachet (25g) into 1 litre of warm water, stir to dissolve. Pour solution into the water tank.
- Press the POWER button to switch the machine on.
- Place a large container under both the Group Head and the Steam Wand.
- Set the Control Dial to the 'Espresso' position and let half the descale solution run through the Group Head.
- Set the Control Dial to the 'Steam' position and allow the remaining solution to run through the Steam Wand. When the liquid stops flowing, set the Control Dial back to the 'Standby' position.
- After descaling, remove the water tank and rinse thoroughly then refill with fresh cold water. To rinse the machine, repeat steps 5-8.
AUTO OFF MODE
The machine automatically switches to AUTO OFF mode after 20 minutes.
CLEANING THE STEAM WAND
- Run steam to clear milk from wand after texturing
![]()
- Wipe steam wand after each use
![]()
- Clean hole with pin
![]()
- Remove tip
![]()
- Soak tip overnight then re-attach
![]()


CLEANING FILTER BASKETS
Should the fine holes in the filters become blocked follow the steps below:
- Place the filter into the portafilter. Run water through the machine with the filter and portafilter, without any ground coffee, in place.
- A pin can be used to clear the filter basket holes.
- For a thorough clean of the filters, dissolve a cleaning tablet in hot water and soak filters overnight.
CLEANING THE OUTER HOUSING / CUP WARMING PLATE
The outer housing and cup warming plate can be cleaned with a soft, damp cloth. Then polish with a soft, dry cloth.
Do not use abrasive cleansers, pads or cloths which can scratch the surface.
CLEANING THE DRIP TRAY
The drip tray should be removed, emptied and cleaned at regular intervals.
Wash the drip tray with warm soapy water, using a non-abrasive washing liquid, rinse and dry thoroughly. The drip tray base and cover are dishwasher safe.
CLEANING THE STORAGE TRAY
The storage tray can be removed after the drip tray is removed then cleaned with a soft, damp cloth (do not use abrasive cleansers, pads or cloths which can scratch the surface).
STORING YOUR MACHINE
Before storing, press the POWER button to off, turn the Control Dial to 'Standby' and unplug.
Insert all accessories into position or into the storage tray.
Store upright. Do not place anything on top.
Do not immerse power cord, power plug or appliance in water or any other liquid. The water tank should never be removed or completely emptied during decalcifying.
| PROBLEM | POSSIBLE CAUSES | WHAT TO DO |
Coffee does not run through | Machine is not turned On | Ensure the machine is plugged in, switched On at the power outlet and the POWER button is pressed. |
| Water tank is empty | Fill the water tank. | |
| The Control Dial not in 'Espresso' position | Turn the Control Dial to the 'Espresso' position. | |
| Coffee grind is too fine | Ensure you use a suitable espresso grind. Refer to 'Extraction Guide'. | |
| Too much coffee in the filter basket | Refer to 'Coffee Dose & Tamping', . | |
| Coffee tamped too firmly | Refer to 'Coffee Dose & Tamping'. | |
| The filter is blocked | Use a pin to clear the holes. Please refer to 'Cleaning Filter'. | |
Coffee runs out too quickly | The coffee grind is too coarse | Ensure you use a suitable espresso grind. Refer to 'Extraction Guide'. |
| Not enough coffee in the filter | Refer to 'Coffee Dose & Tamping'. | |
| Coffee not tamped firmly enough | Refer to 'Coffee Dose & Tamping'. | |
Coffee is too cold | Cups not preheated | Preheat cups. |
| When the base of the jug becomes too hot to touch this is when milk is heated at the correct temperature. Refer to 'Texturing Milk'. | ||
No crema | Coffee is not tamped firmly enough | Refer to 'Coffee Dose & Tamping'. |
| Coffee grind is too coarse | Ensure you use a suitable espresso grind. Refer to 'Extraction Guide'. | |
| Ground coffee is not fresh | Change to freshly roasted beans. | |
| Filter holes are blocked | Use the fine pin on the cleaning tool to clear the holes. Refer to 'Cleaning The Steam Wand'. | |
| Machine is making pulsing / pumping sound while extracting coffee or steaming milk | The machine is carrying out the normal operation of the 15 bar Italian pump | No action required as this is the normal operation of the machine. |
Coffee runs out around the edge of the portafilter | Portafilter is not inserted into the group head properly | Insert portafilter into the group head and align with 'LOCK' on the group head collar, until resistance is felt. |
| There are coffee grounds around the filter basket rim | Clean any excess ground coffee from the rim of the filter basket to ensure a proper fit into the group head. | |
| Too much ground coffee in the filter basket | Refer to 'Coffee Dose & Tamping'. | |
| Ground coffee has been tamped too firmly | Refer to 'Coffee Dose & Tamping'. | |
| Incorrect filter for amount of ground coffee used | Ensure you use the 1 CUP filter for 1 cup of coffee and the 2 CUP filter for 2 cups of coffee. | |
Coffee drips from the portafilter spouts | The water tank is empty or low | Fill the water tank. |
| Coffee grind is too fine | Ensure you use a suitable espresso grind. Refer to 'Extraction Guide'. | |
| Too much coffee in basket | Refer to 'Coffee Dose & Tamping'. | |
| Machine is blocked by mineral deposits | Decalcify the machine. Refer to 'Descaling'. | |
Machine is making a loud and continuous pumping noise | Water tank is empty | Fill the water tank. |
| Water tank is not securely in place | Push water tank down completely to lock into place. | |
No steam is generated | Machine is not turned on | Ensure the machine is plugged in, switched On at the power outlet and the POWER button is pressed. |
| Water tank is empty | Fill the water tank. | |
| Control Dial not in 'Steam' position | Turn the Control Dial to the 'Steam' position. Use the 'SELECT' button to toggle to 'Steam'. Ensure the 'Steam' LED is illuminated for steam and the 'Hot Water' LED is illuminated for hot water. | |
| Steam Wand is blocked | Use the pin on the cleaning tool to clear the opening. If the steam wand continues to be blocked remove the tip of the steam wand using the spanner in the middle of the cleaning tool. Refer to 'Cleaning the Steam Wand'. | |
No hot water | Empty tank | Fill the water tank. |
Milk is not smooth after texturing | Steam Wand is blocked | Use the pin on the cleaning tool to clear the opening. If the steam wand continues to be blocked remove the tip of the steam wand using the spanner in the middle of the cleaning tool. Refer to 'Cleaning the Steam Wand'. |
| Not enough steam | Steam wand may be blocked. Refer to 'Cleaning the Steam Wand'. | |
| Milk is not cold enough | Use cold fresh milk, refer to 'Texturing Milk', . | |
Machine is not working | The safety thermal cut out may have activated due to the pump overheating. Turn the machine off and allow to cool for about 30-60 minutes. |
SAGE® RECOMMENDS SAFETY FIRST
At Sage® we are very safety conscious. We design and manufacture appliances with your safety foremost in mind. We also ask that you exercise a degree of care when using any electrical appliance and adhere to the following precautions.
READ ALL INSTRUCTIONS BEFORE USE AND SAVE
FOR FUTURE REFERENCE
- A downloadable version of this document is also available at sageappliances.com
- Before using for the first time, please ensure that your electricity supply is the same as shown on the rating label on the underside of the appliance. If you have any concerns please contact your local electricity company.
- The installation of a residual current safety switch is recommended to provide additional safety when using all electrical appliances. Safety switches with a rated operating current not more than 30mA are recommended. Consult an electrician for professional advice.
- Remove and discard any packaging materials safely, before first use.
- To eliminate a choking hazard for young children, discard the protective cover fitted to the power plug safely.
- Ensure the product is properly assembled before first use.
- This appliance is for household use only. Do not use the appliance for anything other than its intended purpose. Do not use in moving vehicles or boats. Do not use outdoors. Misuse may cause injury.
- Position the appliance on a stable, heat resistant, level, dry surface away from the counter edge, and do not operate on or near a heat source such as a hot plate, oven or gas hob.
- Fully unwind the power cord before operating.
- Do not let the power cord hang over the edge of a counter or table. Do not let the power cord touch hot surfaces or become knotted.
- Do not leave the appliance unattended when in use.
- If the appliance is to be:
- left unattended
- cleaned
- moved
- assembled; or
- stored
Always switch off the espresso machine by pressing the POWER button to OFF. Switch off and unplug from the power outlet.
- Regularly inspect the power cord, plug and actual appliance for any damage. If found to be damaged in any way, immediately cease use of the appliance and return the entire appliance to the nearest authorised Sage Service Centre for examination, replacement or repair.
- Keep the appliance and accessories clean. Follow the cleaning instructions provided in this book. Any procedure not listed in this instruction booklet should be performed at an authorised Sage Service Centre.
- The appliance can be used by children aged 8 or older and persons with reduced physical, sensory or mental capabilities or a lack of experience and knowledge, only if they have been given supervision or instruction concerning use of the appliance in a safe way and understand the hazards involved.
- Children should not play with the appliance.
- Cleaning of the appliance should not be carried out by children unless they are 8 years or older and under adult supervision.
- The appliance and its cord should be kept out of reach of children aged 8 years and younger.
- Do not use attachments other than those provided with the appliances.
- Do not attempt to operate the appliance by any method other than those described in this booklet.
- Do not move the appliance whilst in operation.
- Do not use any other liquid apart from cold mains/town water. We do not recommend the use of highly filtered, de-mineralised or distilled water as this may affect the taste of the coffee and how the espresso machine is designed to function.
- Never use the appliance without water in the water tank.
- Ensure the portafilter is firmly inserted and secured into the brewing head before using the machine.
- Never remove the portafilter during the brewing operation as the machine is under pressure.
- Do not place anything, other than cups for warming, on top of the appliance.
- Use caution when operating machine as metal surfaces are liable to get hot during use.
- Do not touch hot surfaces. Allow the product to cool down before moving or cleaning any parts.
- Heating element surface is subject to residual heat after use.
- Always ensure the appliance is turned OFF, unplugged at the power outlet and has been allowed to cool before cleaning, attempting to move or storing.
- The appliance is not intended to be operated by means of an external timer or separate remote-control system.
- The use of attachments not sold or recommended by Sage may cause fire, electric shock or injury.
- Always turn the appliance to the off position, switch off at the power outlet and unplug at the power outlet when the appliance is not in use.
- Any maintenance other than cleaning should be performed by an authorised Sage® Service centre.
- Do not use the appliance on a sink drain board.
- Do not operate the appliance if it is in an enclosed space, or within a cupboard.
- Use caution when descaling as hot steam may be released. Before descaling, ensure drip tray is empty and inserted. Refer to 'Care & Cleaning' for further instructions.
SPECIFIC INSTRUCTIONS
FOR WATER FILTER
- Filter cartridge should be kept out of reach of children.
- Store filter cartridges in a dry place in the original packaging.
- Protect cartridges from heat and direct sunlight.
- Do not use damaged filter cartridges.
- Do not open filter cartridges.
- If you are absent for a prolonged period of time, empty the water tank and replace the cartridge.

To protect against electric shock, do not immerse the power cord, power plug or appliance in water or any other liquid.
FOR HOUSEHOLD USE ONLY SAVE THESE INSTRUCTIONS
Documents / ResourcesDownload manual
Here you can download full pdf version of manual, it may contain additional safety instructions, warranty information, FCC rules, etc.
Advertisement


Need help?
Do you have a question about the Duo-Temp Pro BES810 and is the answer not in the manual?
Questions and answers