
Related Manuals for Sage Barista Pro


Summary of Contents for Sage Barista Pro
- Page 1 User Guide Barista Pro ™ B###### / S###### BES878 / SES878 QUICK GUIDE KURZANLEITUNG GUIDE RAPIDE SNELSTARTGIDS GUIDA RAPIDA GUÍA RÁPIDA MANUAL RÁPIDO SZYBKI PRZEWODNIK...
- Page 2 • Remove and discard any RECOMMENDS packaging materials safely, SAFETY FIRST before first use. • To eliminate a choking hazard At Sage we are very safety ® for young children, discard the conscious. We design and protective cover fitted to the manufacture appliances power plug safely.
- Page 3 Sage Service Centre. • Fully unwind the power cord • The appliance can be used by before operating.
- Page 4 • The use of attachments not apart from cold mains/town sold or recommended by water. We do not recommend Sage may cause fire, electric the use of highly filtered, shock or injury. de-mineralised or distilled • Always turn the appliance to...
- Page 5 NOTICE TO CUSTOMERS SPECIFIC INSTRUCTIONS REGARDING MEMORY FOR WATER FILTER STORAGE • Filter cartridge should be kept out of reach of children. Please note that in order to better • Store filter cartridges in a dry serve our customers, internal memory storage has been place in the original packaging.
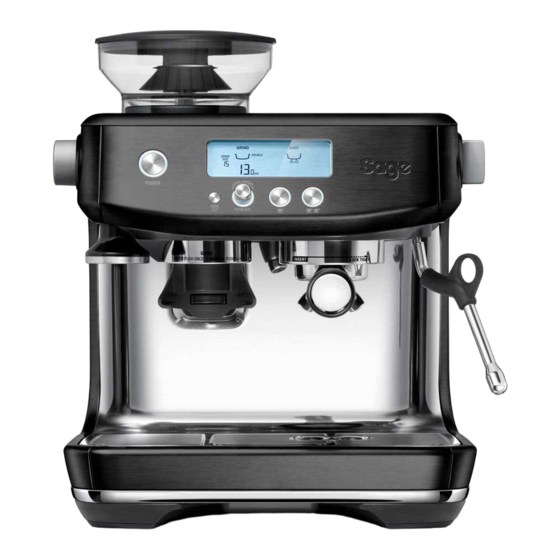
- Page 6 Components A. 250g bean hopper L. 2L removable water tank With locking system for easy removal, With replaceable water filters storage and transfer of coffee beans. to reduce scale and impurities. B. Integrated conical burr grinder M. Steam dial Selector control for steam and hot water. C.
- Page 7 5. Cleaning disc BPA Free Materials* * Sage makes its BPA free claim for this product based on independent laboratory testing performed for all the food contact plastic materials of the product per EU Commission regulation No 10/2011. Rating Information...
- Page 8 Barista Pro Features INSTANT HOT WATER THERMOJET HEATING SYSTEM ™ Dedicated hot water outlet for making Innovative heating system achieves ideal Long Blacks and pre-heating cups. extraction temperature in 3 seconds. LOW PRESSURE PRE-INFUSION INTEGRATED CONICAL BURR GRINDER Applies low water pressure at the start...
- Page 9 Assembly BEFORE FIRST USE NOTE Machine Preparation For replacement water filters, visit the Sage Remove and discard all labels and packaging webpage or contact Sage Customer Service. materials attached to your espresso machine. Ensure you have removed all parts and FILLING THE WATER TANK accessories before discarding the packaging.
- Page 10 Assembly ATTACHING THE HOPPER FIRST USE CYCLE Insert the bean hopper into position on top A first use cycle must be completed before of the machine. the initial use of the machine. The first use cycle rinses the machine and primes the heating system.
- Page 11 Functions Regardless of whether you use Single Wall or TURNING OFF THE MACHINE Dual Wall filters baskets, use the 1 CUP basket To turn the machine off, press the POWER when brewing a single cup and the 2 CUP button. Alternatively, the machine has auto-off, basket when brewing two cups or a stronger if it is not used for 30 minutes.
- Page 12 THE GRIND DOSING THE COFFEE When grinding coffee beans, the grind size • Fill the hopper with fresh coffee beans. should be fine, but not too fine. The grind size • Insert the required filter basket into the portafilter. will affect the rate at which water flows through •...
- Page 13 TAMPING THE GROUND COFFEE • Rotate the Razor dose trimming tool back and ™ forth while holding the portafilter on an angle over • Remove the portafilter from the a knock box to trim off excess coffee grinds. Your grinding cradle. filter basket is now dosed with the correct amount •...
- Page 14 EXTRACTING ESPRESSO • As a guide the espresso will start to flow after 8–12 seconds (infusion time) and should be the consistency of dripping honey. • If the espresso starts to flow after less than 7 seconds, you have either under dosed the filter basket and /or the grind is too coarse.
- Page 15 PRE-PROGRAMMED SHOT PROGRAMMING ESPRESSO SHOT VOLUME – 1 CUP • Press the MENU button to enter the main menu. • Press the 1 CUP button once, the button will flash, indicating that it has been selected. The GRIND LOCK SHOT SHOT TEMP FASTER PRE-INFUSE...
- Page 16 USING HOT WATER OUTLET • Lift the jug to lower the tip beneath the surface but keep the vortex spinning. The milk is at the The hot water function can be used to pre-heat correct temperature (60–65°C) when the jug cups or to add hot water manually.
- Page 17 ADJUSTING CONICAL BURRS Some types of coffee may require a wider grind range to achieve an ideal extraction or brew. A feature of your Barista Pro is the ability to extend this range with an adjustable upper burr. ™ We recommend making only one adjustment at a time.
- Page 18 FLUSH, then press to select. Replacement water filters can be purchased The 1 CUP button will illuminate. from the Sage website or by contacting Sage Customer Service. 8. Press the 1 CUP button to start the cleaning cycle.
- Page 19 DESCALING 6. Remove and empty the drip tray then replace onto the machine. Empty any remaining descaling liquid from the water tank, then fill NOTE the water tank to the MAX line and reattached to the machine. Ensure that the water filter is removed from the 7.
- Page 20 CLEANING THE CONICAL BURR GRINDER This grinder cleaning cycle removes oil build-up on the burrs which can impede performance. Run grinder Unlock hopper Empty hopper Replace hopper Lock hopper Unlock hopper Remove hopper empty Clean top burr Clean lower Clean chute Unlock top burr Remove top burr with brush...
- Page 21 If your machine displays on the LCD, contact Press the 1 CUP button and run a short flow of Sage Customer Service. water to rinse out any residual coffee. Press the 1 CUP button again to stop the hot water.
- Page 22 Dosing Funnel ™ Troubleshooting PROBLEM POSSIBLE CAUSES WHAT TO DO • Water tank is empty. • Fill tank. Water does not flow from the group head. • Water tank is not fully inserted • Push water tank down completely No hot water. and locked into position.
- Page 23 PROBLEM POSSIBLE CAUSES WHAT TO DO • Coffee is ground too coarsely. • Use slightly finer grind. Espresso runs out too quickly. Refer to ‘Setting the Grind Size’, page 12 and ‘Under Extraction’, page 14. • Not enough coffee in the filter •...
- Page 24 • Press the POWER button to switch Machine is on but ceases to operate. have activated due to the pump the machine off and unplug from or grinder overheating. the power outlet. Allow to cool for about 30–60 minutes. • If problem persists, call Sage Support.
- Page 25 PROBLEM POSSIBLE CAUSES WHAT TO DO • No coffee beans in hopper. • Filler hopper with fresh coffee No ground coffee coming from grinder. beans. • Blocked grinder chamber or • Clean and clear grinder chamber chute. and chute. Refer to ‘Advanced Cleaning for the Conical Burr Grinder’, page 20.
- Page 26 2 years from the date of purchase against defects caused by faulty workmanship and materials. During this guarantee period Sage Appliances will repair, replace, or refund any defective product (at the sole discretion of Sage Appliances).
- Page 27 User Guide Barista Pro ™ B###### / S###### BES878 / SES878 KURZANLEITUNG...
- Page 28 Sicherheit ® die Netzspannung der Angabe an erster Stelle auf der Unterseite des Geräts 7 Komponenten entspricht. Wenden Sie sich im 9 Barista Pro Funktionen ™ Zweifelsfall an Ihren örtlichen 10 Zusammenbau Stromversorger. 12 Funktionen 19 Pflege und Reinigung •...
- Page 29 Broschüre. Alle nicht in dieser Bedienungsanleitung • Rollen Sie das Kabel vor beschriebenen Vorgänge sind Inbetriebnahme ganz aus. in einem Sage Service Center • Lassen Sie das Kabel nicht durchzuführen. über die Kante einer Arbe- • Dieses Gerät darf von Kindern itsfläche oder eines Tisches...
- Page 30 Funktionsweise der Espresso- werden. maschine beeinträchtigen kann. • Die Verwendung von Zube- • Verwenden Sie das Gerät nicht hörteilen, die nicht von Sage ver- mit leerem Wassertank. trieben oder empfohlen werden, kann zu Bränden, Stromschlä- • Vergewissern Sie sich, dass der gen oder Verletzungen führen.
- Page 31 • Betreiben Sie das Gerät unsere Geräte in Zukunft noch nicht, wenn es sich in einem besser an die Wünsche und Bedürfnisse unserer Kunden geschlossenen Bereich oder in einem Schrank befindet. anzupassen. Informationen über die Personen, die ein Gerät • Seien Sie beim Entkalken verwenden, oder den Haushalt, vorsichtig, da heißer Dampf in dem es sich befindet, werden...
- Page 32 Dieses Symbol bedeutet, dass das Gerät nicht mit dem gewöhnlichen Haushaltsmüll entsorgt werden darf. Stattdessen muss es zu einer für diesen Zweck eingerichteten behördlichen Sammelstelle oder zu einem Händler gebracht werden, der Entsorgung anbietet. Weitere Informationen dazu erhalten Sie bei Ihrem Gemeindeamt. Um sich vor Stromschlä- gen zu schützen, tauchen Sie das Netzkabel, den...
- Page 33 Komponenten A. 250-g-Bohnenbehälter M. Dampfschalter Mit Verriegelungssystem zum einfachen Entfernen, Drehregler für Dampf und Heißwasser. Aufbewahren und Einfüllen der Kaffeebohnen. N. LCD-Display B. Integriertes Kegelmahlwerk Anzeige von Mahl- und Extraktionsvorgängen. C. Mahlgrad-Einstellung O. Bedienfeld 30 Espresso-Mahlgrade, einstellbar von fein bis grob. Mit Menü, MAHLMENGE/FILTERGRÖSSE, Taste für 1 und 2 Tassen.
- Page 34 54 mm ™ 5. Reinigungsscheibe BPA-freie Werkstoffe* * Sage führt die Bezeichnung „BPA-frei“ für dieses Produkt auf Grundlage unabhängiger Labortests für alle mit Lebensmitteln in Berührung kommenden Kunststoffmaterialien des Produkts gemäß EU-Verordnung Nr. 10/2011. Leistungsangaben 220–240 V~ 50 – 60 Hz 1380 – 1650 W...
- Page 35 PREINFUSION MIT NIEDERDRUCK Barista Pro ™ Der Kaffee wird zunächst bei niedrigem Funktionen Wasserdruck angefeuchtet und sanft aufgequellt, um eine gleichmäßige Extraktion zu gewährleisten. MENGENEINSTELLUNG THERMOJET HEIZSYSTEM ™ Voreingestellte Mengen für 1 oder 2 Tassen, Dieses innovative Heizsystem erreicht die manuelle Übersteuerung oder programmierbare...
- Page 36 HINWEIS Zusammenbau Ersatzwasserfilter können Sie über die Sage-Webseite oder den Sage-Kundendienst bestellen. VOR DEM ERSTEN GEBRAUCH FÜLLEN DES WASSERTANKS • Vergewissern Sie sich, dass der Wasserfilter fest Vorbereiten des Geräts im Wassertank sitzt. Entfernen und entsorgen Sie alle an der •...
- Page 37 BEFESTIGEN DES TRICHTERS ERSTE INBETRIEBNAHME Setzen Sie den Bohnenfülltrichter richtig Vor dem erstmaligen Gebrauch der Maschine in die Maschine ein. sollten Sie einen kompletten Betriebsdurchgang durchlaufen. Beim ersten Betriebsdurchgang wird die Maschine gespült und das Heizsystem betriebsfertig gemacht. 1. Füllen Sie den Wassertank. 2.
- Page 38 Verwenden Sie sowohl mit einwandigen und doppelwandigen Siebeinsätzen stets den Funktionen „1 CUP“-Einsatz zum Brühen einer einzelnen Tasse und den „2 CUP“-Einsatz zum Brühen von zwei Tassen bzw. eines kräftigeren Kaffees. Sie müssen Mahlmenge und Mahlgrad anpassen, AUSSCHALTEN DES GERÄTS wenn Sie von einem einwandigen zu einem doppelwandigen Einsatz wechseln oder Drücken Sie zum Ausschalten des Geräts die...
- Page 39 EINSTELLEN DES MAHLGRADS • Drücken Sie bei Bedarf die Taste „FILTER SIZE“, um die Größe des Siebeinsatzes auszuwählen; Dieses Gerät verfügt über 30 verschiedene Einzel oder Doppel. Mahlgrade. Der jeweils eingestellte wird auf • Drehen Sie bei Bedarf den „GRIND AMOUNT“- dem LCD-Display angezeigt.
- Page 40 TAMPEN DES GEMAHLENEN KAFFEES • Drehen Sie die Razor Dosierhilfe hin und her, ™ während Sie den Siebträger schräg über einen • Ziehen Sie den Siebträger aus der Mahlstation. Kaffeesatzbehälter halten, um überschüssiges • Klopfen Sie den Siebträger mehrmals ab, um Pulver abzustreichen.
- Page 41 EXTRAHIEREN VON ESPRESSO • In der Regel beginnt der Espresso nach 8–12 Sekunden (Brühzeit) zu fließen und sollte die Konsistenz von tropfendem Honig haben. • Wenn der Espresso nach weniger als 7 Sekunden zu fließen beginnt, haben Sie entweder den Siebeinsatz unterdosiert und/oder der Mahlgrad ist zu grob eingestellt. Das ergibt einen UNTEREXTRAHIERTEN KAFFEE.
- Page 42 VORPROGRAMMIERTE PROGRAMMIEREN DER MENGE – 1 TASSE ESPRESSO-MENGE • Drücken Sie die „1 CUP“-Taste einmal. Sie blinkt • Drücken Sie die „MENU“-Taste zum Wechseln zur Bestätigung der Auswahl. Auf dem Display ins Hauptmenü. wird „PRE-INFUSE“ angezeigt und die Mengen- Uhr beginnt mit dem Hochzählen. Sobald der GRIND LOCK SHOT...
- Page 43 ZURÜCKSETZEN AUF • Füllen Sie die Milchkanne auf einen Stand zwischen den „MIN“- und „MAX“-Markierungen. STANDARDWERTE • Heben Sie die Dampfdüse an und setzen Sie die • Drücken Sie die „MENU“-Taste zum Spitze 1–2 cm unter die Oberfläche der Milch, Wechseln ins Hauptmenü.
- Page 44 Betrieb. EINSTELLEN DES KEGELFÖRMIGEN MAHLWERKS Manche Kaffeesorten erfordern einen größeren Mahlbereich, um eine ideale Extraktion oder Zubereitung zu erzielen. Bei der Barista Pro lässt sich dieser Bereich mit dem verstellbaren oberen ™ Mahlwerk vergrößern. Wir empfehlen, diese Anpassung immer nur schrittweise durchzuführen.
- Page 45 Reinigungsvorgangs. Die verbleibende Zeit für HINWEIS den Reinigungsvorgang wird auf dem Display angezeigt. Ersatzwasserfilter können Sie über die Sage-Webseite oder den Sage-Kundendienst 9. Nach Abschluss des Reinigungsvorgangs bestellen. ertönt ein Piepton und die Maschine kehrt in den „READY“-Modus zurück. Wenn noch RÜCKSPÜLZYKLUS...
- Page 46 ENTKALKEN 5. Sobald der Entkalkungsvorgang abgeschlos- sen ist, muss die Maschine einen Spülzyklus durchlaufen. Die „1 CUP“-Taste leuchtet auf. HINWEIS Wie beim Entkalkungsvorgang muss der Dampf-Drehregler manuell in die richtige Posi- Entnehmen Sie den Wasserfilter aus dem tion gedreht werden, wenn dies auf dem Dis- Wassertank, bevor Sie das Entkalkungspulver play angezeigt wird.
- Page 47 REINIGEN DES KEGELMAHLWERKS Dieser Reinigungsvorgang des Mahlwerks entfernt Ölrückstände, die zu einer Beeinträchtigung der Leistung führen können. PUSH Fülltrichter Fülltrichter entleeren Fülltrichter Fülltrichter Mahlwerk leer Fülltrichter Fülltrichter entfernen entriegeln wiedereinsetzen verriegeln laufen lassen entriegeln Oberes Mahlwerk Oberes Mahlwerk Oberes Mahlwerk mit Unteres Mahlwerk Schacht mit Bürste entriegeln...
- Page 48 Sie eventuelle Kaffeereste FEHLERMODUS aus. Drücken Sie die „1 CUP“-Taste erneut zum Anhalten des Heißwasserflusses. Entfernen Sie Wenn das Display Ihrer Maschine anzeigt, wenden Sie sich an den Sage-Kundendienst. den Siebträger und spülen Sie ihn gründlich aus.
- Page 49 Dosing Funnel ™ Störungsbehebung PROBLEM MÖGLICHE URSACHEN LÖSUNG Aus dem Brühkopf • Der Wassertank ist leer. • Füllen Sie den Wassertank. fließt kein Wasser. • Der Wassertank ist nicht • Drücken Sie den Wassertank ganz nach Kein heißes Wasser. ordnungsgemäß angebracht unten, bis er einrastet.
- Page 50 PROBLEM MÖGLICHE URSACHEN LÖSUNG Der Espresso läuft • Der Kaffee ist zu grob gemahlen. • Stellen Sie einen etwas feineren zu schnell durch. Mahlgrad ein. Weitere Informationen finden Sie unter „Einstellen des Mahlgrads“ auf S. 13 und „Unterextraktion“ auf S. 15. •...
- Page 51 PROBLEM MÖGLICHE URSACHEN LÖSUNG • Die Tassen sind nicht • Spülen Sie die Tassen unter dem Der Kaffee ist nicht heiß genug. vorgewärmt. Heißwasserauslass. • Der Siebträger ist nicht • Spülen Sie den Siebträger unter dem vorgeheizt. Heißwasserauslass. Trocknen Sie alles gründlich ab.
- Page 52 Steckdose zu ziehen. Lassen des Mahlwerkes ausgelöst. Sie das Gerät für etwa 30–60 Minuten abkühlen. • Wenn das Problem weiterhin besteht, kontaktieren Sie den Sage-Support. • Es befinden sich keine • Füllen Sie den Trichter mit frischen Es kommt kein Kaffeepulver aus Kaffeebohnen im Trichter.
- Page 53 Garantie 2 JAHRE BESCHRÄNKTE GARANTIE Sage Appliances bietet für dieses Produkt für den häuslichen Gebrauch in bestimmten Bereichen ab Kaufdatum eine 2-jährige Garantie gegen Mängel, die durch fehlerhafte Verarbeitung und Materialien verursacht wurden. Während dieser Garantiezeit repariert, ersetzt oder erstattet Sage Appliances ein defektes Produkt (nach eigenem Ermessen von Sage Appliances).
- Page 54 Notizen...
- Page 55 User Guide Barista Pro ™ B###### / S###### BES878 / SES878 GUIDE RAPIDE...
- Page 56 ® sécurité avant tout de l'appareil. Si vous avez des 7 Composants questions, veuillez contacter 9 Caractéristiques du Barista Pro ™ votre fournisseur d'électricité. 10 Assemblage • L'installation d'un commutateur 12 Fonctions de sécurité de courant résiduel 19 Entretien et nettoyage est recommandée pour assurer...
- Page 57 • Placez l'appareil sur une l'appareil et renvoyez-le au surface stable, résistante à la centre de réparation Sage chaleur, plane et sèche, loin agréé le plus proche pour qu'il du bord. Ne l'utilisez pas sur soit vérifié, remplacé ou réparé.
- Page 58 • Ne retirez jamais le porte-filtre durant l'infusion, car la machine • Tout entretien autre que le est sous pression. nettoyage doit être réalisé par un centre de services Sage • Ne placez rien d'autre que ® agréé. des tasses sur la surface de réchaud de l'appareil.
- Page 59 • N'utilisez pas l'appareil dans AVIS AUX CLIENTS CONCER- un espace clos ou dans un NANT LE STOCKAGE DE LA MÉMOIRE placard. Veuillez noter qu'afin de • Soyez prudent lors du mieux servir nos clients, une détartrage, car de la vapeur mémoire interne a été...
- Page 60 INSTRUCTIONS SPÉCIFIQUES Le symbole illustré indique que cet appareil ne doit pas POUR LE FILTRE À EAU être jeté aux ordures • La cartouche filtrante doit être ménagères. Il doit être conservée hors de la portée amené dans un centre de collecte des enfants.
- Page 61 Composants A. Trémie à grains de 250 g L. Réservoir d'eau amovible de 2 L Avec système de verrouillage pour faciliter le retrait, le Avec filtres à eau remplaçables pour réduire le tartre et stockage et le transfert des grains de café. les impuretés.
- Page 62 ™ Matériaux sans BPA* * Sage déclare que ce produit ne contient pas de BPA sur la base d'essais en laboratoire indépendants effectués pour toutes les matières plastiques du produit en contact avec les aliments, conformément au Règlement de la Commission européenne n° 10/2011.
- Page 63 PRÉ-INFUSION À BASSE PRESSION Caractéristiques Applique une faible pression d'eau au début de du Barista Pro l'extraction pour déployer doucement la mouture ™ afin d'obtenir une extraction uniforme. CONTRÔLE VOLUMÉTRIQUE SYSTÈME DE CHAUFFE THERMOJET ™ Préréglage des volumes de 1 et 2 tasses, Le système de chauffe innovant atteint la...
- Page 64 REMARQUE Assemblage Pour remplacer les filtres à eau, rendez-vous sur la page Web de Sage ou contactez le service client de Sage. AVANT LA PREMIÈRE UTILISATION REMPLISSAGE DU RÉSERVOIR D'EAU • Assurez-vous que le filtre à eau est solidement Préparation de la machine attaché...
- Page 65 FIXATION DE LA TRÉMIE PREMIER CYCLE D'UTILISATION Insérez la trémie à grains sur le dessus de la Un premier cycle d'utilisation doit être effectué machine. avant la première utilisation de la machine. Le premier cycle d'utilisation consiste à rincer la machine et à...
- Page 66 Que vous utilisiez des paniers à filtre à paroi simple ou à double paroi, utilisez le panier à Fonctions filtre 1 CUP lorsque vous voulez remplir une seule tasse et le panier à filtre 2 CUP lorsque vous souhaitez remplir deux tasses, une seule tasse de café...
- Page 67 AJUSTER LE DEGRÉ DE MOUTURE • Si nécessaire, appuyez sur le bouton FILTER SIZE pour sélectionner la taille du panier à filtre : Cette machine dispose de 30 réglages de simple ou double. mouture au choix. Le degré sélectionné est •...
- Page 68 TASSEMENT DU CAFÉ MOULU • Tournez l'outil de dosage the Razor d'avant en ™ arrière tout en maintenant le porte-filtre sur un • Retirez le porte-filtre du support pour mouture. angle au-dessus du tiroir de récupération pour • Appuyez plusieurs fois sur le porte-filtre pour le éliminer l'excédent de café.
- Page 69 EXTRACTION D'UN EXPRESSO • À titre indicatif, l'expresso commencera à s'écouler au bout de 8 à 12 secondes (temps d'infusion) et devrait avoir la consistance du miel qui coule. • Si l'expresso commence à s'écouler après moins de 7 secondes, c'est que vous avez sous-dosé le panier à...
- Page 70 VOLUME DE PRÉPARATION PROGRAMMATION DE LA PRÉDÉFINI - 1 TASSE PRÉPARATION D'EXPRESSO • Appuyez une fois sur le bouton 1 CUP . Le bouton • Appuyez sur le bouton MENU pour accéder au clignote pour indiquer qu'il a été sélectionné. menu principal.
- Page 71 RÉINITIALISATION AUX • Remplissez le pot à lait entre la position MIN et MAX. PARAMÈTRES PAR DÉFAUT • Soulevez la buse vapeur et insérez-la dans le pot • Appuyez sur le bouton MENU pour accéder au à lait avec la pointe de la buse vapeur située à menu principal.
- Page 72 RÉGLAGE DES BROYEURS CONIQUES Certains types de café peuvent nécessiter une gamme de mouture plus large pour une extraction ou une infusion idéale. Votre machine Barista Pro offre la possibilité d'étendre cette gamme avec un ™ broyeur supérieur réglable. Nous vous recommandons de ne faire qu'un seul ajustement à la fois.
- Page 73 7. Utilisez la molette GRIND AMOUNT pour Vous pouvez vous procurer les filtres à eau de accéder au menu FLUSH, puis appuyez pour remplacement sur le site Web de Sage ou en le sélectionner. Le bouton 1 CUP s'allume. contactant le service client de Sage.
- Page 74 DÉTARTRAGE 6. Retirez et videz le bac d'égouttage, puis remettez-le dans la machine. Videz le liquide de détartrage restant dans le réservoir d'eau, puis REMARQUE remplissez le réservoir d'eau jusqu'à la ligne MAX et insérez-le dans la machine. Assurez-vous d'avoir bien retiré le réservoir d'eau avant d'ajouter le détartrant en poudre 7.
- Page 75 NETTOYAGE DU BROYEUR CONIQUE INTÉGRÉ Ce cycle de nettoyage du moulin élimine l'accumulation de graisse sur les broyeurs, ce qui pourrait nuire aux performances. APPUYER Déverrouiller Vider la trémie Remplacer la Verrouiller la Faire tourner le Déverrouiller la Retirer la trémie la trémie trémie trémie...
- Page 76 Appuyez à nouveau sur le bouton 1 CUP pour Si l'écran LCD de votre machine affiche arrêter l'eau chaude. Retirez le porte-filtre et contactez le service client de Sage. rincez-le soigneusement.
- Page 77 Dosing Funnel ™ Dépannage PROBLÈME CAUSES POSSIBLES SOLUTION • Le réservoir d'eau est vide. • Remplissez le réservoir. L'eau ne s'écoule pas au travers du • Le réservoir d'eau n'est pas • Appuyez complètement sur le réservoir groupe chauffant. complètement inséré et d'eau pour verrouiller sa position.
- Page 78 PROBLÈME CAUSES POSSIBLES SOLUTION • La mouture du café est trop L'expresso s'écoule • Utilisez une mouture légèrement plus trop vite. grossière. fine. Reportez-vous aux sections « Ajuster le degré de mouture », page 13 et « Sous-extraction », page 15. •...
- Page 79 PROBLÈME CAUSES POSSIBLES SOLUTION • Les tasses n'ont pas été • Rincez les tasses sous la sortie d'eau Le café n'est pas assez chaud. préchauffées. chaude. • Le porte-filtre n'est pas • Rincez le porte-filtre sous l'eau chaude. préchauffé. Séchez soigneusement. •...
- Page 80 Laissez du moulin. refroidir pendant 30 à 60 minutes. • Si le problème persiste, veuillez contacter le service client Sage. • Il n'y a pas de grains de café • Remplissez la trémie à grains de grains Aucun café moulu ne sort du moulin.
- Page 81 Garantie GARANTIE LIMITÉE DE 2 ANS Sage Appliances garantit ce produit pour un usage domestique sur les territoires spécifiés pendant 2 ans à compter de la date d'achat, contre les défauts de fabrication et de matériaux. Au cours de cette période de garantie, Sage Appliances s'engage à...
- Page 82 Déclaration à l'intention du consommateur SAGE FRANCE - GARANTIE LIMITÉE Sage Appliances garantit ce produit pour un usage Article L. 217-4 du Code de la consommation : « Le vendeur livre un bien conforme au contrat et domestique sur les territoires spécifiés pendant 2 répond des défauts de conformité...
- Page 83 User Guide Barista Pro ™ B###### / S###### BES878 / SES878 SNELSTARTGIDS...
- Page 84 • Het wordt aanbevolen een 2 Sage stelt veiligheid voorop ® aardlekschakelaar te installe- 6 Onderdelen ren voor extra veiligheid bij het 8 Barista Pro Kenmerken ™ gebruik van alle elektrische 9 Montage apparaten. Veiligheidsscha- 11 Functies kelaars met een nominale...
- Page 85 • Zorg dat het netsnoer niet uitgevoerd door een geautori- over de rand van een aanrecht seerd Sage-servicecentrum. of tafel hangt. Zorg dat het netsnoer niet in aanraking • Dit apparaat kan worden komt met hete oppervlakken gebruikt door kinderen van of in de knoop raakt.
- Page 86 • Het gebruik van accessoires kan beïnvloeden. die niet door Sage zijn verkocht • Gebruik het apparaat nooit of aangeraden, kan risico op zonder water in het waterre- brand, elektrische schokken servoir.
- Page 87 KENNISGEVING AAN SPECIFIEKE INSTRUCTIES KLANTEN OVER GEHEU- VOOR WATERFILTER GENOPSLAG • Filterpatroon moet buiten het bereik van kinderen worden Uw apparaat beschikt over gehouden. interne geheugenopslag zodat • Bewaar filterpatronen op een we onze klanten beter van dienst droge plaats in de originele kunnen zijn.
- Page 88 Onderdelen A. Bonencontainer 250 g L. Verwijderbaar waterreservoir 2 liter Met vervangbare waterfilters om kalkaanslag Met vergrendelingssysteem voor het eenvoudig ver- en onzuiverheden te verminderen. wijderen, bewaren en overbrengen van koffiebonen. M. Stoomregelaar B. Molen met geïntegreerde kegelvormige maalelementen Keuzeknop voor stoom en heet water. N.
- Page 89 11. The Dosing Funnel ™ BPA-vrije materialen* * Sage maakt zijn BPA-vrije claim voor dit product op basis van onafhankelijke laboratoriumtests die zijn uitgevoerd voor alle kunststofmaterialen voor contact met levensmiddelen van het product volgens EU-verordening van de Commissie nr. 10/2011.
- Page 90 PRE-INFUSIE BIJ LAGE DRUK Barista Pro ™ Past een lage waterdruk toe aan het begin van Kenmerken de extractie, zodat de gemalen koffie langzaam uitzet voor een gelijkmatige extractie. VOLUMETRISCHE CONTROLE THERMOJET -VERWARMINGSSYSTEEM ™ Vooraf ingestelde volumes voor 1 en 2 kopjes,...
- Page 91 Contact the Breville Customer Service Centre smaak van de koffie beïnvloeden. for further assistance. OPMERKING Ga naar de webpagina van Sage of neem AUS 1300 139 798 contact op met de klantenservice van Sage voor vervangende waterfilters. NZ 0800 273 845 www.Breville.com.au...
- Page 92 DE BONENCONTAINER BEVESTIGEN CYCLUS VOOR EERSTE GEBRUIK Zet de bonencontainer op zijn plaats op het U moet de cyclus voor eerste gebruik voltooien apparaat. voordat u het apparaat voor het eerst kunt gebruiken. Tijdens deze cyclus wordt het apparaat gespoeld en het verwarmingssysteem gebruiksklaar gemaakt.
- Page 93 OPMERKING Functies Mogelijk moet u experimenteren met de hoeveelheid koffie die u in het filterbakje doet en hoelang de koffiemolen moet malen voor de juiste dosering. Wanneer u bijvoorbeeld HET APPARAAT UITZETTEN een fijnere espressomaling gebruikt met de filterbakjes met enkele wand, moet u mogelijk Druk op de knop POWER om het apparaat uit de maalhoeveelheid verhogen om ervoor te te zetten.
- Page 94 DE MALING DE KOFFIE DOSEREN Bij het malen van koffiebonen moet de maalgraad • Vul de bonencontainer met verse koffiebonen. fijn zijn, maar niet te fijn. De maalgraad beïnvloedt • Plaats het juiste filterbakje in het portafilter. de snelheid waarmee het water door de gemalen •...
- Page 95 HANDMATIG DOSEREN • Steek de Razor -doseringstool in het filterbakje ™ totdat de tool op de rand van het bakje rust. Om de koffie handmatig te doseren, blijft u het Het mesje van de doseringstool moet in het portafilter in de molenhouder drukken totdat oppervlak van de aangedrukte koffie gaan.
- Page 96 ESPRESSO MAKEN • Doorgaans begint de espresso na 8 - 12 seconden (extractietijd) te stromen en moet het de consistentie van druppelende honing hebben. • Als de espresso na minder dan 7 seconden begint te stromen, is de dosering in het filterbakje te klein en/of is de maling te grof.
- Page 97 VOORGEPROGRAMMEERD ESPRESSOSHOT PROGRAMMEREN SHOTVOLUME - 1 KOPJE • Druk op de knop MENU om naar het hoofdmenu te gaan. • Druk eenmaal op de knop 1 CUP. De knop knippert om aan te geven dat deze is geselec- teerd. Op het lcd-scherm wordt PRE-INFUSE GRIND LOCK SHOT...
- Page 98 STANDAARDINSTELLINGEN onder het oppervlak van de melk, dichtbij de rechterkant van de kan en naar rechts gericht. HERSTELLEN • Draai de draaiknop STEAM naar • Druk op de knop MENU om naar het hoofdmenu • Houd het uiteinde van het stoompijpje net te gaan.
- Page 99 KEGELVORMIGE MAALELEMENTEN VERSTELLEN Sommige koffiesoorten vereisen een breder maalbereik voor de ideale extractie of bereiding. Met uw Barista Pro kunt u dit bereik uitbreiden met een verstelbaar bovenste maalelement. ™ Het is raadzaam slechts één aanpassing tegelijk uit te voeren.
- Page 100 OPMERKING 5. Vul het waterreservoir tot het MAX-streepje U kunt vervangende waterfilters op de Sage- en zet het vervolgens weer op het apparaat. website kopen of door contact op te nemen met 6. Druk op de knop MENU om naar het de klantenservice van Sage.
- Page 101 ONTKALKING 5. Als de ontkalkingscyclus klaar is, moet het apparaat een spoelcyclus uitvoeren. De knop 1 CUP gaat branden. Net als bij OPMERKING de ontkalkingscyclus, moet de STEAM- draaiknop handmatig in de juiste positie Zorg er bij het ontkalken van het apparaat worden gezet als dit wordt aangegeven voor dat het waterfilter uit het waterreservoir is op het lcd-scherm.
- Page 102 DE MOLEN MET KEGELVORMIGE MAALELEMENTEN REINIGEN Deze reinigingscyclus verwijdert olieresten op de maalelementen die de prestaties kunnen verminderen. DRUK Ontgrendel Maak de Plaats de Vergrendel Laat de molen draaien Ontgrendel Haal de container de container container leeg container terug de container tot deze leeg is de container van de molen...
- Page 103 Druk opnieuw op de knop 1 CUP om het hete FOUTMODUS water te stoppen. Verwijder het portafilter en spoel deze grondig af. Als op het lcd-scherm van uw apparaat wordt weergegeven, neem dan contact op met de klantenservice van Sage.
- Page 104 Dosing Funnel ™ Problemen oplossen PROBLEEM MOGELIJKE OORZAKEN WAT TE DOEN • Waterreservoir is leeg. • Vul het waterreservoir bij. Er komt geen water uit de zetgroep. • Waterreservoir is niet • Duw het waterreservoir naar beneden Geen heet water. correct geplaatst en op om het te vergrendelen.
- Page 105 PROBLEEM MOGELIJKE OORZAKEN WAT TE DOEN • Koffie is te grof gemalen. • Gebruik een iets fijnere maling. Espresso loopt te snel door. Raadpleeg de sectie De maalgraad instellen op pagina 12 en Onderextractie op pagina 14. • Er zit niet genoeg koffie •...
- Page 106 PROBLEEM MOGELIJKE OORZAKEN WAT TE DOEN • Kopjes zijn niet • Spoel de kopjes om onder Koffie is niet warm genoeg. voorverwarmd. de heetwateruitloop. • Portafilter niet • Spoel het portafilter om onder de voorverwarmd. heetwateruitloop. Droog het grondig af. •...
- Page 107 Laat het zo'n 30 - 60 minuten gevolg van oververhitting afkoelen. van de pomp of molen. • Neem contact op met de Sage-onder- steuning als het probleem aanhoudt. • Geen koffiebonen • Vul de bonencontainer met verse Er komt geen gemalen koffie in de bonencontainer.
- Page 108 Garantie BEPERKTE GARANTIE VAN 2 JAAR Sage Appliances biedt een garantie op dit product voor huishoudelijk gebruik in genoemde gebieden gedurende 2 jaar vanaf de datum van aankoop voor defecten veroorzaakt door gebrekkige afwerking en materialen. Gedurende deze garantieperiode zal Sage Appliances defecte producten repareren, vervangen of terugbetalen (naar eigen goeddunken van Sage Appliances).
- Page 109 User Guide Barista Pro ™ B###### / S###### BES878 / SES878 GUIDA RAPIDA...
- Page 110 ® sotto il dispositivo. In caso la sicurezza prima di tutto di dubbi, contattare l'azienda 7 Componenti fornitrice di elettricità locale. 9 Funzioni di the Barista Pro ™ • Si consiglia l'installazione 10 Montaggio di un interruttore salvavita 12 Funzioni...
- Page 111 Sage del piano di lavoro. Utilizzare autorizzato più vicino l'apparecchio lontano da affinché venga esaminato, fonti di calore come piastre sostituito o riparato.
- Page 112 • Non utilizzare l'elettrodo- • L'utilizzo di prolunghe mestico se il serbatoio o accessori non venduti dell'acqua è vuoto. o consigliati da Sage può • Assicurarsi che il portafiltro provocare incendi, scosse sia ben inserito e fissato nella elettriche o lesioni.
- Page 113 • Non usare l'elettrodomestico AVVISO AI CLIENTI IN MERI- sul pianale del lavello. TO AI DISPOSITIVI DI ARCHI- VIAZIONE • Non utilizzare l'elettro- domestico se si trova in Al fine di offrire un servizio uno spazio chiuso o all'in- migliore ai nostri clienti, nei nostri terno di una credenza.
- Page 114 ISTRUZIONI SPECIFICHE Questo simbolo indica che l'apparecchio non PER IL FILTRO DELL'ACQUA può essere smaltito con • Tenere la cartuccia del filtro i rifiuti domestici comuni. fuori dalla portata dei bambini. Deve essere conferito presso • Conservare le cartucce del un centro di smaltimento locale filtro in un luogo asciutto e specializzato o presso un...
- Page 115 Componenti A. Portachicchi da 250 g L. Serbatoio dell'acqua rimovibile da 2 litri Con filtri dell'acqua sostituibili per ridurre calcare Con sistema di bloccaggio per facilitare la rimozione, e impurità. la conservazione e il trasferimento dei chicchi di caffè. M. Manopola vapore B.
- Page 116 ™ Materiali BPA Free* * Sage dichiara questo prodotto BPA Free sulla base di test di laboratorio indipendenti eseguiti per tutti i materiali in plastica del prodotto che entrano a contatto con gli alimenti in conformità al Regolamento della Commissione Europea n. 10/2011.
- Page 117 CONTROLLO DELLA Funzioni di the TEMPERATURA PID Barista Pro ™ Controllo elettronico della temperatura PID per una temperatura più stabile. EROGAZIONE ISTANTANEA DI ACQUA SISTEMA DI RISCALDAMENTO CALDA THERMOJET ™ Uscita dell'acqua calda dedicata per preparare L'innovativo sistema di riscaldamento raggiunge il caffè...
- Page 118 NOTA Montaggio Per i filtri dell'acqua di ricambio, visitare la pagina Web di Sage o contattare il Servizio clienti di Sage. PREPARAZIONE AL PRIMO UTILIZZO RIEMPIRE IL SERBATOIO DELL'ACQUA • Assicurarsi che il filtro dell'acqua sia ben Preparazione della macchina inserito all'interno del serbatoio dell'acqua.
- Page 119 FISSARE IL PORTACHICCHI CICLO DI PRIMO UTILIZZO Inserire il portachicchi nella parte superiore È necessario completare un ciclo di primo della macchina. utilizzo prima di utilizzare la macchina per la prima volta. Il ciclo di primo utilizzo serve a sciacquare la macchina e preparare il sistema di riscaldamento.
- Page 120 Che si scelga di utilizzare il filtro a parete singola o quello a parete doppia, utilizzare il Funzioni filtro per 1 tazza per preparare una sola tazza di caffè e quello per 2 tazze per preparare due tazze o una sola tazza di caffè forte. Sarà...
- Page 121 • Se necessario, premere il pulsante FILTER Quando si regola il grado di macinatura, sul SIZE (dimensione filtro) per selezionare la display LCD viene visualizzata una barra che indica un'erogazione più veloce o più lenta. dimensione del filtro, scegliendo tra una o due tazze.
- Page 122 PRESSARE IL CAFFÈ MACINATO • Rimuovere il portafiltro dal supporto. • Battere il portafiltro diverse volte per distribuire uniformemente il caffè nel filtro. • Pressare con decisione (circa 10-15 kg di pressione) utilizzando il pressino. Non è importante che la pressione esercitata sia forte, ma è...
- Page 123 ESTRAZIONE DELL'ESPRESSO • Come riferimento, l'estrazione dell'espresso inizierà dopo 8-12 secondi (tempo di infusione); il caffè estratto dovrebbe presentare una consistenza simile a quella del miele. • Se l'estrazione dell'espresso inizia dopo meno di 7 secondi significa che la dose di caffè macinato presente nel filtro non è...
- Page 124 VOLUME TAZZA PREPROGRAMMATO - PROGRAMMARE L'ESTRAZIONE 1 TAZZA • Premere il pulsante MENU per accedere al menu principale. • Premere il pulsante 1 TAZZA una volta: il pulsante lampeggia quando viene selezionato. Il display LCD mostrerà la scritta PRE-INFUSE GRIND LOCK SHOT SHOT TEMP...
- Page 125 RIPRISTINARE LE IMPOSTAZIONI • Sollevare la lancia vapore e introdurla nella lattiera immergendone la punta di 1-2 cm sotto PREDEFINITE la superficie del latte, vicino al lato destro della • Premere il pulsante MENU per accedere lattiera. al menu principale. •...
- Page 126 REGOLARE LE MACINE CONICHE Alcuni tipi di caffè possono richiedere una gamma di gradi di macinatura più ampia per ottenere risultati ottimali. Una caratteristica di the Barista Pro è la possibilità di ampliare questa gamma ™ grazie alla macina superiore regolabile. Si raccomanda di effettuare solo una modifica per volta.
- Page 127 MAX e fissarlo nuovamente nell'apparecchio. I filtri dell'acqua di ricambio possono essere 6. Premere il pulsante MENU per accedere acquistati sulla pagina Web di Sage o tramite al menu principale. il Servizio clienti di Sage. 7. Utilizzare la manopola GRIND AMOUNT (quantità...
- Page 128 DECALCIFICAZIONE 5. Una volta terminato il ciclo di decalcificazione, la macchina deve completare un ciclo di risciacquo. Il pulsante 1 TAZZA si illuminerà. NOTA Come per il ciclo di decalcificazione, la manopola STEAM (vapore) deve essere Quando si decalcifica la macchina, assicurarsi impostata manualmente sulla posizione di rimuovere il filtro dell'acqua dal serbatoio corretta quando indicato sul display LCD.
- Page 129 PULIRE IL MACINACAFFÈ CONICO Questo ciclo di pulizia del macinacaffè rimuove l'accumulo di olio sulle macine, che può influire sul funzionamento della macchina. SPINGI Sbloccare il Svuotare il Riposizionare il Bloccare il Avviare il macina- Sbloccare il Rimuovere il portachicchi. portachicchi.
- Page 130 1 TAZZA per arrestare il flusso d'acqua. Conservare l'apparecchio in posizione verticale Rimuovere il portafiltro e sciacquarlo a fondo. e non riporre nulla sopra di esso. CODICE ERRORE Se viene visualizzato il messaggio sul display LCD, contattare il Servizio clienti Sage.
- Page 131 Dosing Funnel ™ Risoluzione dei problemi PROBLEMA POSSIBILI CAUSE COME PROCEDERE • Il serbatoio dell'acqua è vuoto. • Riempire il serbatoio dell'acqua. L'acqua non scorre dal gruppo • Il serbatoio dell'acqua non • Spingere il serbatoio dell'acqua verso di erogazione. è...
- Page 132 PROBLEMA POSSIBILI CAUSE COME PROCEDERE • La macinatura del caffè • Scegliere una macinatura leggermente Il caffè espresso esce troppo è troppo grossa. più fine. velocemente. Consultare le sezioni "Impostare il grado di macinatura" a pag. 13 ed "Estrazione non sufficiente" a pag. 15. •...
- Page 133 PROBLEMA POSSIBILI CAUSE COME PROCEDERE • Tazze non preriscaldate. • Sciacquare le tazze sotto l'erogatore Il caffè non è sufficientemente di acqua calda. caldo. • Portafiltro non preriscaldato. • Sciacquare il portafiltro in acqua corrente calda. Asciugare a fondo. • Il latte non è abbastanza •...
- Page 134 Lasciar raffreddare per 30-60 minuti. pompa o del macinacaffè. • Se il problema persiste, contattare l'assistenza Sage. • Non sono presenti chicchi • Riempire il portachicchi con chicchi Il caffè non esce dal macinacaffè. di caffè nel portachicchi.
- Page 135 Garanzia GARANZIA LIMITATA DI 2 ANNI Sage Appliances offre una garanzia per l'utilizzo domestico di questo prodotto in specifiche aree geografiche; la copertura è di 2 anni a partire dalla data di acquisto. La garanzia copre eventuali malfunzionamenti causati da difetti di fabbricazione o dei materiali.
- Page 136 Nota...
- Page 137 User Guide Barista Pro ™ B###### / S###### BES878 / SES878 GUÍA RÁPIDA...
- Page 138 • Hay una versión de este ® documento disponible seguridad ante todo en sageappliances.com 6 Componentes para descargar. 8 Características de Barista Pro ™ • Antes de usar el producto 9 Ensamblaje por primera vez, asegúrate 11 Funciones de que la tensión de la toma...
- Page 139 No se debe y devuélvela al Centro de servicio utilizar al aire libre. El uso autorizado de Sage más cercano inapropiado podría causar para que la examinen, reem- lesiones. placen o reparen.
- Page 140 • El uso de accesorios no al sabor del café y la forma vendidos o recomendados por en que la máquina de expreso Sage puede provocar incendios, está diseñada para funcionar. descargas eléctricas o lesiones. • Nunca uses el electrodoméstico •...
- Page 141 INSTRUCCIONES • No hagas funcionar el molinillo sin la tapa de la tolva colocada. ESPECÍFICAS PARA Mantén los dedos, manos, EL FILTRO DE AGUA cabello, ropa y utensilios • El cartucho de filtro debe alejados de la tolva durante mantenerse fuera del alcance la operación.
- Page 142 Componentes A. Tolva de café de 250 g L. Depósito de agua extraíble de 2 l Con sistema de bloqueo para facilitar la extracción, Con filtros de agua reemplazables para reducir almacenamiento y transferencia de granos de café. la cal y las impurezas. B.
- Page 143 ™ Materiales libres de BPA* * Sage califica este producto como libre de BPA a partir de pruebas independientes de laboratorio realizadas en todos los materiales plásticos del producto que entran en contacto con alimentos, de conformidad con el Reglamento n.º 10/2011 de la Comisión Europea.
- Page 144 AGUA CALIENTE INSTANTÁNEA Características Salida de agua caliente dedicada para hacer de Barista Pro cafés solos largos y precalentar tazas. ™ PREINFUSIÓN A BAJA PRESIÓN Aplica baja presión de agua al inicio de la extracción para expandir suavemente el café...
- Page 145 Contact the Breville Customer Service Centre for further assistance. NOTA Para filtros de agua de recambio, visita la página AUS 1300 139 798 web de Sage o comunícate con el Servicio de atención al cliente de Sage. NZ 0800 273 845 www.Breville.com.au Assemble...
- Page 146 PRIMER CICLO DE USO Ensamblaje Debe completarse un primer ciclo de uso antes del uso inicial de la máquina. El primer ciclo de uso enjuaga la máquina y ceba el sistema de calentamiento. 1. Llena el depósito de agua. ACOPLAMIENTO DE LA TOLVA 2.
- Page 147 Tanto si usas filtros presurizados como no presurizados, usa el filtro de 1 taza cuando Funciones prepares una taza y el filtro de 2 tazas cuando prepares dos tazas o una taza más fuerte. Tendrás que ajustar la cantidad y el grosor del molido si cambias de un filtro para una taza o para dos, o viceversa.
- Page 148 EL MOLIDO DOSIFICACIÓN DEL CAFÉ • Llena la tolva con granos de café frescos. Al moler los granos de café, el grosor del molido debe ser fino, pero no demasiado fino. El grosor • Inserta el filtro correspondiente en el portafiltros. del molido afectará...
- Page 149 DOSIFICACIÓN MANUAL • Coloca la herramienta de ajuste de dosis the Razor en el filtro hasta que los hombros ™ Para dosificar manualmente el café, mantén de la herramienta se apoyen en el borde del pulsado el portafiltros en el receptáculo de filtro.
- Page 150 EXTRACCIÓN DE EXPRESO • Como guía, el expreso comenzará a fluir después de 8 a 12 segundos (tiempo de infusión) y debe tener la consistencia de la miel que gotea. • Si el café expreso comienza a fluir después de menos de 7 segundos, has dosificado poco el filtro y/o el molido es demasiado grueso.
- Page 151 VOLUMEN DE DOSIS PROGRAMACIÓN DE DOSIS DE EXPRESO PREPROGRAMADO: 1 CUP • Pulsa el botón MENU para acceder al menú principal. • Pulsa el botón 1 TAZA una vez, el botón parpadeará indicando que ha sido seleccionado. La pantalla LCD mostrará PRE-INFUSE GRIND LOCK SHOT...
- Page 152 USO DE LA SALIDA DE AGUA CALIENTE • Levanta la jarra para bajar la punta debajo de la superficie, pero mantén el vórtice girando. La función de agua caliente se puede utilizar La leche está a la temperatura correcta para precalentar tazas o para agregar agua (60-65 °C) cuando la jarra está...
- Page 153 AJUSTE DE MUELAS CÓNICAS Algunos tipos de café pueden requerir un rango de molido más amplio para lograr una extracción o elaboración ideal. Una característica de tu Barista Pro es la capacidad de extender este rango ™ con una muela superior ajustable. Recomendamos hacer solo un ajuste a la vez.
- Page 154 Los filtros de agua de recambio se pueden seleccionar. El botón 1 TAZA se iluminará. comprar en el sitio web de Sage o contactando con el Servicio de atención al cliente de Sage. 8. Pulsa el botón 1 TAZA para iniciar el ciclo de limpieza.
- Page 155 DESCALCIFICACIÓN 5. Una vez que se completa el ciclo de descalcificación, la máquina debe completar un ciclo de enjuague. El botón 1 TAZA NOTA se iluminará. Al igual que con el ciclo de descalcificación, el dial STEAM se debe girar Asegúrate de retirar el filtro del depósito de manualmente a la posición correcta cuando agua antes de añadir el polvo descalcificador...
- Page 156 LIMPIEZA DEL MOLINILLO DE MUELA CÓNICA Este ciclo de limpieza del molinillo elimina la acumulación de aceite en las muelas que pueden impedir el buen rendimiento. Desbloquea Vacía la tolva Coloca la tolva Bloquea la tolva Pon el molinillo Desbloquea Retira la tolva la tolva en marcha en vacío...
- Page 157 Pulsa nuevamente el botón 1 TAZA para Si tu máquina muestra en la pantalla LCD, detener el agua caliente. Retira el portafiltros contacta con el Servicio de atención al cliente y enjuaga bien. de Sage.
- Page 158 Dosing Funnel ™ Resolución de problemas PROBLEMA POSIBLES CAUSAS QUÉ HACER • El depósito de agua está • Llena el depósito. El agua no fluye desde el grupo. vacío. No hay agua caliente. • El depósito de agua no está •...
- Page 159 PROBLEMA POSIBLES CAUSAS QUÉ HACER El expreso sale • Café molido demasiado • Usa un molido ligeramente más fino. demasiado grueso. Consulta “Ajuste del grosor del molido”, rápidamente. página 12 y “Extracción insuficiente”, página 14. • No hay suficiente café •...
- Page 160 PROBLEMA POSIBLES CAUSAS QUÉ HACER El café no está • Tazas no precalentadas. • Enjuaga las tazas bajo la salida lo suficientemente de agua caliente. caliente. • Portafiltros no precalentado. • Enjuaga el portafiltros bajo la salida de agua caliente. Seca bien todo. •...
- Page 161 30-60 minutos. de la bomba o del molinillo. • Si el problema persiste, llama a Soporte de Sage. No sale café molido • No hay granos de café • Llena la tolva con granos de café del molinillo.
- Page 162 Garantía GARANTÍA LIMITADA DE 2 AÑOS La garantía de Sage Appliances cubre este producto para uso doméstico en territorios específicos durante 2 años a partir de la fecha de compra contra fallos causados por mano de obra y materiales defectuosos. Durante el plazo de la garantía, Sage Appliances reparará,...
- Page 163 User Guide Barista Pro ™ B###### / S###### BES878 / SES878 MANUAL RÁPIDO...
- Page 164 7 Componentes • Antes de utilizar pela primeira 9 Funcionalidades vez, certifique-se de que da Barista Pro ™ a sua fonte de alimentação 10 Montagem corresponde à indicada 12 Funções na etiqueta de classificação 19 Cuidados e limpeza na parte inferior do aparelho.
- Page 165 Sage mais de uma fonte de calor, como próximo para fins de inspeção, uma placa térmica, forno substituição ou reparação.
- Page 166 • O uso de dispositivos suple- mentares não vendidos ou • Nunca use o aparelho com recomendados pela Sage pode o depósito de água vazio. provocar incêndios, choques • Certifique-se de que o manípulo elétricos ou lesões.
- Page 167 RELAÇÃO AO ARMAZENA- ser realizada por um centro MENTO NA MEMÓRIA de assistência autorizado Tenha em atenção que, para pela Sage ® servir melhor os nossos clientes, • Não opere o aparelho sobre o armazenamento da memória uma pia de cozinha.
- Page 168 INSTRUÇÕES ESPECÍFICAS O símbolo apresentado PARA O FILTRO DE ÁGUA indica que este aparelho não deve ser eliminado • O cartucho do filtro deve ser juntamente com os resíduos mantido fora do alcance de domésticos normais. Deve ser crianças. encaminhado para um centro de •...
- Page 169 Componentes A. Depósito de grãos de 250 g L. Depósito de água removível de 2 l Com sistema de bloqueio para remoção, armazena- Com filtros de água substituíveis para reduzir mento e transferência fácil dos grãos de café. o calcário e as impurezas. B.
- Page 170 ™ Materiais sem BPA* * A Sage declara que este produto não contém BPA com base nos testes de um laboratório independente realizados em todos os materiais plásticos do produto em contacto com alimentos, de acordo com a Norma 10/2011 da Comissão Europeia.
- Page 171 CONTROLO DE TEMPERATURA Funcionalidades DE DOSE AJUSTÁVEL da Barista Pro Para o sabor ideal do café. CONTROLO DE TEMPERATURA PID Controlo de temperatura eletrónico PID para maior SISTEMA DE AQUECIMENTO estabilidade de temperatura. THERMOJET ™ O inovador sistema de aquecimento atinge ÁGUA QUENTE INSTANTÂNEA...
- Page 172 Contact the Breville Customer Service Centre NOTA for further assistance. Para a substituição dos filtros de água, visite AUS 1300 139 798 a página Web da Sage ou contacte o serviço de atendimento ao cliente da Sage. NZ 0800 273 845 www.Breville.com.au Assemble...
- Page 173 INSTALAR O DEPÓSITO DE GRÃOS CICLO DE PRIMEIRA UTILIZAÇÃO Introduza o depósito de grãos na posição na parte Deve executar um ciclo de primeira utilização superior da máquina. antes de utilizar a máquina. O primeiro ciclo de utilização limpa a máquina e prepara o sistema de aquecimento.
- Page 174 Independentemente de utilizar cestos de filtro de parede única ou parede dupla, utilize o cesto Funções de filtro de 1 chávena quando extrair uma única chávena e os cestos de filtro de 2 chávenas quando extrair 2 chávenas ou uma única chávena com café...
- Page 175 • Se necessário, rode o botão GRIND AMOUNT (Grau de moagem) para alterar o tempo de GRIND LOCK SHOT SHOT TEMP FASTER PRE-INFUSE POUR HOPPER moagem; no sentido dos ponteiros do relógio HOTTER DOUBLE WATER GRIND para aumentar o tempo e no sentido contrário SINGLE SIZE FLUSH...
- Page 176 PRENSAR O CAFÉ MOÍDO • Rode a ferramenta de ajuste de dose Razor ™ para a frente e para trás enquanto segura • Remova o manípulo de café da base de moagem. o manípulo de café inclinado sobre o recipiente •...
- Page 177 EXTRAIR UM CAFÉ EXPRESSO • Como guia, o café expresso inicia a extração após 8-12 segundos (tempo de infusão) e deve ter a consistência do mel. • Se o café expresso começar a sair após menos de 7 segundos, significa que colocou uma dose insuficiente no cesto de filtro e/ou a moagem é...
- Page 178 VOLUME DA DOSE PRÉ-PROGRA- PROGRAMAR UMA DOSE MADO – 1 CHÁVENA DE CAFÉ EXPRESSO • Prima o botão 1 CUP (1 Chávena) uma vez, • Prima o botão MENU para aceder ao menu o botão pisca para indicar que foi selecionado. principal.
- Page 179 REPOR AS PREDEFINIÇÕES • Rode o botão STEAM (Vapor) para • Mantenha o bocal do vaporizador abaixo • Prima o botão MENU para aceder ao menu da superfície do leite até que o leite comece principal. a rodar na direção dos ponteiros do relógio •...
- Page 180 AJUSTAR OS TRITURADORES CÓNICOS Alguns tipos de café podem necessitar de um maior intervalo de moagem para obter a extração ideal. Uma funcionalidade da sua Barista Pro é a capacidade de ampliar este intervalo com um triturador ™...
- Page 181 7. Utilize o botão GRIND AMOUNT (Grau de no website da Sage ou contactando diretamente moagem) para navegar no menu até FLUSH o serviço de atendimento ao cliente da Sage. (Limpeza) e prima para selecionar. O botão 1 CUP (1 Chávena) ilumina-se.
- Page 182 DESCALCIFICAR 5. Após terminar o ciclo de descalcificação, a máquina deve realizar um ciclo de limpeza com água. O botão 1 CUP (1 Chávena) ilumina-se. NOTA Tal como no ciclo de descalcificação, o botão STEAM (Vapor) deve ser rodado manualmente Certifique-se de que remove o filtro de água para a posição correta quando indicado no LCD.
- Page 183 LIMPAR O MOINHO CÓNICO Este ciclo de limpeza do moinho remove a acumulação de óleo nos trituradores, o que pode prejudicar o desempenho. Opere o moinho Desbloqueie Esvazie Substitua Bloqueie Desbloqueie Remova vazio o depósito o depósito o depósito o depósito o depósito o depósito Limpe o triturador...
- Page 184 MODO DE ERRO Prima o botão 1 CUP (1 Chávena) novamente para parar a água quente. Remova o manípulo Se a máquina apresentar no LCD, contacte de café e enxague cuidadosamente. o serviço de atendimento ao cliente da Sage.
- Page 185 Dosing Funnel ™ Resolução de problemas PROBLEMA CAUSAS POSSÍVEIS O QUE FAZER • O depósito de água está vazio. • Encha o depósito. A água não sai da unidade de extração. • O depósito de água não foi • Empurre o depósito de água Não há...
- Page 186 PROBLEMA CAUSAS POSSÍVEIS O QUE FAZER • O grau de moagem do café • Use um grau de moagem ligeiramente O café expresso sai demasiado depressa. é demasiado grosso. mais fino. Consulte a secção "Definir o grau de moagem", na página 12 e a secção "Sub-extração", na página 15.
- Page 187 Deixe arrefecer durante cerca de 30-60 minutos. • Contacte o serviço de atendimento ao cliente da Sage se o problema persistir.
- Page 188 PROBLEMA CAUSAS POSSÍVEIS O QUE FAZER • Não há grãos de café no depósito • Encha o depósito de grãos com grãos Não sai café moído do moinho. de grãos. de café frescos. • A câmara ou calha do moinho •...
- Page 189 Garantia GARANTIA LIMITADA DE 2 ANOS A Sage Appliances fornece uma garantia para este produto para uso doméstico nos territórios especificados de 2 anos a partir da data de compra contra avarias provocadas por defeitos na mão-de-obra e de materiais. Durante esse período da garantia, a Sage Appliances irá...
- Page 190 Notas...
- Page 191 User Guide Barista Pro ™ B###### / S###### BES878 / SES878 SZYBKI PRZEWODNIK...
- Page 192 2 Dla Sage liczy się ® urządzenia. W razie wątpliwości bezpieczeństwo skontaktuj się z lokalnym 6 Części dostawcą energii. 8 Zalety Barista Pro ™ • Zaleca się instalację wyłącznika 9 Montaż różnicowoprądowego w celu 11 Funkcje zapewnienia dodatkowego 18 Konserwacja i czyszczenie zabezpieczenia podczas 22 Rozwiązywanie problemów...
- Page 193 Nie używaj go na zewnątrz. centrum serwisowego Sage ® Niewłaściwe użycie może celu przeprowadzenia kontroli, spowodować obrażenia. dokonania wymiany lub naprawy. • Umieść urządzenie na • Utrzymuj urządzenie i akcesoria stabilnej, odpornej na działanie w czystości. Postępuj zgodnie wysokich temperatur, równej z zalecaniami dotyczącymi...
- Page 194 Nie zalecamy • Używanie przystawek, których stosowania wody filtrowanej, nie sprzedaje ani nie zaleca demineralizowanej ani destylo- firma Sage może spowodować wanej, gdyż może to wpłynąć na smak kawy i działanie pożar, porażenie prądem elektrycznym lub obrażenia. ekspresu ciśnieniowego.
- Page 195 Trzymaj palce, dłonie, włosy, INSTRUKCJE DOTYCZĄCE ubrania i przyrządy kuchenne FILTRA WODY z dala od zasobnika podczas • Przechowuj wkład filtrujący pracy urządzenia. poza zasięgiem dzieci. • Przechowuj wkłady filtrujące INFORMACJE DLA w suchym miejscu, w oryginal- KLIENTÓW DOTYCZĄCE nym opakowaniu. PAMIĘCI MASOWEJ •...
- Page 196 Części A. Zasobnik na ziarna kawy o pojemności 250 g L. Wyjmowany zbiornik na wodę o pojemności 2 l Z wymiennymi filtrami wody, które redukują kamień Z systemem zamykającym ułatwiającym demontaż, i zanieczyszczenia. a także przechowywanie i przenoszenie ziaren kawy. M.
- Page 197 4. Filtr i uchwyt do filtra wody 5. Tarcza czyszcząca * Oświadczenie firmy Sage o braku zawartości BPA dla tego produktu opiera się na niezależnych testach laboratoryjnych przeprowadzonych na wszystkich tworzywach sztucznych mających kontakt z żywnością zastosowanych w produkcie zgodnie z Rozporządzeniem Komisji Europejskiej (UE) nr 10/2011.
- Page 198 SYSTEM KONTROLI TEMPERATURY PID Zalety Elektroniczny system kontroli temperatury PID Barista Pro zwiększający stabilność temperatury. ™ FUNKCJA BŁYSKAWICZNEGO WRZĄTKU SYSTEM GRZEWCZY THERMOJET ™ Osobna wylewka gorącej wody do przyrządzania Innowacyjny system grzewczy uzyskuje kawy long black i podgrzewania filiżanek. temperaturę optymalną do parzenia kawy w zaledwie 3 sekundy.
- Page 199 UWAGA Montaż Jeśli potrzebujesz zapasowych filtrów wody, odwiedź witrynę firmy Sage lub skontaktuj się z Działem Obsługi Klienta Sage. PRZED PIERWSZYM UŻYCIEM NAPEŁNIANIE ZBIORNIKA NA WODĘ • Upewnij się, że filtr wody bezpiecznie Przygotowanie urządzenia zamocowano w zbiorniku na wodę.
- Page 200 MOCOWANIE ZASOBNIKA CYKL PIERWSZEGO URUCHOMIENIA Włóż zasobnik na ziarna kawy w odpowiednie Przed pierwszym użyciem urządzenia należy miejsce w górnej części ekspresu. wykonać cykl pierwszego uruchomienia. Cykl pierwszego uruchomienia polega na przepłukaniu ekspresu i przygotowaniu systemu grzewczego. 1. Napełnij zbiornik na wodę. 2.
- Page 201 Do zaparzania pojedynczej filiżanki używaj sitka do 1 filiżanki, a do zaparzania 2 filiżanek Funkcje lub mocniejszej kawy bądź kubka — sitka do 2 filiżanek (mowa tutaj zarówno o sitkach z pojedynczym i podwójnym dnem). Jeśli przechodzisz z pojedynczego sitka na podwójne lub w drugą...
- Page 202 MIELENIE • Zamocuj i przekręcić lejek dozujący na kolbie. • Umieść kolbę (z lejkiem dozującym) w uchwycie Mieląc ziarna kawy, należy zadbać, aby ziarna do kolby. były drobno zmielone, ale nie sproszkowane. Grubość mielenia wpłynie na tempo przepływu wody przez kawę w sitku filtrującym oraz smak espresso.
- Page 203 UBIJANIE ZMIELONEJ KAWY • Obróć narzędzie do porcjowania Razor ™ w obie strony, trzymając kolbę pod kątem • Wyciągnij kolbę z uchwytu do kolby. nad odbijakiem do fusów, aby pozbyć się • Popukaj kolbą kilka razy, aby lekko ubić nadmiaru zmielonej kawy. Sitko filtrujące jest i równomiernie rozprowadzić...
- Page 204 PARZENIE ESPRESSO • Espresso zacznie płynąć po około 8–12 sekundach (czas parzenia) i powinno mieć konsystencję kapiącego miodu. • Jeśli espresso zacznie płynąć przed upływem 7 sekund, oznacza to, że nałożono zbyt małą porcję kawy do sitka i/lub ziarna zostały zbyt grubo zmielone. Taka kawa jest NIEDOPARZONA. •...
- Page 205 WSTĘPNIE ZAPROGRAMOWANA PROGRAMOWANIE PORCJI ESPRESSO WIELKOŚĆ PORCJI — 1 FILIŻANKA • Naciśnij przycisk MENU, aby przejść do menu głównego. • Naciśnij raz przycisk 1 filiżanki. Przycisk zacznie migać, wskazując, że został naciśnięty. Na wyświetlaczu LCD pojawi się komunikat GRIND LOCK SHOT SHOT TEMP FASTER...
- Page 206 • Wówczas dla ustawień ilości mielonego ziarna, tuż pod powierzchnię i zacznie wprowadzać grubości filtra, temperatury porcji, 1 filiżanki powietrze do mleka. i 2 filiżanek zostaną przywrócone wartości • Lekko przetnij powierzchnię mleka końcówką domyślne. Ekspres powróci do trybu gotowości. dyszy, aby wytworzyć...
- Page 207 REGULACJA ŻAREN STOŻKOWYCH Niektóre rodzaje kawy mogą wymagać szerszego zakresu mielenia, aby można było uzyskać idealną ekstrakcję lub napar. Ekspres Barista Pro daje możliwość zwiększenia tego zakresu dzięki ™ regulowanemu pierścieniowi żarna. Zalecamy dostosowywanie żaren o jeden stopień na raz.
- Page 208 Wymienne filtry wody można nabyć w witrynie 7. Za pomocą pokrętła GRIND AMOUNT przejdź internetowej firmy Sage lub kontaktując się do menu FLUSH, a następnie naciśnij je, aby z Działem Obsługi Klienta firmy Sage. potwierdzić wybór. Przycisk 1 filiżanki zaświeci się.
- Page 209 ODKAMIENIANIE 6. Wyjmuj i opróżnij tackę ociekową, a następnie zamontuj ją z powrotem w ekspresie. Opróżnij zbiornik na wodę z resztek płynu do usuwania UWAGA kamienia, a następnie napełnij go do linii MAX i ponownie zamontuj go w ekspresie. Przed rozpoczęciem procesu odkamieniania 7.
- Page 210 CZYSZCZENIE MŁYNKA Z ŻARNAMI STOŻKOWYMI Ten cykl czyszczenia młynka usuwa olej nagromadzony na żarnach, który może utrudniać pracę. NACIŚNIJ Włącz młynek Odblokuj Opróżnij Załóż zasobnik Zamocuj zasobnik Odblokuj Zdejmij zasobnik i poczekaj, zasobnik zasobnik na ziarna na ziarna zasobnik aż będzie pusty na ziarna na ziarna na ziarna...
- Page 211 Wyjmij kolbę i dokładnie ją wypłucz. Ekspres należy przechowywać w pozycji pionowej i nie umieszczać na nim żadnych przedmiotów. TRYB BŁĘDU Jeśli na wyświetlaczu LCD urządzenia pojawi się komunikat , skontaktuj się z działem obsługi klienta firmy Sage.
- Page 212 Dosing Funnel ™ Rozwiązywanie problemów PROBLEM MOŻLIWE PRZYCZYNY ROZWIĄZANIE • Zbiornik na wodę jest pusty. • Napełnij zbiornik. Woda nie wypływa z głowicy. • Zbiornik na wodę nie • Wciśnij zbiornik na wodę do oporu, Brak gorącej wody. jest całkowicie wsunięty aby zamocować...
- Page 213 PROBLEM MOŻLIWE PRZYCZYNY ROZWIĄZANIE • Kawa jest zbyt grubo zmielona. • Zwiększ nieco stopień mielenia. Espresso wypływa zbyt szybko. Patrz sekcja „Regulowanie grubości mielenia” na stronie 12 oraz „Zbyt krótka ekstrakcja” na stronie 14. • Zbyt mało kawy w sitku •...
- Page 214 Pozostaw ekspres do ostygnięcia na około 30–60 minut. • Jeżeli problem się powtarza, skontaktuj się z Działem Pomocy Technicznej firmy Sage.
- Page 215 PROBLEM MOŻLIWE PRZYCZYNY ROZWIĄZANIE • W zasobniku nie ma ziaren • Napełnij zasobnik świeżymi Z młynka nie wydobywa się zmielona kawa. kawy. ziarnami kawy. • Zapchana komora lub wylot • Oczyść i udrożnij komorę oraz młynka. wylot młynka. Patrz sekcja „Zaawansowane czyszczenie młynka z żarnami stożkowymi”...
- Page 216 Gwarancja OGRANICZONA GWARANCJA NA 2 LATA Firma Sage Appliances obejmuje niniejszy produkt gwarancją na wady produkcyjne i materiałowe pod warunkiem korzystania z niego w warunkach domowych. Gwarancja obowiązuje w ciągu dwóch lat od zakupu i w określonych regionach. W okresie gwarancji firma Sage Appliances naprawi lub wymieni wadliwe produkty bądź...
- Page 217 Notatki...
- Page 218 Notatki...
- Page 219 Notatki...
- Page 220 Deutschland: 0800 505 3104 Österreich: 0800 80 2551 Portugal Sweden 0800 180 243 0200 123 797 Sage Appliances France SAS Siège social: 66 avenue des Champs Elysées – 75008 Paris Poland Finland 879 449 866 RCS Paris 00800 121 8713...
Need help?
Do you have a question about the Barista Pro and is the answer not in the manual?
Questions and answers