
Related Manuals for PureTools PT-PSW-42MV


Summary of Contents for PureTools PT-PSW-42MV
- Page 1 User Manual PT-PSW-42MV User Manual 4x2, Seamless Multi-view Switcher Model PT-PSW-42MV Designed in Germany V1.1 © 2022 PureLink GmbH All rights reserved.
- Page 2 User Manual PT-PSW-42MV Preface Read this user manual carefully before using this product. Pictures shown in this manual are for reference only. Different model layouts and specifications are subject to the physical product. This manual is for operation instructions only, not for any maintenance usage.
- Page 3 PT-PSW-42MV REACH | 1907/2006/EU ROHS | 2011/65/EU PureLink hereby declares that this product PureTools PT-PSW-42MV complies with Directives 1907/2006/EU und 2011/65/EU. EMC / LVD (Electro Magnetic Compatibility / Low Voltage Directive) PureLink GmbH hereby declares that this product PureTools PT-PSW-42MV complies with Directives 2014/30/EU and 2014/35/EU.
- Page 4 User Manual PT-PSW-42MV SAFETY PRECAUTIONS To ensure the best from the product, please read all instructions carefully before using the device. Save this manual for further reference. Unpack the equipment carefully and save the original box and packing material ⚫...
-
Page 5: Table Of Contents
User Manual PT-PSW-42MV Table of Contents http://www.purelink.de/ce/ ...................... 3 1. Introduction ........................... 1 1.1 Features..........................1 1.2 Package List ........................2 2. Specification ..........................3 3. Panel Description ......................... 6 3.1 Switcher Front Panel ......................6 3.2 Switcher Rear Panel ......................7 3.3 Receiver Front and Rear Panel .................. - Page 6 User Manual PT-PSW-42MV 6.3 Display Setting Tab ......................21 6.4 Resolution Tab .........................22 6.5 CEC Tab ..........................23 6.5.1 Source Control ....................23 6.5.2 Display Control ....................23 6.5.3 User-defined CEC Command................24 6.6 EDID Tab ...........................25 6.6.1 EDID Setting ......................25 6.6.2 EDID Upload .......................
-
Page 7: Introduction
PT-PSW-42MV 1. Introduction Thank you for choosing the PureLink PT-PSW-42MV presentation switcher. It offers four HDMI inputs as well as one DisplayPort and USB-C input each, switching to one HDBaseT output as well as one local HDMI monitoring output. The HDBaseT out can... -
Page 8: Package List
User Manual PT-PSW-42MV 1.2 Package List Switcher Receiver 1x 4x2 4K Presentation Switcher 1x HDBaseT Receiver ⚫ ⚫ 2x Mounting Ears with 4 Screws 2x Mounting Ears with 4 Screws ⚫ ⚫ 4x Plastic Cushions 4x Plastic Cushions ⚫ ⚫... -
Page 9: Http://Www.purelink.de/Ce
User Manual PT-PSW-42MV 2. Specification Switcher Video Video Input (4) HDMI IN (1~4), (1) DP, (1) USB-C Input Connector (4) Type-A female HDMI, (1) DisplayPort, (1) Type-C USB HDMI: Up to 4K@30Hz 4:4:4 HDMI Input Resolution DP: Up to 4K@30Hz 4:4:4... - Page 10 User Manual PT-PSW-42MV L+R Audio Output < 0.05%, 20Hz ~ 20kHz bandwidth, 1kHz sine at 0dBFS THD+N level (or max level) > 80dB, 20Hz ~ 20kHz bandwidth Crosstalk Isolation < -70dB, 10kHz sine at 0dBFS level < 0.3dB, 1kHz sine at 0dBFS level (or max level before...
- Page 11 User Manual PT-PSW-42MV Dimension (W*H*D) 250mm x 44mm x 200mm Net Weight 1.6kg Receiver Input and Output Input (1) HDBT IN Input Connector (1) RJ45 Output (1) HDMI OUT Output Connector (1) Type-A female HDMI Control (1) IR IN, (1) IR OUT, (1) RS232 Control Connector (2) 3.5mm jack, (1) 3-pin terminal block...
-
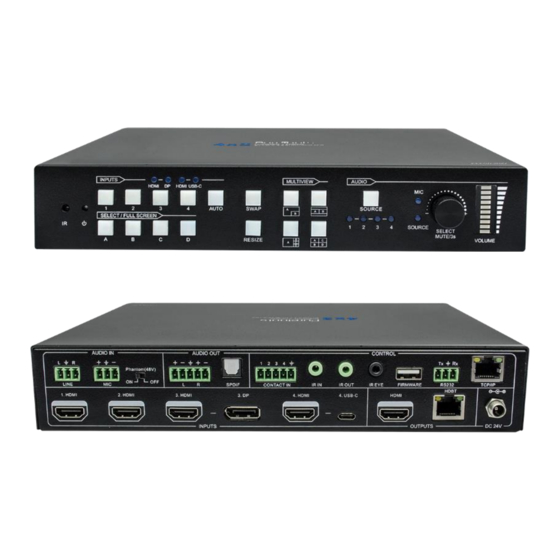
Page 12: Panel Description
User Manual PT-PSW-42MV 3. Panel Description 3.1 Switcher Front Panel Name Description Built-in IR sensor, receives IR signal sent from IR IR LED ① remote. Illuminates red when switcher is in standby POWER LED mode or illuminates green when device is ②... -
Page 13: Switcher Rear Panel
User Manual PT-PSW-42MV Select the audio source. The corresponding LED (1~4) will illuminate blue. When LINE audio is AUDIO SOURCE ⑨ selected, the button itself illuminates blue. Variable audio control. Press the volume knob to select microphone or ⚫ source audio control. -
Page 14: Receiver Front And Rear Panel
User Manual PT-PSW-42MV L+R: Balanced analog audio ouput for audio de-embedding. ④ AUDIO OUT SPDIF: Digital SPDIF audio output for audio de-embedding. CONTACT IN: Implement external sensors, buttons and other devices for input source selection. IR IN: Connects to IR receiver for IR pass-through. -
Page 15: System Diagram
User Manual PT-PSW-42MV IR OUT Connects to IR emitter for IR pass-through. ⑥ HDMI Output: Connect with HDMI display. ⑦ Connect to the HDBT OUT port on the transmitter via HDBaseT input: ⑧ CAT5e/ CAT6a cable. DC 24V DC connector for power adapter connection. -
Page 16: Front Panel Control
User Manual PT-PSW-42MV 4. Front Panel Control 4.1 Multi-view Mode Selection There are four multiview modes that can be selected using the front panel buttons. The factory default multi-view mode is quartered window mode, and there is a one-one correspondence between the four input sources and the four output windows: input 1 ->... -
Page 17: Swap Window Setting
User Manual PT-PSW-42MV 4.3 Swap Window Setting Press the SWAP button to cycle through the video sources of the windows display in anticlockwise direction. The SWAP LED illuminates once when its corresponding button is pressed. Example: In Multiview Mode SWAP... -
Page 18: Video Signal Switching
User Manual PT-PSW-42MV RESIZE RESIZE Example: One Large and Three Small RESIZE RESIZE 4.5 Video Signal Switching In the multiview mode ⚫ Operation: Inputs# + Windows# Example: Switch Input 1 to Window B: Press INPUT 1 (The input 1 LED illuminates blue, the windows A~D LEDs flash.) -
Page 19: Video Switching Status Inquiry
User Manual PT-PSW-42MV When in auto-switching mode, the switcher will switch according to the following rules: The switcher will switch to the available active inputs with the priority: 1-HDMI > ➢ 2-HDMI > 3-HDMI > 3-DP > 4-HDMI > 4-USB-C. When input source and output window are connected, the corresponding LEDs illuminate blue. -
Page 20: Ir Remote Control
User Manual PT-PSW-42MV Press the volume knob to select microphone or source audio control. Rotate the knob to increase or decrease the volume of the selected audio. Press and hold the knob at least 3 seconds to mute the selected audio, rotate the knob to unmute. -
Page 21: Gui Control
User Manual PT-PSW-42MV 6. GUI Control The switcher can be controlled via TCP/IP. The default IP settings are: IP Address: 192.168.0.178 Subnet Mask: 255.255.255.0 Note: It also supports UDP, allowing to be found in the network by other devices. The corresponding port is 7001.The return format is json. -
Page 22: Control Tab
User Manual PT-PSW-42MV 6.1 Control Tab 6.1.1 Video Control The source selection buttons, Auto button and window A~D buttons are same as ⚫ 4.5 Video Signal Switching the buttons of front panel button. Please find more details. Click “Power Off” to enter system standby mode. -
Page 23: Display Control
User Manual PT-PSW-42MV 6.1.2 Display Control Display: Click “On” or “Off” to power on or off the display device. ⚫ Command: Type desired command to be sent in this box to control the display ⚫ device and then click “Send”... - Page 24 User Manual PT-PSW-42MV Source: Select audio source for audio outputs, HDMI and HDBaseT outputs. ⚫ Source Volume: Volume bar, volume up, volume down and mute buttons for ⚫ source audio control. Audio Out Delay: Set the delay time of audio output to 0~150ms.
-
Page 25: Multiview Tab
User Manual PT-PSW-42MV 6.2 Multiview Tab 6.2.1 Pre-defined Up to 16 multiview modes can be selected. ⚫ RESIZE: Click the button to adjust the window size. Note that only Layout 2, ⚫ Layout 5~Layout 8, Layout 9~Layout 12 can be adjusted window size. -
Page 26: User-Defined
User Manual PT-PSW-42MV 6.2.2 User-defined... -
Page 27: Display Setting Tab
User Manual PT-PSW-42MV User Layout: Select the user-defined layout number 1~4. ⚫ Window Select: Select the input source for each window, and then adjust ⚫ window size by setting start position and end position. Click “Save” to save the user-defined layout. -
Page 28: Resolution Tab
User Manual PT-PSW-42MV Display On: Type RS232 command to turn on display, and then click “Save”. ⚫ Input Delay: Set the delay time in seconds between the “Display On” and ⚫ “Display Input Select” commands. Display Input Select: Type the RS232 command to select the current input ⚫... -
Page 29: Cec Tab
User Manual PT-PSW-42MV 6.5 CEC Tab 6.5.1 Source Control Select the HDMI input source which needs to be controlled, and then click ⚫ function buttons. 6.5.2 Display Control... -
Page 30: User-Defined Cec Command
User Manual PT-PSW-42MV Select the output display device which needs to be controlled, and then click ⚫ function buttons. 6.5.3 User-defined CEC Command Select input source or display device, and then type CEC command in the ⚫ corresponding Trigger 1 or Trigger 2 box to be sent to control the selected... -
Page 31: Edid Tab
User Manual PT-PSW-42MV 6.6 EDID Tab 6.6.1 EDID Setting Select the compatible built-in EDID for the selected input source. ⚫ 6.6.2 EDID Upload Upload user-defined EDID by following the steps below: ⚫... -
Page 32: Network Tab
User Manual PT-PSW-42MV Step 1: Prepare the EDID file (.bin) on the control PC. Step 2: Click the "User-defined" box, and then select the EDID file (.bin). Step 3: Click “Apply” to upload the user-defined EDID. 6.7 Network Tab Static IP or Dynamic Host Configuration Protocol (DHCP). -
Page 33: Tags Tab
User Manual PT-PSW-42MV 6.8 Tags Tab Modify the multiview layout labels. ⚫ 6.9 Security Tab Modify the login password. ⚫... -
Page 34: Additional Tab
User Manual PT-PSW-42MV Lock or unlock the front panel buttons ⚫ GUI automatically log on/off setting button ⚫ User 2/ User 3 account control selection setting ⚫ 6.10 Additional Tab Set the baud rate of switcher and restore the switcher to factory default ⚫... - Page 35 User Manual PT-PSW-42MV Select the desired update file and press “Apply” to start upgrade. Note: Please don’t do anything during the upgrade process to avoid upgrade failure.
-
Page 36: Rs232 Control
User Manual PT-PSW-42MV 7. RS232 Control The RS232 port on the switcher has two control methods. 1) Local control: Connect the RS232 port to control device (e.g. PC) to control the switcher by RS232 commands. 2) Display device control: The RS232 signal is passed through to the RS232 port of the connected HDBaseT receiver to control the display device (e.g. -
Page 37: Rs232 Control Software
User Manual PT-PSW-42MV 7.1 RS232 Control Software We are using the software "Docklight" as an example.. Installation ⚫ Please download the latest Software Version from the link below: https://docklight.de/download/Docklight.zip Then follow the installation wizard for installation on Windows 7 and 10. - Page 38 User Manual PT-PSW-42MV Click “Continue” to close this window. Now you are in the main view, where commands are sent and feedback is received. The next step is to select the correct COM port of the PC. To do this, double-click on...
- Page 39 User Manual PT-PSW-42MV Double click on “COM1” to change to the right COM port. In the following window, select the drop-down menu labeled "Send / Receive on Comm Channel", select the appropriate COM port and then click on "OK" at the bottom right corner.
- Page 40 User Manual PT-PSW-42MV Select the right COM port. (1) In order to be able to send commands, open communication with the device by clicking on "Play". (2) Then the keyboard function must be activated, so that commands can be written in the "communication window".
- Page 41 User Manual PT-PSW-42MV Enable the keyboard Command type in function. sending area. Click “Play” to open the communication. Monitoring area, indicates if the command sent works.
-
Page 42: System Commands
User Manual PT-PSW-42MV 7.2 System Commands Command Example Command Description and Feedback >GetFirmwareVersion Get the firmware version. <V1.0.0 >SetFactoryReset Set to factory defaults. <FactoryReset_True >SetReboot System reboot. <Reboot_EN >SetHelp SetAV <Select the input source >SetAV InParam,OutParam InParam = 1~6 Get the command details. -
Page 43: Signal Switching Commands
User Manual PT-PSW-42MV Command Example Command Description and Feedback <V1.0.0 <Video OUT A B C D >GetStatus Get the system status. IN 1 2 3 5 <AudioSource 1 <OutputResolution 8 … … 7.3 Signal Switching Commands Command Example Command Description... -
Page 44: Audio Setting Commands
User Manual PT-PSW-42MV Command Example Command Description and Feedback Select the input source for the third >SetInput3Type H >SetInput3Type input channel. [Param] = H,DP [Param] H - HDMI input <Input3Type H DP - DP input Get the input source of the third <Input3Type H... - Page 45 User Manual PT-PSW-42MV Command Example Command Description and Feedback Get the source audio mute <SourceAudioMute >GetSourceAudioMute status True Set the source audio >SetSourceVOL 6 volume to [Param]. >SetSourceVOL [Param] [Param] = 0~60 (Default: <SourceVOL 6 Get the source audio >GetSourceVOL <SourceVOL 60...
-
Page 46: Function Setting Commands
User Manual PT-PSW-42MV 7.5 Function Setting Commands Command Example Command Description and Feedback Set the baud rate of RS232 port to >SetRS232Baudrate 5 [Param]. [Param] = 1 ~ 5 >SetRS232Baudrate 1 - 115200 [Param] 2 - 57600 <RS232Baudrate 5 3 - 38400... - Page 47 User Manual PT-PSW-42MV Command Example Command Description and Feedback Set the EDID of input soure. >SetInPortEdid 1,1 [Param1] = 1 ~ 6 1 - HDMI 1 >SetInPortEdid 2 - HDMI 2 [Param1],[Param2] 3 - HDMI 3 4 - DP 3...
- Page 48 User Manual PT-PSW-42MV Command Example Command Description and Feedback Set multiview mode. >SetMvMode 1 [Param] = 1 ~ 20 1 - 1 WINDOWS Full 2 - 2 WINDOWS PBP 3 - 3 WINDOWS 2U1D 4 - 4 WINDOWS SAME SIZE (Default)
- Page 49 User Manual PT-PSW-42MV Command Example Command Description and Feedback Set whether to automatically send >SetAutoCommand EN RS232 commands after signal >SetAutoCommand detection. [Param] [Param] = EN, DIS <AutoCommand True EN - Enable (Default) DIS - Disable Get whether to automatically send >GetAutoCommand...
-
Page 50: Cec Commands
User Manual PT-PSW-42MV Command Example Command Description and Feedback >SetInputMsgDelayTi Set the delay time of sending >SetInputMsgDelay me 10 Display Input Select command. Time [Param] <InputMsgDelayTime [Param] = 1 ~ 100 (s) (Default: 3) >GetInputMsgDelay Get the delay time of sending <InputMsgDelayTime... - Page 51 User Manual PT-PSW-42MV Command Example Command Description and Feedback >SetCecSrcBack 1 >SetCecSrcBack Send CEC BACK command to source [Param] device. [Param] = 1 ~ 4 (HDMI 1~4) <CecSrcBack1 >SetCecSrcEnter 1 >SetCecSrcEnter Send CEC ENTER command to source [Param] device. [Param] = 1 ~ 4 (HDMI 1~4) <CecSrcEnter 1...
-
Page 52: Special Commands
User Manual PT-PSW-42MV Command Example Command Description and Feedback >SetCecDisplayMute Send CEC MUTE command to display >SetCecDisplayMut device. [Param] = 1 ~ 2 (1 - HDMI, 2 - e [Param] HDBT) <CecDisplayMute 1 >SetCecDisplayVol+ Send CEC VOLUME UP command to >SetCecDisplayVol... - Page 53 User Manual PT-PSW-42MV Command Example Command Description and Feedback Set the HEX “Display Input Select” command "XX XX" to be sent to >SetDisplayInputSend display device when power on the Hex_5:30 31 32 33 switcher. [Param] = 1~5 (Baud rate of RS232 >SetDisplayInputSe...
- Page 54 User Manual PT-PSW-42MV Command Example Command Description and Feedback Set the ASCII “Power Off” command "XXXX" to be sent to display device >SetSleepSendChar_5: when the switcher enter standby ABCDEFG mode. [Param] = 1~5 (Baud rate of RS232 port) >SetSleepSendChar 1 - 115200...
-
Page 55: Firmware Upgrade
User Manual PT-PSW-42MV 8. Firmware Upgrade 1) Prepare the latest upgrade file (.bin) and rename it as “FW_MV bin” on PC. 2) Power off the switcher and connect the FIRMWARE port of switcher to the PC with type-A USB cable. -
Page 56: After-Sales Service
User Manual PT-PSW-42MV 9. After-Sales Service If problems occur while operating the product, please use the troubleshooting and maintenance information in this manual to deal with these problems. Any transport costs are borne by the user during the warranty period. - Page 57 User Manual PT-PSW-42MV...
-
Page 58: Www.purelink.de
User Manual PT-PSW-42MV Asking for Assistance Technical Support: Phone: +49 5971 800299 -0 Fax: +49 5971 800299 -99 Technical Support Hours: 8:30 AM to 5:00 PM Monday thru Thursday 8:30 AM to 4:00 PM Friday Write to: PureLink GmbH Von-Liebig-Straße 10 D - 48432 Rheine www.purelink.de...
Need help?
Do you have a question about the PT-PSW-42MV and is the answer not in the manual?
Questions and answers