
Related Manuals for PureTools PT-PSW-41H


Summary of Contents for PureTools PT-PSW-41H
- Page 1 User Manual User Manual Scaler Switcher Multiformat Scaling, 4K (60Hz 4:2:0), HDMI Out Model PT-PSW-41H Designed in Germany © 2017 PureLink GmbH All rights reserved. VersionV1.0...
- Page 2 User Manual Preface Read this user manual carefully before using the product. Pictures shown in this manual are for reference only. Different model layouts and specifications are subject to the physical product. This manual is for operation instructions only, not for any maintenance usage. In the constant effort to improve our product, we reserve the right to make changes in functions or parameters without prior notice or obligation.
- Page 3 User Manual REACH | 1907/2006/EU ROHS | 2011/65/EU PureLink hereby declares that this product PureTools PT-PSW-41H complies with Directives 1907/2006/EU und 2011/65/EU. EMC / LVD (Electro Magnetic Compatibility / Low Voltage Directive) PureLink GmbH hereby declares that this product PureTools PT-PSW-41H complies with Directives 2014/30/EU and 2014/35/EU.
- Page 4 User Manual SAFETY PRECAUTIONS To ensure the best from the product, please read all instructions carefully before using the device. Save this manual for further reference. Unpack the equipment carefully and save the original box and packing material for possible future shipment.
-
Page 5: Table Of Contents
User Manual Contents 1. Introduction ........................1 1.1 Introduction to PT-PSW-41H ..................1 1.2 Feature ........................1 1.3 Package List.......................2 2. Panel Description ........................ 3 2.1 Front Panel ........................ 3 2.2 Rear Panel ........................ 4 3. System Connection ......................5 3.1 Usage Precaution ....................... 5 3.2 System Diagram ....................... -
Page 6: Introduction
1. Introduction 1.1 Introduction to PT-PSW-41H The PT-PSW-41H is a professional 4K Scaler Switcher scaling HDMI/DP/VGA video signal to an HDMI output by selecting output resolution from 720p to 4K via OSD. It can work with HDMI, DP, and VGA table grommets to switch source and output black screen for display (table grommets sold separately). -
Page 7: Package List
User Manual 1.3 Package List 1 x PT-PSW-41H 4x1 4K Scaler Switcher 1 x Power Adapter (12VDC, 2A) 2 x Mounting Ears with 4 Screws 4 x Plastic Cushions 6 x 3-pin Phoenix Connectors Note: Please contact your distributor immediately if you found any damage or defect in the... -
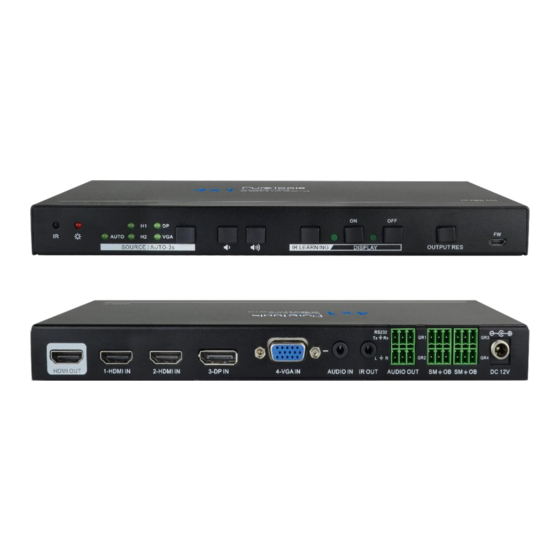
Page 8: Panel Description
User Manual 2. Panel Description 2.1 Front Panel AUTO SOURCE / AUTO-3s IR LEARNING DISPLAY OUTPUT RES Name Description ① Built-in IR Receiver Receive IR signal from IR remote. ② Power LED Red when powered on. AUTO: Auto switching activity LED. ... -
Page 9: Rear Panel
VGA auxiliary audio input. ⑥ IR OUT Connect with IR emitter to control display via IR. Serial port, connect a control device (PC) to control the PT-PSW-41H. ⑦ RS232 Connect the display to control it via front panel buttons. -
Page 10: System Connection
User Manual Name Description ⑧ AUDIO OUT Audio output port, connect with speaker. GR1,GR2, Connect with HDMI, DP or VGA table grommet to control ⑨ GR3&GR4 source switching and black screen showing. ⑩ DC 12V Connect the including power adaptor. 3. -
Page 11: System Diagram
User Manual 3.2 System Diagram VGA: HDMI: Audio: Projector Speaker Control: Emitter PT-PSW-41H RS232 HDMI OUT 1-HDMI IN 2-HDMI IN 3-DP IN 4-VGA IN AUDIO IN IR OUT AUDIO OUT DC 12V Show Output Show Output Black Black Gromment Gromment... -
Page 12: Button Control
Rebooting Device The PT-PSW-41H has the ability to save the latest configuration before losing power. The switcher automatically enters the mode as latest mode used; moreover, it detects all the inputs and memorizes the connection status for future rebooting use. If the latest displayed signal is still available, the unit will output the signal. -
Page 13: Volume Adjustment
User Manual 4.2 Volume Adjustment ① Press the Volume Up button to increase the output volume of scaler switcher and display. ② Press the Volume Down button to decrease the output volume of scaler switcher and display. 4.3 Display Control For compatibility with different displays, two customizable buttons on the front panel can be used to turn on/off the display. - Page 14 User Manual " XXXXXXX " is display control command (ASCII, max 48 byte). /+ax:0123456 Configure OFF button: Command Format Description & Example Feedback "x" represents the baud rate: x=0(2400)/ 1(4800)/ 2(9600)/ 3(19200)/ 4(38400)/ 5(57600)/ 6(115200). XX XX XX XX /-Ax:XX XX XX XX "...
-
Page 15: Output Resolution Selection
User Manual 4.4 Output Resolution Selection ① Resolution Selection Step1: Press the OUTPUT RES button to enter the following resolution list shown as below. Step2: Press this button again to move up and down in the list. Step3: Long-press this button at least 2 seconds to confirm the selected output resolution. ②... -
Page 16: Rs232 Control
User Manual 5. RS232 Control Connect the control device (PC) to the RS232 port of PT-PSW-41H, The PT-PSW-41H can be controlled by sending RS232 commands via RS232 control software installed in the PC. 5.1 RS232 Control Software Installation: Copy the control software file to the computer connected with PT-PSW-41H. - Page 17 User Manual The interface of the control software is showed as below: Parameter Configuration Area Monitoring Area, indicates if the sent command is working. Command Sending Area Please set the parameters of COM number, bound rate, data bit, stop bit and the parity bit correctly, then the command is ready to be sent in the Command Sending Area.
-
Page 18: Rs232 Command
User Manual 5.2 RS232 Command Communication protocol: RS232 Communication Protocol Baud rate: 9600 Data bit: 8 Stop bit: 1 Parity bit: none 5.2.1 System Configuration Command Function Feedback SFUD Software upgrading Software Update GET VER Check the software version Version Vx.x.x FRST Restore factory default Factor Reset... -
Page 19: Signal Switching
User Manual 5.2.2 Signal Switching Command Function Feedback SWIN H1 Switch to HDMI input Switch to hdmi SWIN H2 Switch to HDMI2 Switch to hdmi2 SWIN DP Switch to DP Switch to dp SWIN VG Switch to VGA input Switch to vga AUTO 01 Enable auto switching Auto Switching... -
Page 20: Output Resolution Selection
User Manual 5.2.4 Output Resolution Selection Command Function Feedback SRES 01 Change output resolution to 3840x2160 Resolution: 3840x2160 SRES 02 Change output resolution to 1920x1080 Resolution: 1920x1080 SRES 03 Change output resolution to 1280x720 Resolution: 1280x720 VGAA Automatic image correction for VGA input VGA Input Auto 5.2.5 EDID Management Command... -
Page 21: Baudrate Setting
User Manual 5.2.6 Baudrate Setting Command Function Feedback BAUD 115200 Set RS232 baudrate to 115200 Set Baudrate 115200 BAUD 57600 Set RS232 baudrate to 57600 Set Baudrate 57600 BAUD 38400 Set RS232 baudrate to 38400 Set Baudrate 38400 BAUD 19200 Set RS232 baudrate to 19200 Set Baudrate 19200 BAUD 9600... -
Page 22: Specification
User Manual 6. Specification Input & Output Input (2) HDMI; (1) DP; (1) VGA; (1) AUDIO (2) Type A Female HDMI; (1) DisplayPort; (1) Female VGA Input Connector (15-pin); (1) 3.5mm Mini Jack Output (1) HDMI; (1) AUDIO Output Connector (1) Type A Female HDMI;... -
Page 23: Panel Drawing
User Manual 7. Panel Drawing RS232 HDMI OUT 1-HDMI IN 2-HDMI IN 3-DP IN 4-VGA IN AUDIO IN IR OUT AUDIO OUT DC 12V 230.0 mm(754ft) AUTO SOURCE / AUTO-3s IR LEARNING DISPLAY OUTPUT RES... -
Page 24: Troubleshooting & Maintenance
User Manual 8. Troubleshooting & Maintenance Problems Potential Causes Solutions Bad quality of the connecting Try another high quality cable cable. Output image with white noise. Make sure the connection is Fail or loose connection good. Check with oscilloscope or No signal at the input / multimeter if there is any output end... -
Page 25: After-Sales Service
User Manual 9. After-Sales Service If problems occur when running the product, please check and deal with the problems referring to this user manual. Any transport costs are borne by the user during the warranty period. Product Limited Warranty: The product will be free from defects in materials and workmanship for two years (The purchase invoice shall prevail). - Page 26 User Manual...
- Page 27 User Manual...
- Page 28 User Manual Asking for Assistance Technical Support: Phone: +49 5971 800299 - 0 Fax: +49 5971 800299 – 99 Technical Support Hours: 8:30 AM to 5:00 PM Monday thru Thursday 8:30 AM to 4:00 PM Friday Write to: PureLink GmbH Von-Liebig-Straße 10 D - 48432 Rheine www.purelink.de...
Need help?
Do you have a question about the PT-PSW-41H and is the answer not in the manual?
Questions and answers