
Related Manuals for PureTools PT-PSW-52


Summary of Contents for PureTools PT-PSW-52
- Page 1 User Manual PT-PSW-52 User Manual Multiformat Seamless Scaling, 1080p, HDMI & HDBaseT Out Model PT-PSW-52 Designed in Germany © 2017 PureLink GmbH All rights reserved. VersionV1.1...
- Page 2 User Manual PT-PSW-52 Preface Read this user manual carefully before using this product. Pictures shown in this manual are for reference only. Different model layouts and specifications are subject to the physical product. This manual is for operation instructions only, not for any maintenance usage.
- Page 3 PT-PSW-52 REACH | 1907/2006/EU ROHS | 2011/65/EU PureLink hereby declares that this product PureTools PT-PSW-52 complies with Directives 1907/2006/EU und 2011/65/EU. EMC / LVD (Electro Magnetic Compatibility / Low Voltage Directive) PureLink GmbH hereby declares that this product PureTools PT-PSW-52 complies with Directives 2014/30/EU and 2014/35/EU.
- Page 4 User Manual PT-PSW-52 SAFETY PRECAUTIONS To insure the best from the product, please read all instructions carefully before using the device. Save this manual for further reference. Unpack the equipment carefully and save the original box and packing material for possible future shipment ...
-
Page 5: Table Of Contents
User Manual PT-PSW-52 Contents 1. Introduction ..........................1 1.1 Introduction to PT-PSW-52 .................... 1 1.2 Feature ..........................1 1.3 Package List ........................2 2. Panel Description ........................3 2.1 Front Panel ......................... 3 2.2 Rear Panel .......................... 4 3. System Connection ........................6 3.1 Usage Precaution ...................... - Page 6 User Manual PT-PSW-52 4.3.3 Control PT-PSW-52 or 3rd Party Device from Local ........30 4.3.4 Control PT-PSW-52 or 3rd Party Device form Remote ......31 4.4 OSD Menu Control ......................32 4.4.1 OPTIONS ....................... 33 4.4.2 PICTURE ........................ 34 4.4.3 SETUP ........................35 4.5 GUI Control........................36...
-
Page 7: Introduction
1. Introduction 1.1 Introduction to PT-PSW-52 The PT-PSW-52 (hereinafter referred to as „Scaler Switcher“) is a compact mini scaler switcher with 5 video inputs (1 HDMI/MHL, 2 HDMI, 1 DP, and 1 VGA) and 3 audio inputs (1 DP external audio, 1 VGA auxiliary audio, 1 MIC audio). The VGA input supports VGA, YPbPr and C-video, so the device switcher is compliant with multiple video signals. -
Page 8: Package List
Controllable via buttons, IR remote, RS232 & GUI. Powerful OSD function. Supports online software upgrading. 1.3 Package List 1 x PT-PSW-52 Compact Scaler Switcher 2 x Mounting Ears with 4 Screws 4 x Plastic Cushions 1 x Power Adapter (24VDC,2.71A) -
Page 9: Panel Description
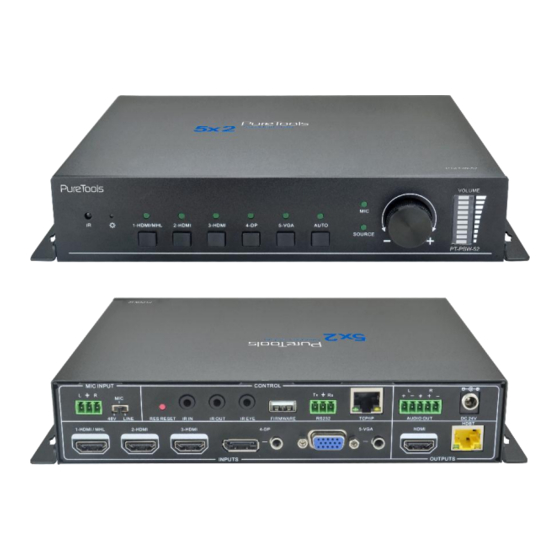
User Manual PT-PSW-52 2. Panel Description 2.1 Front Panel 1-HDMI/MHL 2-HDMI 3-HDMI 4-DP 5-VGA AUTO SOURCE ① Built-in IR Receiver ② Power indicator Off when there is no power to the device. Red when the device is in standby mode. -
Page 10: Rear Panel
User Manual PT-PSW-52 2.2 Rear Panel CONTROL MIC INPUT LINE RES RESET IR IN IR OUT IR EYE FIRMWARE RS232 AUDIO OUT DC 24V HDBT 1-HDMI / MHL 2-HDMI 3-HDMI 4-DP 5-VGA HDMI INPUTS OUTPUTS ① INPUTS Video input ports: 1 HDMI/MHL input, 2 HDMI inputs, 1 DP and 1 VGA ... - Page 11 EDID data. RS232: Serial port, 3-pin phoenix connector, connect with a control device (such as PC) to control the PT-PSW-52 or other devices connected with HDBaseT Receiver. TCP/IP: Ethernet port, connect with PC to control the PT-PSW-52 via Web-based GUI.
-
Page 12: System Connection
User Manual PT-PSW-52 3. System Connection 3.1 Usage Precaution System should be installed in a clean environment, preferably at ambient temperature or within given working temperature range (see page44 for limits). All of the power switches, plugs, sockets and power cords should be insulated. -
Page 13: Connection Procedure
User Manual PT-PSW-52 3.3 Connection Procedure Step1. Connect HDMI source devices (e.g. Blue-ray DVD) to 1~3 HDMI input ports with HDMI cable Step2. Connect a DisplayPort source device (e.g. MAC MINI) to DP input port with DisplayPort cable and DP audio input port with audio cable. -
Page 14: Microphone Connection
User Manual PT-PSW-52 3.4 Microphone Connection The PT-PSW-52 provides with one 3-level microphone input port, to accommodate different microphone input modes, including 48V phantom power mode, MIC mode & LINE mode. 48V phantom power Mode 48V phantom power input has a good frequency characteristic, high input impedance and high sensitivity. - Page 15 User Manual PT-PSW-52 2) Balanced connection: “+” connects to positive, “-” connects to negative and “ ” connects to ground. LINE Mode LINE input has a low frequency characteristics, and wide frequency response. When switch to “LINE”, the microphone input is used for connecting with line audio or wireless microphone output.
-
Page 16: Application
User Manual PT-PSW-52 2) Balanced connection: “+” connects to positive, “-” connects to negative and “ ” connects to ground. 3.5 Application The PT-PSW-52has a good application in various occasions, such as computer realm, monitoring, conference room, big screen displaying, television education, command... -
Page 17: System Operation
User Manual PT-PSW-52 4. System Operation 4.1 Button Control Front panel buttons can be used for switching operations and volume adjusting. Manual Switching 4.1.1 Press 1-HDMI/MHL, 2-HDMI, 3-HDMI, 4-DP, 5-VGA on front panel to select the corresponding input source. Auto Switching 4.1.2... -
Page 18: Volume Adjustment
User Manual PT-PSW-52 Signal removing Once removing the current display signal, the PT-PSW-52will detect all input signals with priority from 1-HDMI/MHL to 5-VGA. It will transfer the signal firstly detected to be available to output devices. Note: When the DP signal is switched as input, the DP source device may not read the EDID data from display device, at this point re-plug the DP source device to solve this phenomenon. -
Page 19: Ir Control
User Manual PT-PSW-52 4.2 IR Control IR Remote 4.2.1 Connect IR receiver to IR EYE port, the PT-PSW-52cans be controlled by using IR remote. As CEC function, it is able to use the IR remote to turn on/off the HDMI source or Display. -
Page 20: Control Far-End Device From Local
User Manual PT-PSW-52 Control Far-end Device from Local 4.2.2 Connect an IR receiver to IR IN port on the PT-PSW-52and connect IR emitter to the IR OUT port on the HDBaseT Receiver, the far-end device can be control by its IR remote from local. -
Page 21: Control Local Device From Remote
Control Local Device from Remote 4.2.3 Connect an IR emitter to IR OUT port on the PT-PSW-52 and connect IR receiver to the IR IN port on the HDBaseT Receiver, the source devices can be control by their IR remote from remote. - Page 22 User Manual PT-PSW-52 The working status related to CEC and STANDBY is showed as below: Situation Working Status Press STANDBY button on IR remote, the PT-PSW-52enters in standby mode, so do all HDMI source devices and display. CEC: on, Standby: on...
-
Page 23: Rs232 Control
User Manual PT-PSW-52 4.3 RS232 Control As RS232 can be transmitted bi-directionally between the PT-PSW-52and the HDBaseT Receiver, so it is able to control a third party RS232 device from local or control the PT-PSW-52from remote. The baud rate support 2400, 4800, 9600(default), 19200, 38400, 57600 or 115200. - Page 24 User Manual PT-PSW-52 The interface of the control software is showed as below: Parameter Configuration area Monitoring area, indicates if the command sent works. Command Sending area Please set the parameters of COM number, bound rate, data bit, stop bit and the parity bit correctly, and then you are able to send command in Command Sending Area.
-
Page 25: Rs232 Command
User Manual PT-PSW-52 RS232 Command 4.3.2 Communication protocol: RS232 Communication Protocol Baud rate: 9600 Data bit: 8 Stop bit: 1 Parity bit: none Switch Commands Command Function Feedback Example 50701% Switch to 1-HDMI/MHL input Switch to HDMI 1 50702% Switch to 2-HDMI input... - Page 26 User Manual PT-PSW-52 Audio Commands Command Function Feedback Example 50600% MUTE Source audio Source Mute 50601% UnMute Source audio Source Unmute 50602% Increase the volume of source audio Source Volume: xx (xx=00~60) 50603% Decrease the volume of source audio Source Volume: xx (xx=00~60)
- Page 27 User Manual PT-PSW-52 Resolution Commands Command Command Command Set the output resolution to 50619% Resolution: 1360x768 1360X768 HD Set the output resolution to 50626% Resolution: 1024x768 1024X768 XGA Set the output resolution to 50627% Resolution: 1280x720 1280X720 720P Set the output resolution to...
- Page 28 User Manual PT-PSW-52 Setup Commands Command Command Command 50604% Lock the front panel buttons Front Panel lock 50605% Unlock the front panel buttons Front Panel Unlock 502xx% Set the brightness to xx. Brightness: xx (xx=00~99) 503xx% Set the contrast to xx.
- Page 29 User Manual PT-PSW-52 Setup Commands Command Command Command 50766% Disable freeze icon display Freeze Icon: disable 50644% Enable channel status display Input Icon: enable 50645% Disable channel status display Input Icon: disable 50650% Check the channel status Input Icon: xx...
- Page 30 User Manual PT-PSW-52 Setup Commands Command Command Command Auto Switch Mode: Disable the Auto Switch Mode: Set no input 50714% automatic power off function to power off function: Disable Auto Switch Mode: Set the automatic Auto Switch Mode: Set no input...
- Page 31 User Manual PT-PSW-52 Setup Commands Command Command Command Manual Switch Mode: Set no Manual Switch Mode: Set the power 50743% input to power off time: 5 off time to 5 minute minutes Manual Switch Mode: Set no Manual Switch Mode: Set the power...
- Page 32 User Manual PT-PSW-52 Inquire Commands Command Command Command Source Volume: xx (xx=00~60) 50630% Check the volume level MIC Volume: xx (xx=00~60) Input: xx (xx= HDMI1/ HDMI2/ 50631% Check the input source HDMI3/ DP/ VGA/ YPbPr/ AV) Resolution: xx (xx=1920×1200/ 1920×1080/ 1600×1200/...
- Page 33 User Manual PT-PSW-52 Inquire Commands Command Command Command 50753% Check the freeze status Freeze: enable/disable 50754% Check the panel locked status Front Panel Lock/UnLock Source Volume: XX Mic Volume: XX Input: XXXX Resolution: XXXX Display statues including MIC, LINE Mute/Unmute...
- Page 34 User Manual PT-PSW-52 Adjustment Commands Command Command Command Stretch left from left side (increase 50674% Output Width Adjust xx image width) Pull right from left side (decrease 50675% Output Width Adjust xx image width) Stretch upwards from bottom side 50676%...
- Page 35 User Manual PT-PSW-52 CEC Commands Command Command Command 50908% Left CEC cmd: left 50909% Right CEC cmd: right 50910% Confirm command CEC cmd: select 50911% Exit command CEC cmd: exit 50913% Source power on Source power on 50914% Source power off...
-
Page 36: Control Pt-Psw-52 Or 3Rd Party Device From Local
User Manual PT-PSW-52 Control PT-PSW-52 or 3rd Party Device from Local 4.3.3 Firstly, according the following connection diagram to connect all devices as needed. Secondly, send command 50787% (serial control mode 1, factory default) via RS232 communication software. Lastly, send the right command of the PT-PSW-52or other remote RS232 device connected in present system. -
Page 37: Control Pt-Psw-52 Or 3Rd Party Device Form Remote
Control PT-PSW-52 or 3rd Party Device form Remote 4.3.4 Firstly, according the following connection diagram to connect all devices as needed. Secondly, send command 50788% via RS232 communication software. Lastly, send the right command to control the PT-PSW-52. Connect as below: 3rd party MIC INPUT CONTROL... -
Page 38: Osd Menu Control
User Manual PT-PSW-52 4.4 OSD Menu Control The PT-PSW-52provides a powerful OSD operation menu, contains 3 parts: optional settings, image settings, and system setting etc. There are two ways to enter OSD menu: Press MENU button on IR remote. -
Page 39: Options
User Manual PT-PSW-52 OPTIONS 4.4.1 Includes Output Adjust, Input 5 Select, Baud rate, User EDID Load (USB), Resolution, and Software Update (USB). Output Adjust: Adjust output image position (X: horizontal direction and Y: vertical direction), ratio aspect (width and height), polarity adjustment (H Polarity and V Polarity) and output setting (HDMI on/off and HDBT on/off). -
Page 40: Picture
IP: Show the IP address. Software Update (USB): Insert the USB flash disk with updating file to USB port of the PT-PSW-52, to update the software through this menu. PICTURE 4.4.2 Including Picture Mode, Color Temperature, Aspect Ratio, Noise Reduction, Screen and Color Range. -
Page 41: Setup
User Manual PT-PSW-52 Noise Reduction (not for VGA format): Includes Off, Low, Middle, High and Default. Screen: (not for HDMI source): Include Auto Adjust, Horizontal, Vertical, Size, and Phase. SETUP 4.4.3 Including OSD Language, Restore Factory Default, Blending, HDMI CEC, OSD Duration and version inquiry ... -
Page 42: Gui Control
User Manual PT-PSW-52 4.5 GUI Control In addition to control the PT-PSW-52via front panel button, IR remote and RS232 communication software. The PT-PSW-52can be controlled via web-based GUI. It allows users to interact with the PT-PSW-52through graphical icons and visual indicators. -
Page 43: Control Menu
User Manual PT-PSW-52 Control Menu 4.5.1 Type user name: user and password: user (default setting) on the log-in interface, and then click Login to enter Control menu shown as below: Sources: Click the corresponding button (1-HDMI/MHL, 2-HDMI, 3-HDMI, 4-DP, and 5-VGA) to select video input source. -
Page 44: Configuration Menu
User Manual PT-PSW-52 Configuration Menu 4.5.2 Click on control menu to enter setting menu shown as below: ① Output Resolution: Select the output resolution that you need and then click Confirm. Update: Insert the USB flash disk with EDID file/software updating file to FIRMWARE port, and then click EDID/Firmware to start update procedure. - Page 45 User Manual PT-PSW-52 Click Network to enter network setting menu shown as below: ② In this interface, dynamic or static IP mode can be selected. Under static IP mode, IP address and subnet mask, gateway can be set and make sure the IP addresses are...
- Page 46 User Manual PT-PSW-52 Click Source Label to enter source label setting menu shown as below: ③ In this interface, the name of source input selection button can be modified as you need.
-
Page 47: Rs232 Control Menu
Click RS232 Control on the top of interface to enter RS232 control menu shown as below: Port: Local port refers to the RS232 port of the PT-PSW-52, and the HDBT port refers to the RS232 port of HDBaseT Receiver. -
Page 48: Password Menu
User Manual PT-PSW-52 Password Menu 4.5.4 Click Password on the top of interface to enter password menu shown as below: In this interface, the user name and password can be modified as you need. -
Page 49: Gui Update
User Manual PT-PSW-52 GUI Update 4.5.5 GUI for the PT-PSW-52supports online update in http://192.168.0.178:100. Type the username and password (the same as the GUI log-in settings, modified password will be available only after rebooting) to log in the configuration interface. After that, click Administration at the source menu to get to Upload Program as shown below: Select the desired update file and press Apply, it will start upgrading then. -
Page 50: Specification
User Manual PT-PSW-52 5. Specification Video Video input (1) HDMI/MHL; (2) HDMI; (1) DP; (1) VGA (3) female HDMI; (1) DisplayPort; Video Input Connector (1) female 15-pin VGA Input Video Signal HDMI, DP, YPbPr, C-video, VGA Video Output (1) HDMI; (1) HDBaseT Video Output Connector (1) female HDMI;... - Page 51 User Manual PT-PSW-52 General Transmission Distance 1080P≤70m(Cat6) Temperature 0 ~ +50℃ Humidity 10% ~ 90% Power Supply DC24V 2.71A Power Consumption Dimension (W*H*D) 220mm x 44mm x 172.5mm Weight 800g...
-
Page 52: Panel Drawing
User Manual PT-PSW-52 6. Panel Drawing CONTROL MIC INPUT LINE RES RESET IR IN IR OUT IR EYE FIRMWARE RS232 AUDIO OUT DC 24V HDBT 1-HDMI / MHL 2-HDMI 3-HDMI 4-DP 5-VGA HDMI INPUTS OUTPUTS 220 mm 1-HDMI/MHL 2-HDMI 3-HDMI... -
Page 53: Troubleshooting & Maintenance
User Manual PT-PSW-52 7. Troubleshooting & Maintenance Problems Causes Solutions Bad quality of the Try another high quality cable. connecting cable Output image with snowflake Fail or loose Make sure the connection is connection good Check with oscilloscope or No signal at the input... -
Page 54: After-Sales Service
User Manual PT-PSW-52 8. After-Sales Service If there appear some problems when running the product, please check and deal with the problems referring to this user manual. Any transport costs are borne by the users during the warranty. 1) Product Limited Warranty: This product will be free from defects in materials and workmanship for two years (The purchase invoice shall prevail). - Page 55 User Manual PT-PSW-52...
- Page 56 User Manual PT-PSW-52 Asking for Assistance Technical Support: Phone: +49 5971 800299 - 0 Fax: +49 5971 800299 – 99 Technical Support Hours: 8:30 AM to 5:00 PM Monday thru Thursday 8:30 AM to 4:00 PM Friday Write to: PureLink GmbH Von-Liebig-Straße 10...
Need help?
Do you have a question about the PT-PSW-52 and is the answer not in the manual?
Questions and answers