
Related Manuals for Backyard Creations Palm Springs PS-6PC-SG


Summary of Contents for Backyard Creations Palm Springs PS-6PC-SG
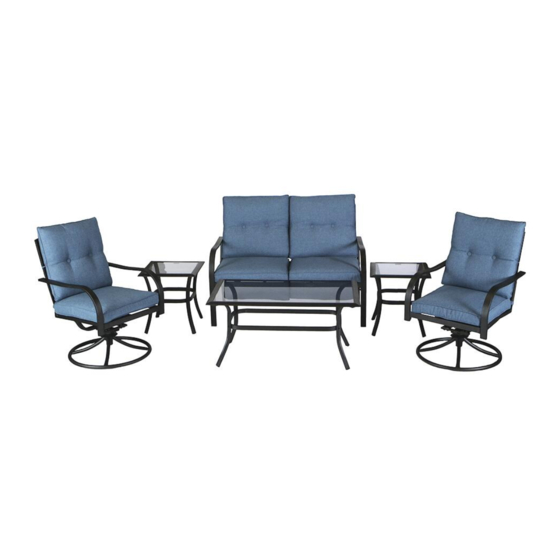
- Page 1 Owner’s Manual Palm Springs 6-Piece Seating Group Model Number: PS-6PC-SG SKU Number: 272-1910 1 of 14...
- Page 2 Parts List – Swivel Rockers (2) Letter Illustration Description Qty. Letter Illustration Description Qty. Left Arm M8 Nut Right Arm M6 Bolt Cap Seat and Back M6 Nut Cap Swivel Rocker Seat Cushion Base Swivel Base Back Cushion Connector M6 x 15mm Bolt Allen Wrench M6 x 42mm Bolt Open Wrench...
- Page 3 Assembly Instructions Swivel Rockers (2) Note: For video instructions please visit: https://insideout.store/video-assembly-instructions/ Important: Read all the instructions before assembly. Failure to do so may result in faulty assembly and ⚫ potential injury. ⚫ Before assembling the product, remove all protective materials, hardware kit(s), and identify all parts packed in the carton are present.
- Page 4 Step 3: Connect the Bottom Seat Bracket on Seat-and-Back (C) to the “Back” position of the Swivel Plate on Swivel Base (D) with Bolts (H), Swivel Base Connector (E), and Nuts (J). See Figure 2. Tighten bolts using Open Wrench (P & Q). Figure 2 Step 4: Add Bolt Caps (K &...
- Page 5 Parts List – Loveseat Letter Illustration Description Qty. Letter Illustration Description Qty. Left Arm M6 Washer Right Arm M6 Bolt Cap Back Allen Wrench Seat Seat Cushion M6 x 15 mm Bolt Back Cushion M6 x 42 mm Bolt 5 of 14...
- Page 6 Assembly Instructions Loveseat Note: For video instructions please visit: https://insideout.store/video-assembly-instructions/ Important: Read all the instructions before assembly. Failure to do so may result in faulty assembly and ⚫ potential injury. ⚫ Before assembling the product, remove all protective materials, hardware kit(s), and identify all parts packed in the carton are present.
- Page 7 Step 2: Attach Seat (D) to Back (C) using Bolts (E) and Washers (G). See Figure 2. Do not tighten bolts until after Step 3. Step 3: Connect Left Arm (A) and Right Arm (B) to Back (C) using Bolts (F) and Washers (G). See Figure 3A and 3B.
- Page 8 Parts List – Coffee Table Letter Illustration Description Qty. Letter Illustration Description Qty. Tabletop Table Leg M6 Bolt Cap Leg Brace M6 Nut Cap M6 x 15 mm Bolt Allen Wrench M6 x 35 mm Wrench Bolt M6 Washer 8 of 14...
-
Page 9: Coffee Table
Assembly Instructions Coffee Table Note: For video instructions please visit: https://insideout.store/video-assembly-instructions/ Important: Read all the instructions before assembly. Failure to do so may result in faulty assembly and ⚫ potential injury. ⚫ Before assembling the product, remove all protective materials, hardware kit(s), and identify all parts packed in the carton are present. - Page 10 Step 2: Attach Leg Brace (C) to Table Legs (B) using Bolt (E), Washer (F) and Nut (G). Tighten all Bolts (D and E) using Allen Wrench (J) and Wrench (K), attach Bolt Caps (H) and Nut Caps (I). Figure 2 Step 3: Turn the assembled table upright.
- Page 11 Parts List – Side Tables (2) Letter Illustration Description Qty. Letter Illustration Description Qty. Tabletop Table Leg M6 Bolt Cap Leg Brace M6 Nut Cap M6 x 15 mm Bolt Allen Wrench M6 x 35 mm Wrench Bolt M6 Washer 11 of 14...
-
Page 12: Side Tables
Assembly Instructions Side Tables (2) Note: For video instructions please visit: https://insideout.store/video-assembly-instructions/ Important: Read all the instructions before assembly. Failure to do so may result in faulty assembly and ⚫ potential injury. ⚫ Before assembling the product, remove all protective materials, hardware kit(s), and identify all parts packed in the carton are present. - Page 13 Step 2: Attach Leg Brace (C) to Table Legs (B) using Bolts (E), Washers (F) and Nuts (G). See Figure 2. Tighten all bolts using Allen Wrench (J) and Open Wrench (K), attach Bolt Caps (H) and Nut Caps (I). Figure 2 Step 3: Turn the assembled table upright.
-
Page 14: Warranty
Care & Maintenance Maintain your outdoor furniture by using furniture covers or storing out of the elements when not in use. Frame: Clean frames with a mild soap and warm water. Do not use abrasive materials, cleaners or bleach. Rinse with clean water and dry thoroughly. Always clean, drain and dry thoroughly before storing for the winter.
Need help?
Do you have a question about the Palm Springs PS-6PC-SG and is the answer not in the manual?
Questions and answers
How do I order a part for my set?