Advertisement
Quick Links
Thank you for your purchase!
Please carefully unpack each of the components and hardware. Check the
components against the parts list and make sure there are no missing parts.
Should you have any missing parts please contact our Customer Service
department as shown on the last page of instructions.
For ease of assembly, it is recommended to have 2 or more people and
allow enough time to completely finish the assembly.
Assembly can take 4-6 Hours.
We are proud of this products. Please enjoy it along with the enhanced
outdoor living experience for which it is designed.
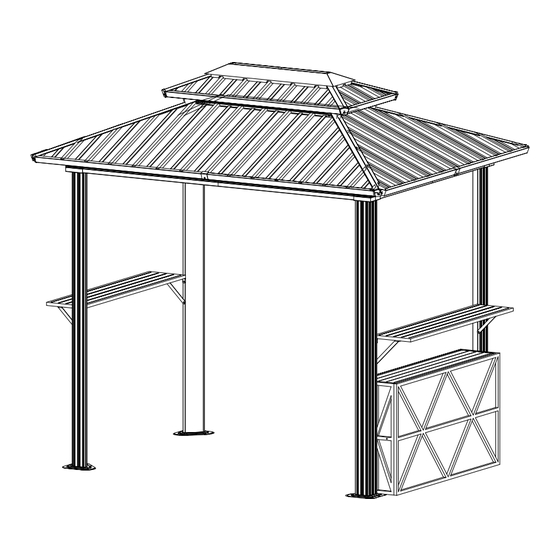
EDISON GRILL GAZEBO
SKU#272-1955
Advertisement

Related Manuals for Backyard Creations EDISON 272-1955


Summary of Contents for Backyard Creations EDISON 272-1955
- Page 1 SKU#272-1955 EDISON GRILL GAZEBO Thank you for your purchase! Please carefully unpack each of the components and hardware. Check the components against the parts list and make sure there are no missing parts. Should you have any missing parts please contact our Customer Service department as shown on the last page of instructions.
- Page 2 PART ITEM DESCRIPTION PART PILLAR 1 PILLAR 2 LONG CROSSBEAM SHORT CROSSBEAM ROOF RIBS 1 ROOF RIBS 2 ROOF TOP SUPPORT 1 ROOF TOP SUPPORT 2 SHELF ROOF BORDER 1 ROOF BORDER 2 ROOF BORDER 3 ROOF TOP BORDER 1 ROOF TOP BORDER 2 ROOF PLATE BORDER 1 ROOF PLATE BORDER 2...
- Page 3 PART ITEM DESCRIPTION PART CONNECTOR 1 CORNER RIB BRACE CENTER RIB BRACE SUPPORT BRACKET 1 SUPPORT BRACKET 2 FOOT BASE CLIP CLIP PLASTIC WASHER ROOF PLATE 1 ROOF PLATE 2 ROOF PLATE 3 ROOF PLATE 4 ROOF PLATE 5 ROOF PLATE 6 ROOF PLATE 7 ROOF PLATE 8...
- Page 4 ROOF PLATE 9 SHELF 1 MIDDLE SHELF SIDE SHELF BACK SHELF BOLT (M6 X 15mm) BOLT (M6 X 23mm) NUT BOLT (M6 X 42mm) NUT BOLT (M6 X 12mm) WASHER BOLT (M6 X 35mm) ALLEN WRENCH HEX WRENCH...
- Page 5 Warning: Do not tighten the bolts completely until end of the frame assembly. Before assembling the Roof Panels, make sure all bolts of the frame have been tightened. STEP 1: Attach Foot Base ( part M) to the Pillars 1, 2 (part A1, A2) AA x 12 M6*15 STEP 2: Attach Long Crossbeam (part B) and short Crossbeam (part C) to the pillars...
- Page 6 STEP 3: Attach the Support Brackets (part L, L1) to the shelf (part H) and pillar (part A1,A2). L× 2 L1× 2 STEP 4: Attach the Corner Protector (part K). K× 4...
- Page 7 STEP 5: Assemble the Roof Frame by attaching the Roof Ribs 1 (part D) to the Roof Top Brace (part J) as shown in the diagram. STEP 6: Attach the roof to the gazebo frame.
- Page 8 STEP 7: Attach the Roof Top Support 1 (part G) and Roof Top Support 2 (part F) using Connector (part K1). AA x 8 M6 x 15 STEP 8: Attach the assembled Roof Top Support to the Roof Ribs (part D). Lift the partially assembled Roof to the assembled frame and attach as shown in the diagram.
- Page 9 STEP 9: Attach the Roof Ribs 2 (part E) to the assembled Roof Top Support (part G,F). Attached the Roof Ribs (part E) to the assembled frame as shown in the diagram. STEP 10: Attach the Clips (part N1) and Clips (part N2) to the Roof Plates 6,7,8,9 (part R,R1,S,S1)as shown in the diagram.
- Page 10 STEP 11: Attach Roof Top Borders 1 (part I3) to the long edge of the Roof and Roof Top Borders 2 (part I4) to the short edge of the roof. Attach the Corner Rib Brace (part K2) as shown in the diagram. K2×...
- Page 11 STEP 13: Attach the Clips (part N1) to Roof Plates 1,2,4,5 (part O,O1,Q,Q1) as shown in the diagram. O2× 2 O1× 2 Q× 2 P× 2 N1× 32 Q1× 2 STEP 14: Install the Roof Plates on the long sides of the Gazebo. Work your way from left to right. Start by sliding the Roof Plate 1(part O) into position.
- Page 12 STEP 15: Attach Roof Border 2 and 3 (parts I2,I3) to the long edge of the roof. Attach Roof Border 1 (part I) to the short edge of the roof. Attach the Center Rib Braces (part K3) as shown in the diagram. Attach the Corner Rib Braces (part K2) as shown in the diagram.
- Page 13 STEP 17: Attach the side panel(V) to the shelf 1,2,3 (part T, part U.) STEP 18: Attach the back panel (part W) to the shelf frame.
- Page 14 STEP 19: Attach the shelf box to the pillars. Now the gazebo is ready for enjoy. EE x 4 M6 x 15...
- Page 15 12 MONTH LIMITED WARRANTY WHAT IS COVERED This product is covered under the manufacturer's 12 Month Limited Warranty against defects in materials and workmanship. If your furniture frame fails structurally due to inferior metals or welds during normal use within 12 months of purchase, the manufacturer will repair or replace the defective piece at no charge.
Need help?
Do you have a question about the EDISON 272-1955 and is the answer not in the manual?
Questions and answers