Advertisement
Quick Links
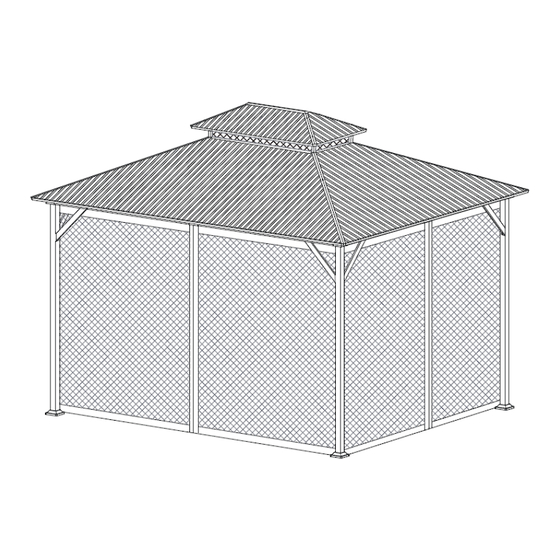
10' x 12' Hard Top Gazebo
SKU Number: Frame # 272-3049 / Roof # 272-3048
Note: This gazebo frame is designed to be used as a permanent fixture. The Gazebo cover is
recommended when not in use or storing for winter. Please visit your retailer's website to purchase
or contact service@shadenshelters.com for more information.
Owner's Manual
Duncan
Scan For Video
Assembly Instructions!
1 of 30
Advertisement

Related Manuals for Backyard Creations Duncan 272-3049


Summary of Contents for Backyard Creations Duncan 272-3049
- Page 1 Owner’s Manual Duncan 10’ x 12’ Hard Top Gazebo SKU Number: Frame # 272-3049 / Roof # 272-3048 Scan For Video Assembly Instructions! Note: This gazebo frame is designed to be used as a permanent fixture. The Gazebo cover is recommended when not in use or storing for winter.
-
Page 2: Parts List
Parts List Duncan 10’ x 12’ Hard Top Gazebo Letter Illustration Description Qty. Corner Post Base Cover Base Plate Short Lintel Short Lintel Long Lintel Long Lintel Lintel Corner Support Bar Lintel Corner Support Bar Lintel Connector Lintel Bracket - Top 2 of 30... - Page 3 Letter Illustration Description Qty. Connector Bracket Lintel Bracket - Top Lintel Cover - Corner Lintel Cover Main Roof Corner Support Main Roof Vertical Center Support Main Roof Center Frame - Short Connector Main Roof Center Frame - Long Connector Roof Vent - Corner Supports Roof Vent - Center Support Roof Vent Hook Roof Vent - Top Trim...
- Page 4 Letter Illustration Description Qty. Main Roof Upper Horizontal Support - Left Main Roof Upper Horizontal Support - Middle Main Roof Upper Horizontal Support - Right Main Roof Lower Horizontal Support - Left Main Roof Lower Horizontal Support - Middle Main Roof Lower Horizontal Support - Right Roof Vent Frame - Long Sides Main Roof Corner Trim...
- Page 5 Letter Illustration Description Qty. Main Roof Trim - Right Side Roof Vent Side Trim - Long Side Roof Vent Side Trim - Short Side Main Roof Trim - Middle Short Mosquito Netting Tube Long Mosquito Netting Tube Mosquito Netting Connecting Tube Mosquito Netting Connecter Main Roof Trim Connector Roof Vent Mosquito Netting Connector...
- Page 6 Letter Illustration Description Qty. Roof Vent Panel - Long Side (Right) Main Roof Panel - Left Corner Main Roof Panel - Left Side Main Roof Panel - Center Main Roof Panel - Right Side Main Roof Panel - Right Corner Main Roof Panel - Left Center Main Roof Panel - Right Center Mosquito Netting...
- Page 7 Letter Illustration Description Qty. M6 x 25mm Bolt with Plastic Washer M6 x 25mm Bolt with Steel Washer & Nut M6 x 30mm Bolt with Flat Washer & Nut M6 x 35mm Bolt with Plastic Washer M6 x 40mm Bolt with Steel Washer M6 x 45mm Bolt with Steel Washer M6 x 52mm Bolt with Flat Washer &...
- Page 8 Open Wrench #4 Allen Wrench #5 Allen Wrench 8 of 30...
- Page 9 Assembly Instructions Duncan 10’ x 12’ Hard Top Gazebo Note: For video instructions please visit: https://shadenshelters.com/10x12-duncan-gazebo Important: ⚫ Read all the instructions before assembly. Failure to do so may result in faulty assembly and potential injury. Before assembling the product, remove all protective materials, hardware kit(s), and identify all ⚫...
- Page 10 Step 2A: Insert two Lintel Connectors (G1) into the Short Lintel (D2) and attach using Bolts/Washers (AA). See Figure 2-1. Step 2B: Insert the Lintel Connectors (G1) into the Center Lintel Cover (H2) and Short Lintel (D1). See Figure 2-2. Step 2C: Attach the Center Lintel Cover (H2) to the bottom of Short Lintels (D1 and D2) using Bolts/Washers (AA).
- Page 11 Step 3A: Insert two Lintel Connectors (G1) into the Long Lintel (E2) and attach using Bolts/Washers (AA). See Figure 3-1. Step 3B: Insert the Lintel Connectors (G1) into the Center Lintel Cover (H2) and the Long Lintel (E1). See Figure 3-2. Step 3C: Attach the Center Lintel Cover (H2) to the bottom of Long Lintels (E1 and E2).
- Page 12 Step 4: Attach Long Lintels (E1 and E2) to the outside of Corner Posts (A) using Bolts (BB). See Figure 4. Tighten all Bolts. Repeat for opposite side Long Lintels (E1 and E2) and Corners Posts (A). Figure 4 12 of 30...
- Page 13 Step 5: Attach Short Lintels (D1 and D2) to the outside of Corner Posts (A) using Bolts (BB). See Figure 5. Tighten all Bolts. Repeat for opposite side Short Lintels (D1 and D2) and Corner Posts (A). Figure 5 13 of 30...
- Page 14 Step 6A: Attach Support Bars (F1) to Corner Posts (A) and Lintels (D1 and E1). Attach Support Bars (F2) to Corner Posts (A) and Lintels (D2 and E2). Tighten all Bolts. See Figure 6-1. Step 6B: Attach Corner Lintel Cover (H1) to Lintels (D1 and E2) and (E1 and D2). Repeat for all Corners. Tighten all Bolts.
- Page 15 Step 7: Assemble the Main Roof Center Frame by inserting the Long Connector (J2) into the Short Connector (J1) and attach with Bolts/Washers (AA). See Figure 7-1. Repeat for opposite sides and ends. Tighten all Bolts. See Figure 7-2. Figure 7-1 Figure 7-2 15 of 30...
- Page 16 Step 8A: Attach the Connector Brackets (G3) and the Mosquito Netting Connector (U4) to the Main Roof Center Support (I1) using Bolts/Washers (KK). Tighten all Bolts. See Figure 8-1. Step 8B: Attach each Main Roof Corner Support (I1) to the Short Connectors (J1) on the Main Roof Center Frame using Bolts/Washers (AA).
- Page 17 Step 9A: Attach the Main Roof Vertical Center Supports (I2) to the Main Roof Center Frame Long Connector (J2) using Bolts/Washers (AA). See Figure 9-1. Step 9B: Attach the Main Roof Vertical Center Supports (I2) to the Lintel Brackets (G2) using Bolts (JJ). Tighten all Bolts.
- Page 18 Step 10A: Attach the Main Roof Vertical Center Support (I2) to the Main Roof Center Frame Short Connector (J1) using Bolts/Washers (AA). See Figure 10-1. Step 10B: Insert the Mosquito Netting Connecting Tubes (U3) into the Top Lintel Bracket (G4). Secure by inserting Bolt/Washer (GG) through the Mosquito Netting Connecting Tubes (U3) and attaching to the Main Roof Vertical Support (I2).
- Page 19 Step 11A: Connect the Mosquito Netting Connecting Tube (U3) to the Lintel Bracket (G4) on top of the Long Lintels (E1 and E2) using Bolts/Washers/Nuts (EE). Tighten all Bolts. See Figure 11-1. Note: Use the Short Mosquito Netting Tube (U1) for the 10 Foot Side and the Long Mosquito Netting Tube (U2) for the 12 Foot Side.
- Page 20 Step 12A: Assemble the Roof Vent Frame by attaching the Roof Vent Corner Support (J3) to the Roof Vent Center Support (K1) using Bolts/Washers/Nuts (II). Repeat for all corners. Tighten all Bolts. See Figure 12-1. Step 12B: Screw in the Roof Vent Hook (K2) to the Roof Vent Center Support (K1). See Figure 12-2. Figure 12-1 Figure 12-2 20 of 30...
- Page 21 Step 13A: Secure the Roof Vent Frame to the Main Roof Center Frame by inserting the Roof Vent Corner Supports (J3) into each vertical post on the Short Connectors (J1) and attach using Bolts/Washers (AA). See Figure 13-1. Step 13B: Attach the Roof Vent Frame Long Sides (O) to the Roof Vent Corner Supports (J3) using Bolts/Washers (AA).
- Page 22 ROOF VENT / MAIN ROOF PANEL ASSEMBLY Note: Install Roof Panels from Left to Right. The Right Panel must overlap the Left Panel. Each Panel is attached with Bolt/Washer (CC) and Spacer (LL). Hand tighten only until all panels have been installed.
- Page 23 Step 15A: Attach the Long Roof Vent Side Trim (T3) and the Short Roof Vent Side Trim (T4) to the Roof Vent Supports (J3) using Bolts/Washers (AA). Repeat for opposite side and attach to each corner. Tighten all Bolts. See Figure 15-1 and 15-2. Step 15B: Attach the Roof Vent Corner Trim (Q) using Bolts/Washers (FF).
- Page 24 Step 16A: Attach the Main Roof Upper Horizontal Supports (M1, M2, and M3) to the Main Roof Corner Supports and Center Supports (I1 and I2) using Bolts/Washers (AA). See Figure 16-1, Figure 16- 2, and Figure 16-5. Step 16B: Attach the Main Roof Lower Horizontal Supports (N1, N2, and N3) to the Main Roof Corner Supports (I1) and Center Supports (I2) using Bolts/Washers (AA).
- Page 25 Step 17A: MAIN ROOF PANELS - SHORT SIDE: Note: Install Roof Vent Panels from Left to Right. The Right Panel must overlap the Left Panel. Each Bolt (CC) must be attached to Spacer (LL). Hand tightens only until all panels have been installed then tighten all bolts.
- Page 26 Step 18A: LOWER TRIM: Attach the Main Roof Trim (T1 and T2) to the Main Roof Corner Support (I1) using Bolts/Washers (AA). See Figure 18-1. Step 18B: Secure the Main Roof Trim (T1 and T2) to Main Roof Center Support (I2) on the Short Side of your gazebo using the Main Roof Connector (V1) and Bolts/Washers (AA).
- Page 27 Step 19A: CORNER TRIM: Attach the Main roof Corner Trim (P) to the Main Roof Corner Support (I1) using Bolts/Washers (FF). Repeat for each corner. Tighten all Bolts. See Figure 19-1. Step 19B: UPPER CENTER TRIM: Attach one Short Center Frame Trim (S) to the Short Connector (J1) using Bolts/Washers (AA).
- Page 28 Step 20A: Attach the Roof Vent Mosquito Netting (Z) to the Velcro on Roof Vent Support Frame (J3) and secure with Roof Vent Mosquito Connector (V2) and Bolts/Washers (AA). See Figure 20-1 and 20-2. Step 20B: Attach the Mosquito Netting (Y) to the Mosquito Netting Hooks (MM). See Figure 20-3. Note: Use the Inside Rail for the Mosquito Netting.
- Page 29 Step 21: Insert the Ground Stakes (NN) into the Base Plates (C). See Figure 21-1. Repeat for all corners. Figure 21-1 Note: Please see our video for additional assembly assistance: https://shadenshelters.com/10x12-duncan-gazebo 29 of 30...
-
Page 30: Warranty
Maintenance & Care Maintenance is required for all outdoor gazebo/pergola/pavilion. Inspect hardware thoroughly before use and during the season to make sure bolts are securely fastened. Remove fabric canopy from soft top gazebo and store out of the elements when not in use or during hazardous weather conditions (wind, rain, snow, etc.). Remove all snow from the hard top gazebo/pavilion.
Need help?
Do you have a question about the Duncan 272-3049 and is the answer not in the manual?
Questions and answers
what size lug bolts or construction screws do i use to anchor base plate to a wooden deck