
Related Manuals for Stinger STXJLPOD


Summary of Contents for Stinger STXJLPOD
- Page 1 STXJLPOD Installation Guide ® STXJLPOD 2018- 2022 Jeep Wrangler JL / Gladiator JT 6.5" Speaker Pods with Tweeter Adapters Installation Guide...
- Page 2 ® What’s In The Box LH Speaker Pod X 1 RH Speaker Pod X 1 Speaker Plug Adapter X 2 Tweeter Mounting Plate X 2...
-
Page 3: Recommended Tools
Installation Notes Read this installation guide thoroughly before disassembling or modifying the vehicle. Installation of this product requires technical skill, experience and specialized tools. If in doubt, it’s recommended to have it professionally installed by an authorized Stinger Dealer. -
Page 4: Vehicle Disassembly
® Vehicle Disassembly 1. Starting at the top, remove the knee panel below the steering wheel by pulling outward to release the retaining clips, then work your hands down the edges of the panel to release the remaining clips and remove the panel. - Page 5 STXJLPOD Installation Guide 4. Unplug the two connectors on the backside of the radio/climate control panel and remove. 5. Remove the two screws securing the radio bezel to the sub-dash. NOTE: If the vehicle has an aftermarket radio, it may need to be removed to complete disassembly of the dash area.
- Page 6 ® Vehicle Disassembly (cont.) 7. Remove the indicated screw above the radio display that is securing the upper dash pad. 8. Starting at either end, pull the upper dash pad trim towards the rear of the vehicle to release the retaining clips from one side to the other.
- Page 7 STXJLPOD Installation Guide 10. Remove the indicated screws at the top of the light switch panel to the left of the instrument cluster. 11. Unclip the left side of the upper steering wheel trim. Remove the indicated screw. 12. Using a trim tool, remove the...
- Page 8 ® Vehicle Disassembly (cont.) 13. Remove the 4 screws from the driver's end panel. NOTE: Unplugging the door harness and unbolting the door stay will allow the door to open freely and allow easier access to the screws. 14. Using a 7mm wrench, remove the lower screw on the driver's end panel.
- Page 9 STXJLPOD Installation Guide 16. Pull out (towards the door) on the edge of the end panel and release the alignment studs indicated. Then pull towards the rear to access the back of the panel. 17. Unplug the headlamp switch wire harness connector and remove the panel.
- Page 10 ® Vehicle Disassembly (cont.) 19. Remove the screw at the top of the speaker enclosure. The enclosure should now be free. 20. Push down on the enclosure and angle the top mounting tab passed the sub-dash and outward. 21. Tilt the enclosure forward far enough to access the speaker connector on the backside of the enclosure.
- Page 11 STXJLPOD Installation Guide 22. With the speaker connector unplugged, tilt the speaker enclosure further to access the two plugs connected to the module. Unplug the two connectors and remove the speaker enclosure. Now for the passenger side... 23. Open and empty the glove box.
- Page 12 ® Vehicle Disassembly (cont.) 25. Remove the end cover on the right side of the grab handle above the glove box. 26. Remove the two 10mm bolts and remove the grab handle. 27. Inside the glove box opening, at the top behind the plastic stop, locate and remove the two 13mm bolts.
- Page 13 STXJLPOD Installation Guide 28. Using a trim tool, unclip the cover panel above the glove box. If this panel is tethered to the sub- dash, you can leave it connected and still access the screws. 29. Remove the two screws at the bottom of the air vent/airbag panel.
- Page 14 ® Vehicle Disassembly (cont.) 31. Move the air vent/airbag panel down and out of the way to gain access to indicated dash panel screw on the top. Remove the screw. 32. Lift the air vent/airbag panel up and out of the way to gain access to the dash panel screw on the right side.
- Page 15 STXJLPOD Installation Guide 34. Remove the three dash panel screws along the bottom of the glove box opening. 35. Inside the glove box opening, on the lower right side, remove the 7mm screw from the bottom of the speaker enclosure.
- Page 16 ® Vehicle Disassembly (cont.) 37. Using a trim tool, remove the dash end cover on the passenger side. 38. Remove the 4 screws from the passenger side dash end panel. NOTE: Unplugging the door harness and unbolting the door stay will allow the door to open freely and allow easier access to the screws.
- Page 17 STXJLPOD Installation Guide 40. Remove the speaker enclosure side screw located inside the lower access hole. If you are having trouble accessing this screw, read NOTE in Step 35. 41. Pull out (towards the door) on the edge of the end panel and release the alignment studs indicated.
- Page 18 ® Vehicle Disassembly (cont.) 43. Pull out on the dash panel far enough to allow the speaker enclosure to be removed from the bottom Optional dash speaker removal... If you are replacing the dash speakers using the included tweeter mounting plates, follow the instructions below for both sides of the vehicle.
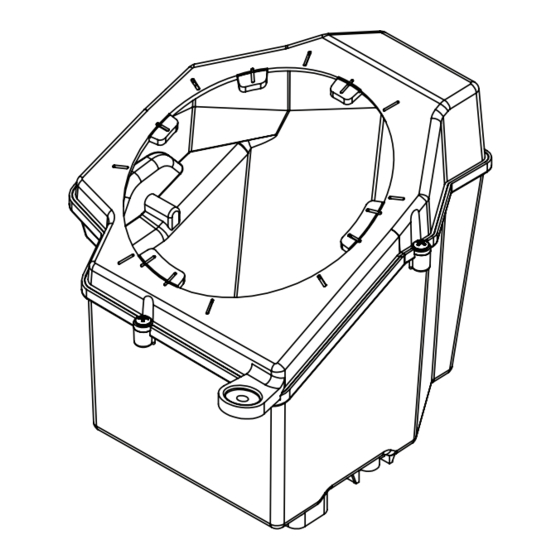
- Page 19 STXJLPOD Installation Guide Speaker Pod Preparation Driver's side shown. Preparation is similar for both sides. 1. Remove the three screws securing the factory speaker. 2. Before unplugging speaker, check speaker wire polarity and make note of positive and negative. Depending...
- Page 20 ® Speaker Pod Preparation (cont.) 4. Remove the rubber grommet from the backside of the enclosure. Pull out the speaker harness and set it to the side. This will be installed on the replacement pods. 5. Driver's side only: Remove the three screws securing the module to the backside and set the module and screws to the side.
- Page 21 STXJLPOD Installation Guide 7. Re-seat the rubber grommet and slide and lock the speaker connector on the backside of the pod. 8. Driver's side only: Attach the module to the backside of replacement pod using the three screws removed from the factory enclosure.
- Page 22 ® Speaker Pod Preparation (cont.) 10. Attach one of the included Speaker Plug Adapters to factory speaker connector. Verifying polarity, attach the speaker leads to the replacement speaker. 11. Align and install the speaker using the hardware included with the replacement speakers.
- Page 23 STXJLPOD Installation Guide Speaker Pod Installation Installing the replacement pods is done in reverse order of removing the factory enclosures. Refer to the removal instructions for reference. Driver's Side: 1. Position the driver's side pod backside up, and plug in the two connectors to the module.
- Page 24 ® Limited Warranty Stinger warrants this product to be free of defects in materials and workmanship for a period of one (1) years from the original date of purchase. This warranty is not transferable and applies only to the original purchaser from an authorized Stinger dealer in the United States of America only.
Need help?
Do you have a question about the STXJLPOD and is the answer not in the manual?
Questions and answers