Primera Max User Manual
Optical disc duplicator
Hide thumbs
Also See for Max:
- Connectivity manual (20 pages) ,
- Connectivity manual (20 pages) ,
- User manual (44 pages)

Related Manuals for Primera Max


Summary of Contents for Primera Max
- Page 1 051704-510231-(09) Optical Disc Duplicator User’s Manual © 2001 All rights reserved.
- Page 2 Notices: The information in this document is subject to change without notice. NO WARRANTY OF ANY KIND IS MADE WITH REGARD TO THIS MATERIAL, INCLUDING, BUT NOT LIMITED TO, THE IMPLIED WARRANTIES OF MERCHANTABILITY AND FITNESS FOR A PARTICULAR PURPOSE. No liability is assumed for errors contained herein or for incidental or consequential damages in connection with the furnishing, performance, or use of this material.
-
Page 3: Table Of Contents
Table of Contents Section 1: Getting Started ...1 A. Choosing a Good Location ...2 B. Unpacking and Inspection...2 C. Identifying the Parts ...3 D. Minimum System Requirements ...6 E. Overview of Operation ...6 Section 2: Hardware and Software Set-Up and Testing ...10 A. -
Page 5: Section 1: Getting Started
Section 1: Getting Started THANK YOU… ...for purchasing the Optical Disc Duplicator Pro/XL. It is the perfect way for you to copy CDs in jobs of up to 100 discs at a time. You can also print directly onto disc surfaces with an optional ink-jet or thermal printer. -
Page 6: Choosing A Good Location
A. CHOOSING A GOOD • Place the Duplicator in a location with adequate air circulation to prevent internal heat build up. If you will be attaching an optional printer, you'll need a table-top with at least 30" (76cm) of depth for adequate clearance. •... -
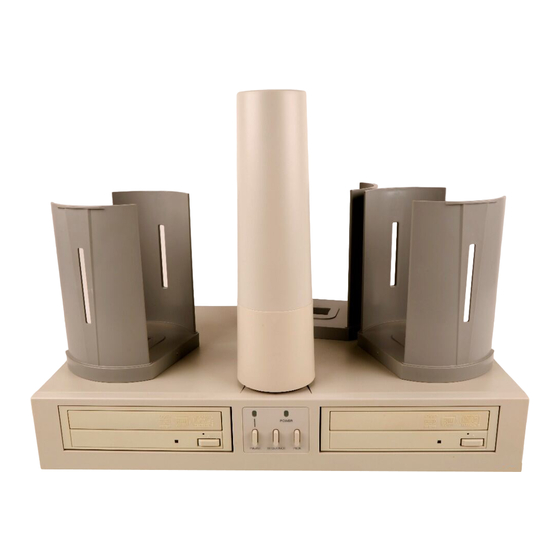
Page 7: Identifying The Parts
IDENTIFYING THE PARTS Front Panel and Top This illustration shows the Duplicator, its Control Panel, Buttons, LED indicator lights, components. An optional unit so that you can see where it is attached: Output Bin CD Recorder 1 is the first drive the Duplicator loads and unloads as discs are copied CD Recorder 2 is only available on the Optical Disc Duplicator Pro... - Page 8 LED Status Lights the Pause Button has been pressed. They also blink in certain patterns to indicate an error or other condition of the Duplicator. See Section 4 for a full explanation of the LED Status Light conditions. Pause Button Robotic Arm.
- Page 9 Note that the Thermal CD Printer printer and that the Output Bin is located in a different spot due to the location of the Thermal CD Printer. When you first power-up the Duplicator, it will automatically do a search for where the Input and Output Bins will know where to pick and place discs.
-
Page 10: Minimum System Requirements
MINIMUM SYSTEM REQUIREMENTS Single Drive Duplicator XL: • 700MHz or faster genuine Intel Pentium IV • 512MB or more RAM • PCI slot based recommended) • Desktop PC (laptops not recommended) • Video display capable of 800x600 resolution or better •... - Page 11 1. Up to 100 blank discs may be loaded at one time into the Input Bin. 2. The Duplicator has an integrated robotic arm that "picks" one disc one at a time from the Input Bin. 3. The tray of CD Recorder 1 will open automatically and the Robotic Arm will place a disc into the tray of recorder 1.
- Page 12 Since most CD-Rs available today are of extremely high quality, you will rarely reject a disc. Nevertheless, it is good practice to test each disc - just in case. You certainly don't want to send out a great looking disc that does not read properly in your customer's CD drive! Keep in mind that verifying each disc will add extra time to the recording process.
-
Page 13: Output Bin
NOTE: Only the CD version of duplicators can print and record simultaneously. To ensure proper recording, the robotics may pause momentarily when the CD Recorder drives are initializing. This pause is normal. The robotics will continue operating after a short pause. -
Page 14: Section 2: Hardware And Software Set-Up And Testing
Section 2: A. CONNECTING INTERFACE CABLES 1. Make sure that your PC is turned off and that it is disconnected from its power source. Leave the PC turned off until you are requested to turn it on later in this set-up procedure. - Page 15 4. Connect the Serial Interface the DB9 connector on the rear panel of the Duplicator. The other end is connected to your PC's DB9 COM1 port. If COM1 is already used for another device, you can use COM2 or COM3 and follow on-screen instructions later in the set-up procedure for changing the default serial port for the Duplicator.
- Page 16 7. Connect the optional Printer Stand) to the rear panel of the Duplicator. Do not connect the other end yet. You need to attach the printer first. 8. Attach the optional printer stand (required for a printer installation) to the Duplicator by locating the connecting tabs and inserting them into the slots on the rear panel of the Duplicator.
- Page 17 INDEX For the Thermal CD Printer, the printer is mounted on the left side of the Duplicator. For either printer, find the locating holes on the bottom plate of the printer. Position the printer on the stand so that the printer stand locating pins are inserted into the locating holes of the printer.
- Page 18 9. Connect the other end of the Printer Control Port 10. Connect the printer with an IEEE 1284 compliant cable. One end is connected to the parallel port on the rear panel of the printer. The other end is connected to the parallel port of your PC.
-
Page 19: Hardware Test And Printer Alignment
12. Apply power to the printer. One end of the Power Adapter is connected to the printer's rear-panel The other end is attached to a wall outlet. Note: The power supply for the inkjet printers is a 30 Volt supply. Both the Thermal Printer and Duplicator require 24 Volt supplies. - Page 20 b. Put a stack of blank CDs in the the right side). Press the control panel. The Robotic Arm will swing around to do an initial check to detect which printer is installed. It will then go to a position directly above the Input Bin.
- Page 21 Open the printer tray with the disc in/out button. On the Ink-Jet CD Printer, this is the button with the two arrows pointing different directions. On the this is the button on the lower right side of the front panel. Press the Sequence button Arm comes to rest over the Printer's Disc Tray.
-
Page 22: Fine Tuning The Printer Stand Alignment
Check one more time for printer alignment by pressing after the screws have been tightened down, just in case something changed while you were making the adjustment. Re-align if necessary. Press the Sequence m. Press the Pick Output Bin. n. Press the Pick button again. The CD will be picked up out of the Output Bin. -
Page 23: Software Installation
6. With the Robotic Arm holding a disc just over the tray, move the printer around until aligned as close as possible. For a more accurate alignment, press the Sequence Button to step the arm slightly to the right (clockwise), or press the Pause Button to step the arm slightly to the left (counter-clockwise). -
Page 24: Selecting Your Recorder Drives
INDEX 3. The Welcome Screen is now displayed. Press Install and follow the on-screen instructions. 4. Re-boot your computer before you proceed. SELECTING YOUR RECORDER DRIVES Each time PrimoDVD is launched, the following dialogue box will appear: This is necessary for PrimoDVD to identify the drives. All recording drives installed on your PC will be listed in this dialogue box. -
Page 25: Software Test
SOFTWARE TEST The final set-up step before starting your first job is to test the entire hardware/software configuration. This will confirm that the hardware, software and your PC are all communicating properly with each other properly. Follow this procedure: 1. Launch the software from your Windows Desktop or program menu. - Page 26 3. In the drop-down menu, go to Services. 4. Click on Check Communications. You will get a dialog box saying "Communication OK. System Idle." If you don't, check that all cables are connected securely. Or, change the serial cable and change the setting in the menu.
- Page 27 INDEX 6. Click on Robotics again. 7. Select Manual Movements. Hardware and Software Set-Up and Testing 23...
- Page 28 8. Deselect any components you don't have installed in the check boxes in Multiple System Test. 9. Load at least 4-5 discs into the Input Bin. 10. Click on Start Test. The robotic arm will move through its entire sequence automatically. If you specified more than one disc, it will continue until the number you specified is completed or it runs out of discs.
-
Page 29: Section 3: Running Your First Job
Section 3: Now that you've completed the hardware set-up, connected all cables, loaded the PrimoDVD Software and the printer driver and performed all tests, you're ready to copy discs. The example given in this chapter is for a simple copying job using PrimoDVD software. -
Page 30: Overview Of Recording
Here's a short explanation of each Window: • Drive Status your computer. Your configuration has just two drives: the internal drive in your PC and the CD Recorder installed in your Duplicator. • Job Set-Up Panel for each job is displayed. When you select a job by clicking on File: New from the File pull-down menu, a different type of Job Panel will appear in the Job Set-Up Window depending upon the type of job selected. - Page 31 INDEX Test recording performs all of the operations of recording with the drive's laser turned on to reading power. A test recording run will determine if the data source will keep up with the recorder's demand. Normally, a single test run is sufficient to determine if a condition knows as "buffer underrun"...
-
Page 32: Copying An Audio Cd
The Stop Button will abort any recording in progress and cause the Duplicator to transport the disc to the will also terminate that job. Record, Stop and Pause actions for the currently-selected (highlighted) job may also be selected from the Toolbar at the top of the main Application Screen. - Page 33 HINT: To copy specific tracks from the CD, highlight the desired tracks then click the Extract Track button. This will allow you to take the individual tracks from the cd and convert them to MP3 or Wave files. This is useful for making a compilation disc of tracks from different CDs.
-
Page 34: Creating Print Files
11. Press the red Record button to start recording your copies. 12. If everything worked right, the Duplicator should now be recording and printing your discs. 13. Other types of duplication are explained in PrimoDVD, Select Help, then Index, then Job Preparation from the applications main menu. -
Page 35: Section 4: Interpreting The Duplicator's Led Status Lights
Section 4: Interpreting the Duplicator's LED Status Lights LED Status Lights They can tell you a lot about what is happening at any given moment with the Duplicator, including a number of error conditions. To accurately interpret what is meant when the lights are on, off, or flashing, please refer to the following chart: A. -
Page 36: Section 5: Maintenance And Troubleshooting
Section 5: Maintenance Troubleshooting The Duplicator is designed to operate for extended periods of time with very little attention. In fact, no regular maintenance is recommended other than cleaning the outside case. NOTE: Do NOT attempt to oil or grease the Duplicator's Robotic Arm shaft or other components. -
Page 37: Recording Errors
INDEX C. RECORDING ERRORS If discs are not being recorded properly or are not passing verification, you will want to consult the error log. This is available in PrimoDVD by clicking View, then Show Log from the drop-down menu. This will show a history of tasks performed by PrimoDVD. If there are errors, you will see them in this list. - Page 38 a. Click Tools, Options and check the box labeled Enable Burn Proof. This option enables the drive to slow down its recording speed to match the data. b. Click Robotics, Options and deselect Record and Print Simultaneously. This will cause your jobs to take longer, but will free more computer resources for recording.
-
Page 39: Technical Support
Guide should, in most cases, solve the problem. If you still have difficulty, contact the technical support number listed on the insert included in the supply pack that came with your Duplicator. Please also visit www.primera.com for updates and answers to many frequently asked questions. Maintenance and Troubleshooting 35... -
Page 40: Section 6: Technical Specifications
Section 6: Technical Model Configurations Optional Printers Minimum System Single Drive Duplicator XL: Dual Drive Duplicator Pro: Disc Capacity 36 Technical Specifications Specifications Optical Disc Duplicator Pro CD-R System: One (XL) or Two (Pro) CD-R recorders, PrimoDVD Software, Robotic Transport Station DVD-R System: One (XL) or Two (Pro) General-Purpose DVD-R recorders, PrimoDVD Software, Robotic Transport... - Page 41 Recordable Formats Operating Systems Interface Power Requirement Weight Dimensions Certifications Warranty CD-R: CD-Audio (CD-DA), CD-ROM, CD-I, Video-CD, MP3 to CD-Audio (on the fly, no hard drive overhead required) Writes: DVD-R (4.7 General Only) DVD-RW, CD-R, CD-RW Reads: DVD-ROM DVD-R (all types), DVD-RW, CD ROM, CD TEXT, Photo CD, CD-DA, CD Extra Windows XP - Service Pack 1 and...
-
Page 42: Index
Index Application Window ...21, 25, 26 Audio Job, Running ...25 Bins Input ...3, 4, 5, 7, 9, 15, 16, 18 Output ...3, 4, 5, 9, 15, 18 Buttons CD Tray ...3, 16 Pause ... 4, 27, 32 Pick ...4, 16, 17, 18, 32 Sequence ...4, 16, 17, 18 Cables 6-Pin mini-DIN ...12, 14... - Page 43 PrimoDVD Software Activity Log ...25, 26 Application Window...21, 26 Drive Status Window ...25, 26 Job Set-Up Window ...25, 26 Job Status Window ...25, 26 Print Files Creating ...30 Types ...30 Printer Driver Software ...19, 24 Printers Ink-Jet ...1, 3, 5, 9, 12, 17, 36 Thermal ...1, 4, 5, 9, 13, 17, 36 PRN Files ...29, 30 Reject Area ...4, 7, 28...
- Page 44 Printed in the United States of America P/N 510231...
Need help?
Do you have a question about the Max and is the answer not in the manual?
Questions and answers