
Subscribe to Our Youtube Channel
Related Manuals for Puretec HYBRID H6


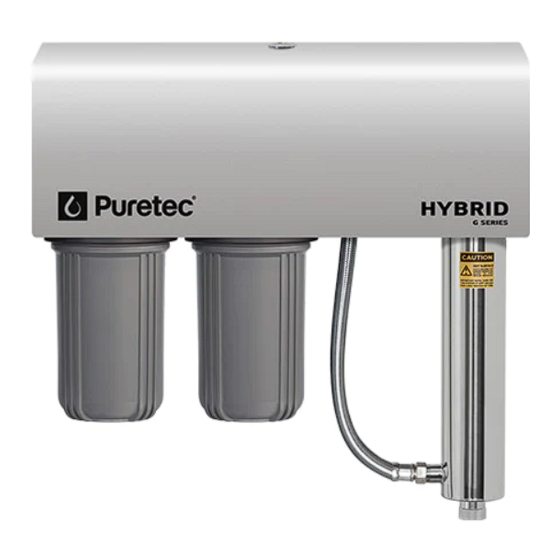
Summary of Contents for Puretec HYBRID H6
- Page 1 Hybrid User Guide ATS5200.103 Licence No. WM 74593 Filtration & Ultraviolet Disinfection All in One Unit ApprovalMark For correct operation & installation it is essential to observe these instructions. SEPT2016...
-
Page 2: Table Of Contents
Lamp Ballast Specifications .................... 11 Replacement Parts Guide ....................11 Cartridge Installation/Replacement ................12 Quartz Sleeve Maintenance Procedure ..............13 Troubleshooting Guide ...................... 14 Warranty ............................ 15 Product Information Distributor Installer Phone Date Installed Installation & Operation Manual Copyright © Puretec Pty Ltd 2016... -
Page 3: Puretec Customer Service
For other types of water supply please contact your local Puretec stockist or call our Puretec Customer Service Helpline at (AU) 1300 140 140 or (NZ) 0800 130 140. The Puretec Hybrid system cartridges and lamp needs replacing regularly to maintain optimum performance. -
Page 4: Preparing Your System
Preparing the system Preparing your system The Puretec systems are designed to run economically for many years and this is dependant on the initial installation and periodical maintenance. Please read all instructions carefully as failures caused by incorrect installation or operation are not covered by warranty. -
Page 5: Positioning Your System
Installation Guide Positioning your System Choose a location where water spillage will not cause damage. Make sure mounting position is solid so that the filter housing stays in position when changing filters. An isolation valve may be installed immediately prior to the filter system to isolate the unit for changing the cartridges. -
Page 6: Installation Requirements
If stated parameters are exceeded pre-filtration is required as water of this quality can compromise the effectiveness of the UV system. The filters and the sleeve should be cleaned or replaced as required to maintain them in good condition. Note: This water filtering appliance should only be installed by a licensed plumber. Installation & Operation Manual Copyright © Puretec Pty Ltd 2016... -
Page 7: Installation Procedure
Ordering code is RI-TMS4. Installation Procedure Puretec Hybrid Series has 1" [25mm] plumbing connections. Before attempting installation check the unit to ensure the sleeve is intact and the lamp is present. - Page 8 10. Turn the power on and ensure that the lamp is operating. (see also lamp installation instructions). 11. Close and lock the lid. Note: Your cabinet comes with 2 keys for your convenience. Please store them safely. Note: Lost or misplaced keys are not covered by warranty. Installation & Operation Manual Copyright © Puretec Pty Ltd 2016...
-
Page 9: Operation
Operation Operation • Allow two minutes for the UV lamp to reach full intensity before starting water flow. • On a new installation where no other form of sterilisation has been in constant usage, we recommend flushing the pipe work with a suitable sanitiser such as TankSafe (for dosage refer to product instructions). - Page 10 Always keep UV lamp on, as continuously turning on and off will shorten the service life of the UV lamp. Ballast Safety Power Plug Aluminium Lamp Power Connector UV lamp Quartz Sleeve O-Ring Water Outlet Stainless Steel Chamber Water Inlet 10 Installation & Operation Manual Copyright © Puretec Pty Ltd 2016...
-
Page 11: Lamp Ballast Operation
To maintain the high quality of the purified water the cartridges need changing periodically (this is dependant on water quality and usage). You can obtain replacement cartridges from your local Puretec dealer. To maintain performance, warranty and Australian and New Zealand Standards use genuine Puretec replacements. -
Page 12: Cartridge Installation/Replacement
Close down stream tap and check for leaks. Flush system for 1-2 minutes after any period of non-use more than 2 weeks. For a period of non-use of 6 months or more, it may be necessary to replace the cartridges. 12 Installation & Operation Manual Copyright © Puretec Pty Ltd 2016... -
Page 13: Quartz Sleeve Maintenance Procedure
Maintenance Quartz Sleeve Maintenance Procedure To ensure high sterilizing rate with best water quality, check sleeve regularly (about every 3 months depending on quality of water source) and see whether there is dirt or substances gathered. Clean with alcohol based cleaner if necessary. Allow the unit to cool before servicing. -
Page 14: Troubleshooting Guide
Lamp is disconnected or faulty Check lamp connection, replace if needed Display flashing Power interrution Reset ballast Error Code ‘A3’ on Ballast countdown has reached 0, lamp Replace lamp ballast life expired 14 Installation & Operation Manual Copyright © Puretec Pty Ltd 2016... -
Page 15: Warranty
False and incorrect claims will be pursued at Puretec’s discretion, including chargeable inspection and labour costs incurred. This warranty is given by Puretec Pty Ltd, ABN 44 164 806 688, 14-16 Bailey Street, St Marys SA 5064, telephone no. 1300 140 140 and email at sales@puretec.com.au.
Need help?
Do you have a question about the HYBRID H6 and is the answer not in the manual?
Questions and answers