
Related Manuals for SHOWTEC Power Spot 9 Q6 Tour


Summary of Contents for SHOWTEC Power Spot 9 Q6 Tour
- Page 1 MANUAL ENGLISH Power Spot 9 Q6 Tour Ordercode: 42576 Highlite International B.V. – Vestastraat 2 – 6468 EX – Kerkrade – the Netherlands...
-
Page 2: Table Of Contents
Power Spot 9 Q6 Tour Table of contents Warning ....................................2 Unpacking Instructions ..............................2 LED Expected Lifespan ..............................2 Safety Instructions ................................. 2 Operating Determinations ............................4 Rigging .................................... 4 Connection with the mains............................5 Return Procedure ................................6 Claims .................................... -
Page 3: Warning
Save the carton and all packing materials. In the event that a fixture must be returned to the factory, it is important that the fixture be returned in the original factory box and packing. Your shipment includes: ● Showtec Power Spot 9 Q6 Tour ● Schuko to pro power cable (1,5 m) ●... - Page 4 ● If your Showtec device fails to work properly, discontinue the use immediately. Pack the unit securely (preferably in the original packing material), and return it to your Showtec dealer for service.
-
Page 5: Operating Determinations
Power Spot 9 Q6 Tour ● During the initial start-up some smoke or smell may arise. This is a normal process and does not necessarily mean that the device is defective. ● Repairs, servicing and electric connection must be carried out by a qualified technician. -
Page 6: Connection With The Mains
Power Spot 9 Q6 Tour The Power Spot can be placed on a flat stage floor or mounted to any kind of truss with a clamp. Improper installation can cause serious injuries and/or damage of property! Connection with the mains Connect the device to the mains with the power-plug. -
Page 7: Return Procedure
Power Spot 9 Q6 Tour Return Procedure Returned merchandise must be sent prepaid and in the original packing, call tags will not be issued. Package must be clearly labeled with a Return Authorization Number (RMA number). Products returned without an RMA number will be refused. Highlite will not accept the returned goods or any responsibility. -
Page 8: Description Of The Device
Power Spot 9 Q6 Tour Description of the device Features The Power Spot 9 Q6 Tour is an ultra-compact light effect with high output and great effects. It is the ideal solution for small clubs and mobile DJs. ● Input voltage: 100–240 V AC, 50/60 Hz ●... -
Page 9: Frontside
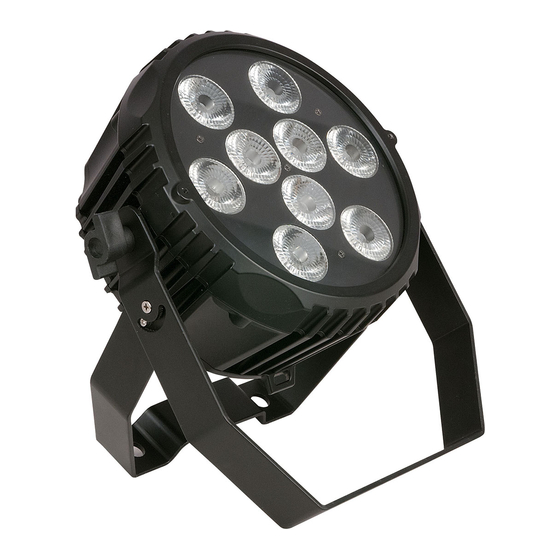
Power Spot 9 Q6 Tour Frontside Fig. 01 01) Adjustment screw 02) Double mounting bracket 03) 9 x 6-in-1 12 W LED RGBWA-UV Ordercode: 42576... -
Page 10: Backside
Power Spot 9 Q6 Tour Backside Fig. 02 04) LCD display + control buttons 05) 5-pin DMX signal connector IN 06) 3-pin DMX signal connector IN 07) Blue power connector 100–240 V IN 08) White power connector 100–240 V OUT... -
Page 11: Installation
Power Spot 9 Q6 Tour Installation Remove all packing materials from the Power Spot 9 Q6 Tour. Check if all foam and plastic padding is removed. Connect all cables. Do not supply power before the whole system is set up and connected properly. -
Page 12: Multiple Power Spots (Dmx Control)
Power Spot 9 Q6 Tour Multiple Power Spots (Master/Slave control) Fig. 03 Multiple Power Spots (DMX Control) 01) Fasten the effect light to a firm trussing. Leave at least 0,5 meter on all sides for air circulation. 02) Always use a safety cable (ordercode 70140 / 70141). -
Page 13: Fixture Linking
Power Spot 9 Q6 Tour Multiple Power Spots DMX Setup Fig. 04 Note : Link all cables before connecting electric power Fixture Linking You will need a serial data link to run light shows of one or more fixtures using a DMX-512 controller or to run synchronized shows of two or more fixtures set to a master/slave operating mode. -
Page 14: Control Panel
Power Spot 9 Q6 Tour The Power Spot 9 Q6 Tour can be operated with a DMX controller in control mode or without the DMX controller in stand-alone mode. Control Panel A) LCD display MODE button C) SETUP button D) UP button DOWN button Fig. -
Page 15: Menu Overview
Power Spot 9 Q6 Tour Menu Overview Ordercode: 42576... -
Page 16: Main Menu Options
01) Press the MODE button until the display shows 02) Press the SETUP button to open this menu and set the sensitivity of the Power Spot 9 Q6 Tour. 03) Press the UP/DOWN buttons to set the required sensitivity from 04) Turn on the music and the Power Spot 9 Q6 Tour will react to the beat of the music 3. -
Page 17: Settings
Power Spot 9 Q6 Tour 4. Settings In this menu you can manually set a few settings. 01) Press the MODE button until the display shows 02) Press the SETUP button to open this menu. The Power Spot 9 has 2 different setting modes. -
Page 18: Slave Mode
Power Spot 9 Q6 Tour 7. Built-in programs In this menu you can you can set the built-in programs. 01) Press the MODE button until the display shows 02) Press the SETUP button to open this menu. 03) Press the UP/DOWN buttons to scroll through the 12 built-in programs. -
Page 19: Dmx Channels
Power Spot 9 Q6 Tour DMX Channels 6 channels Channel 1 – Red 0–255 Gradual adjustment Red, from 0–100 % Channel 2 – Green 0–255 Gradual adjustment Green, from 0–100 % Channel 3 – Blue 0–255 Gradual adjustment Blue, from 0–100 % Channel 4 –... -
Page 20: Channels
Power Spot 9 Q6 Tour 10 channels Channel 1 – Dimmer intensity 0–255 Gradual adjustment, from dark to brightest 0–100 % Channel 2 – Red Dimmer must be open 0–255 Gradual adjustment Red, from 0–100 % Channel 3 – Green Dimmer must be open 0–255... -
Page 21: Maintenance
04) The electric power supply cables must not show any damages or material fatigue. The Power Spot 9 Q6 Tour requires almost no maintenance. However, you should keep the unit clean. Otherwise, the fixture’s light output will be significantly reduced. Disconnect the mains power supply, and then wipe the cover with a damp cloth. -
Page 22: No Light
01) Power supply. Check that the unit is plugged into an appropriate power supply. 02) The LEDs. Return the Power Spot to your Showtec dealer. 03) The internal fuse. Return the Power Spot to your Showtec dealer. 04) If all of the above appears to be O.K., plug the unit in again. -
Page 23: Product Specifications
Power Spot 9 Q6 Tour Product Specifications Model: Showtec Power Spot 9 Q6 Tour Input Voltage: 100–240 V, 50/60 Hz Power consumption: 64,1 W (full output) DMX linking: 30 pcs Dimensions: 264 x 113 x 294 mm (LxWxH) Weight: 2,84 kg... -
Page 24: Dimensions
Power Spot 9 Q6 Tour Dimensions Ordercode: 42576... -
Page 25: Notes
Power Spot 9 Q6 Tour Notes Ordercode: 42576... - Page 26 Power Spot 9 Q6 Tour Ordercode: 42576...
- Page 27 Power Spot 9 Q6 Tour Ordercode: 42576...
- Page 28 ©2021 Showtec...
Need help?
Do you have a question about the Power Spot 9 Q6 Tour and is the answer not in the manual?
Questions and answers