Table of Contents
Advertisement
TECHANGLE
MICRO
ELECTRONIC
TORQUE-ANGLE
WRENCH
SAFETY INSTRUCTIONS
1
IMPORTANT SAFETY INSTRUCTIONS
23
IMPORTANTES INSTRUCTIONS DE SECURITE
24
INSTRUCCIONES DE SEGURIDAD IMPORTANTES
25
WICHTIGE SICHERHEITSHINWEISE
26
ISTRUZIONI CAUTELARI IMPORTANTI
27
BELANGRIJKE VEILIGHEIDSINSTRUCTIES
28
INSTRUÇÕES DE SEGURANÇA IMPORTANTES
®
STEEL
Advertisement
Table of Contents

Related Manuals for Snap-On TECHANGLE STEEL MICRO


Summary of Contents for Snap-On TECHANGLE STEEL MICRO
- Page 1 ® TECHANGLE STEEL MICRO ELECTRONIC TORQUE-ANGLE WRENCH SAFETY INSTRUCTIONS IMPORTANT SAFETY INSTRUCTIONS IMPORTANTES INSTRUCTIONS DE SECURITE INSTRUCCIONES DE SEGURIDAD IMPORTANTES WICHTIGE SICHERHEITSHINWEISE ISTRUZIONI CAUTELARI IMPORTANTI BELANGRIJKE VEILIGHEIDSINSTRUCTIES INSTRUÇÕES DE SEGURANÇA IMPORTANTES...
-
Page 2: Important Safety Instructions
Do not use on live electrical circuits. SAVE THESE INSTRUCTIONS Disclaimer ® Operation of TechAngle Steel Micro Wrench is not warranted in an EU member state if operating instructions are not in that State’s language. Contact Snap-on if a translation is needed. -
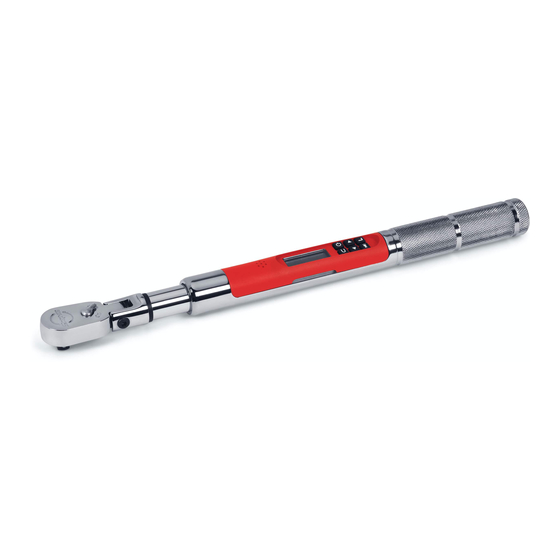
Page 3: Specifications
Specifications Head Type Square drive 72 teeth, sealed flex. B.B. retention or quick release button. Display DISPLAY TYPE: Dot Matrix LCD (168 x 48 Resolution) VIEWING ANGLE: 6:00 BACKLIGHT: WHITE (LED) Sealed Button Pad POWER - ON/OFF and torque and angle re-zero ENTER - measurement mode select and menu entry UP –... - Page 4 1. Turn On Wrench. Momentarily press POWER button. Snap-on logo is displayed followed by torque re-zeroing screen. If previous measurement was angle measurement, then angle re-zeroing screen follows the torque zeroing screen. After re-zeroing, the target torque or target angle screen is displayed depending on previous measurement mode.
- Page 5 Note: If wrench is powered up in torque only measurement mode, angle is not zeroed until mode is changed to angle measurement mode, at which time torque and angle zeroing begins automatically after 2 seconds. Wrench should be placed on a stable surface with no torque applied.
- Page 6 Mode Cycle Count Mode cycle count feature is used to indicate number of times wrench has reached target torque in torque measurement mode or target 180° angle in angle measurement mode. MEMORY ICON MODE CYCLE COUNT Torque and Angle Mode Cycle Counting 1.
- Page 7 Note: Head length entered is offset length measured from center of drive to center of fastener. ������������ Use of Negative Offsets Note: Enter a negative value for offset when used in reverse direction. ������������ When length of an offset is negative, maximum fastener target is limited by following formulas: 240 in-lb wrench: 100 in-lb wrench: Maximum Target Torque = offset * 24 + 240...
-
Page 8: Clear Data
ENTER EXIT button SET HEAD LENGTH 100.0 held SHOW DATA IN-LB Target Screen UP/DOWN buttons 0002: 15:40:15 EXIT ENTER button 2017/01/26 SET HEAD LENGTH TQ: 100.2 IN-LBS SHOW DATA UP/DOWN buttons 0001: 15:35:05 2017/01/26 100.3 IN-LBS 84° Note: A maximum of 50 data records can be stored in memory. Memory full icon will be displayed when full. - Page 9 Language 1. To select language menu, press ENTER button while LANGUAGE is highlighted then highlight desired language and press ENTER button. 2. Decimal Mark selection menu is displayed. Decimal separator can be a comma or decimal point. ...
- Page 10 5. MAXIMUM TORQUE screen is displayed next. MAXIMUM TORQUE is torque value above which red progress lights turn on. Initial MAXIMUM TORQUE value will be MINIMUM TORQUE plus 4%. Maximum torque value can be set greater than MINIMUM TORQUE value to 10% above wrench maximum range by pressing UP /DOWN buttons.
- Page 11 UNIT ADD PRESET button held 90° Target Angle Screen UP/DOWN buttons UP/DOWN buttons UP/DOWN buttons ENTER ADD PRESET MINIMUM ANGLE ENTER MAXIMUM ANGLE button button 90° 94° ENTER button ENTER button BATCH COUNT ENTER button PSET 02 90° Preset Angle Screen UP/DOWN buttons Editing a Preset Edit PSET function gives user ability to edit stored PSETS on wrench.
-
Page 12: Advanced Settings
UNIT PSET 02 DELETE button held EDIT 92° EXIT Preset Angle Screen UP/DOWN buttons DELETE EDIT ENTER button EXIT ENTER button 100.0 IN-LB Target Torque Screen Note: Pressing ENTER button while EXIT menu selection is highlighted will exit without deleting ... -
Page 13: Sleep Time
SHOW INFO ISD: 2017/01/01 SLEEP TIME UP/DOWN buttons AXZ: 157 CAL: 2017/01/01 © 2017 SNAP-ON ENTER button Setting Sleep Time This function will allow user to set interval wrench enters power-down state following last applied torque or button press. 1. From Settings menu, use UP ... -
Page 14: Lcd Contrast
EXIT SHOW INFO SLEEP TIME UP/DOWN buttons ENTER EXIT SLEEP TIME button SHOW INFO 2 MIN SLEEP TIME EXIT UP/DOWN buttons SLEEP TIME 8 HR ENTER EXIT button Setting LCD Contrast This function will allow user to set LCD contrast for optimal viewing. 1. -
Page 15: Auto Backlight
Key Beep Setup This function will allow user to enable or disable audio feedback when a button is pressed. 1. From Settings menu, use UP /DOWN buttons to highlight KEY BEEP selection then press ENTER button. ... - Page 16 Toggle Backlight Setup This function will allow user to enable or disable backlight toggle function. If toggle mode is disabled, BACKLIGHT button turns on backlight and it automatically turns off after five seconds following any last button press. If toggle mode is enabled, a BACKLIGHT button press will turn on backlight and it will remain on until next BACKLIGHT button press.
- Page 17 Battery Type Selection This function will allow user to configure the battery discharge thresholds for the type of battery used. 1. From Settings menu, use UP /DOWN buttons to highlight BATTERY TYPE selection then press ENTER button.
-
Page 18: Advanced Configuration
Advanced Configuration Accessing Advanced Configuration Advanced configuration is accessed from CONFIGURE menu selection on main menu. 1. From target torque or angle screen, press and hold ENTER button for 3 seconds. 2. Highlight CONFIGURE menu selection using UP /DOWN buttons. -
Page 19: Set Date/Time
Note: Red and yellow progress lights turn on if torque exceeds maximum torque or if angle exceeds maximum angle in Preset mode. Calibration Calibration menu is password protected. Contact your local Snap-on Repair MODE SETUP Center regarding Calibration menu. DELETE PRESETS... - Page 20 4. Use UP /DOWN buttons to set month then press ENTER button to highlight day. 5. Use UP /DOWN buttons to set day then press ENTER button. 6. SET TIME screen is displayed with Hour highlighted. ...
-
Page 21: Troubleshooting
Note: As an alternative to calibration interval, a Calibration Cycle Counter is provided in Calibration menu (Contact your local Snap-on Repair Center regarding Calibration menu). Troubleshooting Note: If any of following issues persist, return wrench to an authorized Snap-on repair center. Issue Possible Cause Resolution... -
Page 22: Maintenance & Service
Clean wrench by wiping with a damp cloth. DO NOT use solvents, thinners or carburetor cleaners. DO NOT immerse in anything. Service, repair and calibration are to be done by Snap-on Service Centers only. Contact your Snap-on Tools representative. Ratchet head repair can be done by Snap-on Representative or user. - Page 23 Less than 50 torque and angle records MEMORY stored in memory. MEMORY 50 torque or angle records stored in memory. Oldest record will FULL be replaced by next record. MEMORY Memory read or write error. Return to Snap-on Repair Center if ERROR persists after clearing memory.
-
Page 24: Importantes Instructions De Securite
à l'intérieur d’un état membre de l'Union Européenne si ® L'emploi de cette clé TechAngle les instructions de fonctionnement ne sont pas dans la langue de l’état en question. Contacter Snap-on si vous avez besoin d’une traduction. Français... -
Page 25: Instrucciones De Seguridad Importantes
El funcionamiento de la llave TechAngle no está garantizado en los países miembros de la UE si las instrucciones de funcionamiento no figuran en el idioma del país en cuestión. Póngase en contacto con Snap-on si necesita una traducción. Español... -
Page 26: Wichtige Sicherheitshinweise
BEWAHREN SIE DIESE ANLEITUNG AUF Haftungsausschluss ® Es besteht keine Garantie für den Betrieb des TechAngle Schlüssels in einem EU- Mitgliedstaat, wenn die Betriebsanweisungen nicht in der betreffenden Landessprache abgefasst sind. Wenden Sie sich an Snap-on, wenn eine Übersetzung benötigt wird. Deutsch... -
Page 27: Esonero Di Responsabilità
Non utilizzare su circuiti elettrici sotto tensione. CONSERVARE QUESTE ISTRUZIONI ESONERO DI RESPONSABILITÀ: ® Non si garantisce l'uso della chiave TechAngle nei Paesi membri della CEE dove le istruzioni per l'uso non sono in lingua locale. Contattare la Snap-on per l'eventuale traduzione. Italiano... -
Page 28: Belangrijke Veiligheidsinstructies
Disclaimer ® Er geldt geen garantie voor het gebruik van de TechAngle -sleutel in lidstaten van de EU als de gebruiksaanwijzing niet in de taal van het land in kwestie beschikbaar is. Neem contact op met Snap-on voor vertalingen. Nederlands... -
Page 29: Instruções De Segurança Importantes
Aviso de isenção de responsabilidade ® A operação do torquímetro TechAngle não é permitida em nenhum Estado-membro da União Europeia se as instruções operacionais não estiverem no idioma do Estado em questão. Entre em contato com a Snap-on se uma tradução for necessária. Português... -
Page 32: Authorized Snap-On Repair Centers
AUTHORIZED SNAP-ON REPAIR CENTERS INTERNATIONAL Snap-on/SUN De Mexico S.A. De C.V. Eastern Repair Center United Kingdom Repair Avenida Presidente Juarez No. 6320 Flank Drive Center 2016 Harrisburg, PA 17112 Telford Way Col Los Reyes Zona Industrial Phone: 717-652-7914 Telford Way Industrial Estate...
Need help?
Do you have a question about the TECHANGLE STEEL MICRO and is the answer not in the manual?
Questions and answers