
Related Manuals for Snap-On CTM 550 Series


Summary of Contents for Snap-On CTM 550 Series
- Page 1 OPERATOR’S MANUAL CTM 550 & 800 STANDARD 18 V MULTI-TORQUE WITH ANGLE TOOL Part Number 34522 | Issue 1 | Original Instructions (English)
-
Page 2: Read Operator's Manuals
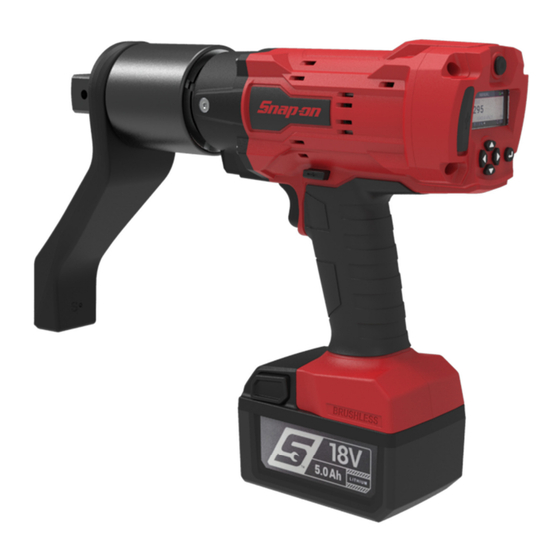
READ OPERATOR’S MANUALS Operator’s Product Model Image Manual Cordless Torque Multiplier CTM550SSB #34522 (CTM 550 & 800 Series) CTM800SSB CTB Battery Pack (CTB Series) CTB185 #ZCTB185CE CTC Series 18 V Battery CTC131A Series #ZCTC131ACE Charger (Single Bay) ... -
Page 3: Table Of Contents
CONTENTS Read Operator’s Manuals Part Numbers Covered by This Manual Serial Number Safety Messages Safety – General Power Tool Safety Warnings Work Area Safety Electrical Safety Personal Safety Power Tool Use and Care Battery Tool Use and Care Service Safety –... -
Page 4: Part Numbers Covered By This Manual
PART NUMBERS COVERED BY THIS MANUAL This manual covers the set up and use of Snap-on ® CTM 550 & 800 Standard Battery Tools. Model Torque Operating Range Part Number CTM 550 55 - 550 ft∙lb CTM550SSB CTM 800 80 - 800 ft∙lb... -
Page 5: Safety Messages
® Use only with Snap-on 18 V Battery Pack (CTB Series) batteries. Read Snap-on ®... -
Page 6: Australia/New Zealand
• When operating a power tool outdoors, use an extension cord suitable for outdoor use. Use of a cord suitable for outdoor use reduces the risk of electric shock • If operating a power tool in a damp location is unavoidable, use a residual Ground Fault Circuit Interrupter (GFCI) protected supply. -
Page 7: Battery Tool Use And Care
• Keep cutting tools sharp and clean. Properly maintained cutting tools with sharp cutting edges are less likely to bind and are easier to control • Use the power tool, accessories and tool bits etc. in accordance with these instructions, taking into account the working conditions and the work to be performed. -
Page 8: Safety - Ctm Specific Safety Warning
SAFETY – CTM SPECIFIC SAFETY WARNING This tool is intended for use with threaded fasteners. Always use impact or high-quality sockets Use only sockets and adaptors which are in good condition Use only sockets and adaptors which are intended for use with power tools ... -
Page 9: Introduction
INTRODUCTION The Cordless Torque Multiplier (CTM) is an electronic torque tool designed for applying torque to threaded fasteners. There are models to cover torque capacities of 550 ft∙lb & 800 ft∙lb. Parts Included Model Description CTM 550 CTM 800 Maximum Torque 550 ft∙lb 800 ft∙lb... -
Page 10: Features And Functions
FEATURES AND FUNCTIONS ‘Safe to Start‘ Button Bright Display for visibility in all conditions Drive Square USB Port – for updating Software Clockwise / Counter-Clockwise Switch Trigger Handle Battery Pack Release Button Battery Pack Preset Selection / Menu Reaction Bar LED torch ‘Enter‘... -
Page 11: Set Up Instructions
SET UP INSTRUCTIONS NOTE: If the equipment is used in a manner not specified by the manufacturer, the protection provided by the equipment may be impaired. WARNING: ALLOW THE TOOL TO EQUALISE TO THE AMBIENT TEMPERATURE / HUMIDITY BEFORE SWITCHING ON. WIPE OFF ANY MOISTURE BEFORE USE. - Page 12 Reaction Bar Bladed Reaction Wheel Reaction Assembly (accessory) #19859 #19864 To fit tool 550 ft∙lb 550 ft∙lb Dimensions (mm) 2. Fit reaction bar over the drive square to engage reaction splines. Secure with circlip supplied. TIP: To remove the circlip a flat screwdriver may be required. X ...
-
Page 13: Battery
® 1. Only use Snap-on CTB185, CTB8187 or CTB1856 battery with this tool. 2. To charge battery. Charge battery in separate Snap-on ® CTC131A Series Battery Charger. 3. To insert and remove battery. Insert battery into tool handle until latch operates. -
Page 14: Display Screens
Display Screens: Insert Battery. Press to select option. Press trigger to start tool. Press to adjust option. Press to accept. HOLD to exit. Splash Screen: HOLD to shut down. D = Display Software number M = Motor Software number ... -
Page 15: Main Menu
Main Menu Use ⇧ ⇩ select. Use ⇧ ⇩ ⇦ ⇨ to adjust. Hold ⇦ to exit. Use ⏎ to Enter. Main Menu Action PRESET Use ⇧ ⇩ to select PRESET (PRESET 1, PRESET 2 PRESET 3, ….. 10). Use ⇦... -
Page 16: Operating Instructions
OPERATING INSTRUCTIONS WARNING: KEEP HANDS CLEAR OF THE REACTION BAR. WARNING: WHEN USING THIS TOOL IT MUST BE SUPPORTED AT ALL TIMES IN ORDER TO PREVENT UNEXPECTED RELEASE IN THE EVENT OF FASTENER OR COMPONENT FAILURE. Tightening 1. Fit the tool with required impact or high-quality socket. Slide the socket over the tool square drive ensuring the pin hole in both socket and square drive line up. - Page 17 3. Ensure TORQUE or TORQUE AND ANGLE preset is correct. TORQUE (TRQ) Torque is applied until the preset torque is reached. Torque Preset TORQUE Start Time TORQUE AND ANGLE (TAA) The tool applies the preset torque followed by the preset angle.
- Page 18 5. Adopt a posture to counteract normal or unexpected movement of the tool due to reaction forces. 6. Run the tool. Press trigger and ‘Safe to Start’ button within Safe to Start 1 second to slowly bring reaction bar into Button contact with the reaction point.
-
Page 19: Loosening
Loosening 1. Fit the tool with required impact or high-quality socket. Slide the socket over the tool square drive ensuring the pin hole in both socket and square drive line up. Insert holding pin through the hole and place the retaining ring over the holding pin to secure. -
Page 20: Maintenance
MAINTENANCE For optimum performance and safety, regular tool maintenance is required. The user maintenance is limited to that stipulated in this section. Any other maintenance or repairs should be carried out by a Customer Service professional. After any repair not covered in this section a recalibration must be completed. WARNING: THE TOOL FEATURES A LITHIUM BATTERY. -
Page 21: Drive Square
Drive Square The output drive square can be replaced (800 ftꞏlb tool only). For part numbers see ACCESSORIES listed in the INTRODUCTION. The drive square is NOT covered by the standard product warranty. To replace the drive square: 1. -
Page 22: Specifications
SPECIFICATIONS NOTE: Due to continuous improvement, all specifications are subject to change without prior notice. Symbol Meaning Symbol Meaning REFER TO OPERATOR’S C-Tick (Australia) MANUAL CE MARK VOLT CANADIAN - UNITED STATES DIRECT CURRENT UNDERWRITERS LABORATORY UKCA (UK CONFORMITY DO NOT PLACE IN GENERAL WASTE ASSESSED) MARKING... - Page 23 SPECIFICATIONS (continued) Display: Color TFT (152 x 320 pixels) Motor Voltage: 18.0 VDC Ingress protection IP 20 Environment: Industrial. Store in a clean and dry environment Temperature Range: Operating & storage = -4ºF to 120ºF (-20ºC to +49ºC) Operating Humidity: 85% Relative Humidity @ 86ºF (30ºC) maximum Tool Weight (kg)
-
Page 24: Declaration Of Conformity
The UKCA mark was first applied in: 2024. The authorized representative located within the United Kingdom (UK) is: Matthew Law Snap-on Tools Ltd Telford Way Industrial Estate, Kettering, Northants. NN16 8SN United Kingdom Signed for and on behalf of Snap-on Incorporated. -
Page 25: Troubleshooting
TROUBLESHOOTING The following is only a guide, for more complex fault diagnoses please contact your Industrial Rep, Franchisee or Customer Service professional. Error Code Likely Reason Likely Solutions 1. 18 V BATTERY LOW Under voltage protection Charge battery 2. -
Page 26: Problem
TROUBLESHOOTING (continued) Problem Likely Reason Likely Solutions i. Tool is shut down. i. Press trigger to power tool. No Display ii. Flat battery ii. Change / charge battery No battery fitted Fit battery Tool in menu screen Exit menu to home screen ‘Safe to Start’... -
Page 27: Glossary Of Terms
GLOSSARY OF TERMS Word or Term Meaning Angle Tolerance Pass acceptance for angle result Cal Interval Settable calibration reminder Counter-Clockwise. When set tool has full reverse (FULL-R) Cordless Torque Multiplier Clockwise. When set tool has full reverse (FULL-R) Degrees of angle movement END TQR The torque when angle complete for a TORQUE AND ANGLE (TAA) preset... - Page 28 NOTES ...
- Page 29 SNAP-ON TOOLS CORPORATION Contact Us (United States) ® Snap-on Incorporated Customer Service Tel: +1 877-762-7664 Email: eorders@snapon.com Snap-on Tools Company, 2801 80 Street, Kenosha, WI 53143, USA...
- Page 30 5. Set Clockwise / Secure with pin through square battery. to turn tool ON. Counter-Clockwise. circlip. drive. Secure pin with retaining ring. Part Number 34523 | Issue 1 | Original Instructions (English) Snap-on Tools Company, 2801 80th Street, Kenosha, WI 53143, USA...
- Page 31 FAIL / PASS FAIL PASS FAIL PASS Fastener complete Result (red or green) If fastener was releasing final torque will be zero. Part Number 34523 | Issue 1 | Original Instructions (English) Snap-on Tools Company, 2801 80th Street, Kenosha, WI 53143, USA...
Need help?
Do you have a question about the CTM 550 Series and is the answer not in the manual?
Questions and answers