Table of Contents
Advertisement
Quick Links
MODEL EW1020
MODEL EW1220
I
NSTALLATION
Two Post, Inground, Cassette EnviroLift™
2311 South Park Rd. Louisville, Kentucky 40219
Email:
sales@challengerlifts.com
Office 800-648-5438 / 502-625-0700 Fax 502-587-1933
(10,000 LB CAPACITY – 2500 LB PER ARM)
(12,000 LB CAPACITY – 3000 LB PER ARM)
, O
PERATION
& M
AINTENANCE
Web site:
www.challengerlifts.com
M
ANUAL
Rev. 12/29/2022
EW-IOM-A.doc
Advertisement
Table of Contents

Subscribe to Our Youtube Channel
Related Manuals for Challenger Lifts EnviroLift EW1020


Summary of Contents for Challenger Lifts EnviroLift EW1020
- Page 1 MODEL EW1020 (10,000 LB CAPACITY – 2500 LB PER ARM) MODEL EW1220 (12,000 LB CAPACITY – 3000 LB PER ARM) & M NSTALLATION PERATION AINTENANCE ANUAL Two Post, Inground, Cassette EnviroLift™ 2311 South Park Rd. Louisville, Kentucky 40219 Email: Web site: sales@challengerlifts.com www.challengerlifts.com Office 800-648-5438 / 502-625-0700 Fax 502-587-1933...
-
Page 2: General Specifications
Models EW1020, EW1220 Installation, Operation and Maintenance IMPORTANT: READ THIS MANUAL COMPLETELY BEFORE INSTALLING or OPERATING LIFT General Specifications See Page 3 EW1020 EW1220 Rise Height (Screw Pads Highest Position) 78 1/4” 78 1/2” Overall Width 117 1/2” 121 1/2"” Drive Thru 88”... -
Page 3: Vertical Clearance
ERTICAL LEARANCE Check the height of the area where the lift is to be installed. Clearance should be calculated based on the full raised height of the lift. Failure by purchaser to provide adequate WARNING clearance could result in unsatisfactory lift performance, property damage, or personal injury. -
Page 4: Tools And Supplies
If it is apparent that the lift has been mishandled in shipment, or if parts or assemblies are missing, note the damage or missing part(s) on the shipping papers and notify Challenger Lifts, Inc. immediately. The Challenger 2-Post EnviroLift™ consists of two packages, the lift-containment assy. -
Page 5: Installation And Service
Models EW1020, EW1220 Installation, Operation and Maintenance Installation Procedure AFETY EQUIREMENTS FOR NSTALLATION AND ERVICE Refer to ANSI/ALI ALIS (current edition) Location Locate lift to allow plenty of working room on all sides. Allow room for workbenches at front of bay, aisles, lubrication equipment or other obstructions. Check overhead clearances. -
Page 6: Installation
Models EW1020, EW1220 Installation, Operation and Maintenance Existing Facility Excavation Excavation is the same as in new construction. However, it will be necessary to break out a trench 6"-8" wide by 12" deep to run the PVC chase. Installation 1. For best balance of lift / containment assembly while lowering into excavation, sling using the shipping straps provided. - Page 7 Models EW1020, EW1220 Installation, Operation and Maintenance Figures 3 and 4. 1/2-13 x 18 1/2-13 1/2-13 x 18 1/2-13 All Thread Rod Nut and Washer All Thread Rod Nut and Washer 6 x 6 Support Finished Concrete Tie Anchor Floor Lift / Containment Assembly Fig.
- Page 8 Models EW1020, EW1220 Installation, Operation and Maintenance Before beginning to back fill take care to protect the plunger tops, cover joints and hardware from debris. Duct tape should be used to cover these joints. Make sure all factory supplied thread protectors and caps are in place. Recheck plumb and back fill approximately 2 feet with pea gravel.
- Page 9 Models EW1020, EW1220 Installation, Operation and Maintenance New Floor Pour 8” to 12” of concrete around the top of the lift / containment assembly and install rebar to tie in the finished floor as shown in Fig. 6. 1/2-13 x 18 1/2-13 All Thread Rod Nut and Washer...
-
Page 10: Wiring Diagram
Models EW1020, EW1220 Installation, Operation and Maintenance Wiring Diagram FOR SINGLE PHASE (Normally Open) FIELD CONECTIONS FOR THREE PHASE FACTORY WIRED FOR 208−240V RECONNECTIONS FOR 440−480V Fig. 7 Rev.12/29/22 EW-IOM-A.doc... - Page 11 Models EW1020, EW1220 Installation, Operation and Maintenance Fill the reservoir with 12 quarts of 10 weight hydraulic / biodegradable oil or Dexron III ATF. Remove the center cover plate from the lift / containment assembly to expose the hydraulic connection. Attach the 37 deg. Union adapter (supplied) to the hard hydraulic line.
- Page 12 Models EW1020, EW1220 Installation, Operation and Maintenance NOTE: The cover plates are asymmetric and have a notch to indicate installation. The cover plate notches should be positioned towards the center of the lift. With the plungers raised slight (1”-2”) to avoid damaging the wiper. Position the bolster over the pistons and attach using the 7/8-9x3 1/2 cap screws and lock washers provided and torque to 120 ft-lbs.
-
Page 13: Troubleshooting
Models EW1020, EW1220 Installation, Operation and Maintenance Lifting a Vehicle Be sure the adapters are in the lowered position and the arms are parked as seen in Fig. 1 before attempting to drive on or off of the lift. Failure to do so may damage the adapters or vehicle. -
Page 14: Operation Procedure
Models EW1020, EW1220 Installation, Operation and Maintenance The Owner/Employer shall maintain the periodic WNER PERATOR HECKLIST inspection maintenance records 30. Demonstrate the operation of the lift to the recommended by the manufacturer or ANSI/ALI owner/operator and review correct and safe ALOIM, American National... -
Page 15: Maintenance
Maintenance To avoid personal injury, permit only qualified personnel to perform maintenance on this equipment. Maintenance personnel should follow lockout/tagout instructions per ANSI Z244.1. The following maintenance points are suggested as the basis of a routine maintenance program. The actual maintenance program should be tailored to the usage of the lift. - Page 16 EW1020 EW1220 IMPORTANT Replace all worn, damaged, or broken parts with parts approved by Challenger Lifts Inc. or with parts meeting Challenger Lifts Inc. specifications. Contact your local Challenger Lifts Parts Distributor for pricing and availability. (Call Challenger Lifts Inc. (502) 625-0700 for the Parts Distributor in your area) Rev.12/29/22...
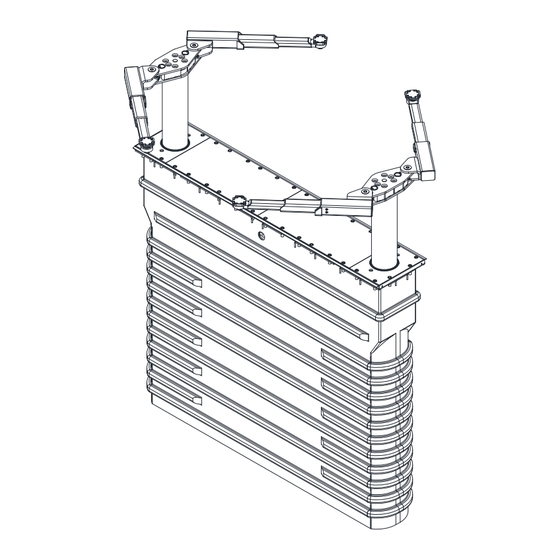
- Page 17 Models EW1020, EW1220 Installation, Operation and Maintenance EV1020 SUPER STRUCTURE B17550SLD B17550SRD Rev.12/29/22 EW-IOM-A.doc...
- Page 18 A1075 Ring Replace all worn, damaged, or broken parts with parts approved by Challenger Lifts Inc. or with parts meeting Challenger Lifts Inc. specifications. Contact your local Challenger Lifts Parts Distributor for pricing and availability. (Call Challenger Lifts Inc. (502) 625-0700 for the Parts Distributor in your area) Rev.12/29/22...
- Page 19 Models EW1020, EW1220 Installation, Operation and Maintenance EV1220 SUPER STRUCTURE ADAPTERS B17560SRA Right Arm Assy. B17560SLA Left Arm Assy. Rev.12/29/22 EW-IOM-A.doc...
- Page 20 A1075 Ring Replace all worn, damaged, or broken parts with parts approved by Challenger Lifts Inc. or with parts meeting Challenger Lifts Inc. specifications. Contact your local Challenger Lifts Parts Distributor for pricing and availability. (Call Challenger Lifts Inc. (502) 625-0700 for the Parts Distributor in your area) Rev.12/29/22...
- Page 21 Concrete Tie Weld-Long (Not Serviceable after Installation) Replace all worn, damaged, or broken parts with parts approved by Challenger Lifts Inc. or with parts meeting Challenger Lifts Inc. specifications. Contact your local Challenger Lifts Parts Distributor for pricing and availability. (Call Challenger Lifts Inc.
- Page 22 17411 1/4” x 2” Grease Line Replace all worn, damaged, or broken parts with parts approved by Challenger Lifts Inc. or with parts meeting Challenger Lifts Inc. specifications. Contact your local Challenger Lifts Parts Distributor for pricing and availability. (Call Challenger Lifts Inc.
- Page 23 1/4” ID x 2 ¼ Spacer Replace all worn, damaged, or broken parts with parts approved by Challenger Lifts Inc. or with parts meeting Challenger Lifts Inc. specifications. Contact your local Challenger Lifts Parts Distributor for pricing and availability. (Call Challenger Lifts Inc.
-
Page 24: Frame Assembly
Models EW1020, EW1220 Installation, Operation and Maintenance FRAME ASSEMBLY 1 1 1 1 2 2 2 2 3 3 3 3 15 16 17 15 16 17 15 16 17 15 16 17 15 16 17 15 16 17 15 16 17 15 16 17 4 4 4 4 2 2 2 2... - Page 25 A1122-12 Hose Clamp Replace all worn, damaged, or broken parts with parts approved by Challenger Lifts Inc. or with parts meeting Challenger Lifts Inc. specifications. Contact your local Challenger Lifts Parts Distributor for pricing and availability. (Call Challenger Lifts Inc. (502) 625-0700 for the Parts Distributor in your area) Rev.12/29/22...
- Page 26 Models EW1020, EW1220 Installation, Operation and Maintenance PLUNGER/ RAIL ASSEMBLY Rev.12/29/22 EW-IOM-A.doc...
- Page 27 39103 #6 JIC Union Tee Replace all worn, damaged, or broken parts with parts approved by Challenger Lifts Inc. or with parts meeting Challenger Lifts Inc. specifications. Contact your local Challenger Lifts Parts Distributor for pricing and availability. (Call Challenger Lifts Inc. (502) 625-0700 for the Parts Distributor in your area) Rev.12/29/22...
- Page 28 9/16-18 “O” Ring x 37 Deg. Elbow Replace all worn, damaged, or broken parts with parts approved by Challenger Lifts Inc. or with parts meeting Challenger Lifts Inc. specifications. Contact your local Challenger Lifts Parts Distributor for pricing and availability. (Call Challenger Lifts Inc.
- Page 29 Models EW1020, EW1220 Installation, Operation and Maintenance Rev.12/29/22 EW-IOM-A.doc...
- Page 30 Models EW1020, EW1220 Installation, Operation and Maintenance Rev.12/29/22 EW-IOM-A.doc...
- Page 31 Models EW1020, EW1220 Installation, Operation and Maintenance REVISIONS Rev.12/29/22 EW-IOM-A.doc...
Need help?
Do you have a question about the EnviroLift EW1020 and is the answer not in the manual?
Questions and answers