
Related Manuals for Lilin ZSR8122


Summary of Contents for Lilin ZSR8122
- Page 1 ZHR8182 D/N 4K Ultra HD Auto Focus IR IP Camera ZSR8122 D/N 1080P60 HD Auto Focus IR IP Camera SR8222 D/N 1080P60 IR IP Camera Quick Installation Guide...
- Page 2 CAUTION Do not drop or strike this equipment Do not install the equipment near any naked flames or heat sources Do not expose this unit to rain, moisture, smoke or dust environment Do not cover the opening of the cabinet with cloth and plastic or to install this unit in poor ventilated places.
-
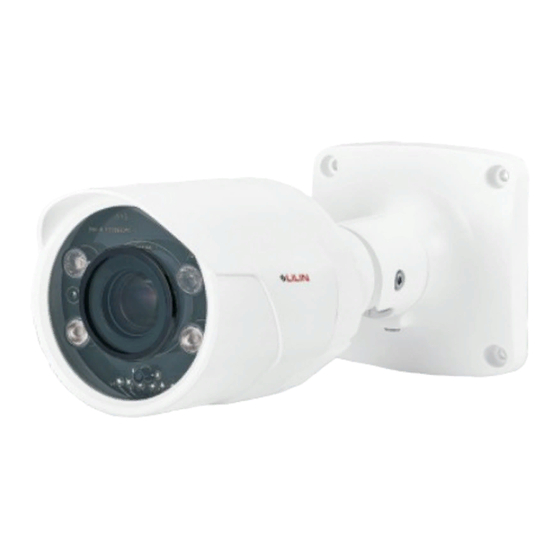
Page 3: Product Overview
Product Overview Unit: mm ① Camera Body ② Window ③ Adjustment Screw A ④ Adjustment Screw B ⑤ Adjustment Screw C ⑥ Lens ⑦ LED Indicators Green (Power): Indicates system status. Green (LINK): Illuminates when the camera is connected to a network. -
Page 4: Installation
⑧ Live Video Output ⑨ Reset Key Restores the camera back to factory default settings. ⑩ Micro SD Card Slot ⑪ AF Key [Auto Focus Model Only] The IP camera will automatically adjusts the camera lens to obtain focus after pressing the AF (Auto Focus) button continuously for 2 seconds. - Page 5 First, remove the waterproof connector and loosen the waterproof nut. Insert the Ethernet cable and use a tool to connect the RJ-45 connector (FIG.3). Connect the RJ-45 connector to the camera, and then secure the waterproof nut after securing the waterproof connector (FIG.4). 2.
- Page 6 Install the Camera with a Junction Box (Optional) A. Choose a desired position for the junction box, and secure the truss head screws enclosed in the box to the holes marked as “a” (FIG.11 & 12) on the junction box. B.
- Page 7 C. Attach the safety cable to the hole at the bottom of the junction box (FIG.15), and connect the Ethernet cable, video cable, and power cable to the camera’s RJ-45 connector, video output, and power input respectively (FIG.16). Please refer to “1.”...
- Page 8 Change the Outlet Position for the Ethernet and Power Cables 1. Loosen the threaded plug at the bottom of the junction box and secure it to the lateral hole (FIG.19). 2. Insert the Ethernet cable, video cable, and power cable through the opening at the bottom of the junction box (FIG.20) and connect them to the camera’s RJ-45 connector, video output, and power input respectively (refer to “1”...
-
Page 9: Emergency Factory Default
DC12V Power Supply (2). Use a PoE network switch to connect to the network. (3). Use a PoE power injector and a network switch to connect to the network. Emergency Factory Default To restore the hardware to factory default settings, please follow these steps: 1. -
Page 10: Software Requirements
JPEG or H.264 Full HD video. When you login to the IP camera by Internet Explorer, the security warning dialog box will prompt the installation of the LILIN Universal ActiveX. Click Install to download it. Configuring IP Addresses with IPScan Software... - Page 11 address, subnet mask, gateway, or HTTP port, you can follow the steps below: 1. Run the IPScan software. 2. Click Refresh. All available devices should be listed in the device list. 3. Select your device from the list provided. 4. Change the IP address, subnet mask, gateway, or HTTP port for the IP camera.
- Page 12 4. Change the IP address, subnet mask, gateway, or HTTP port for the IP camera. 5. Click Submit to verify the settings. Internet Browser Settings & Application Required Make sure your Internet browser allows the signed ActiveX plug-in to work on your computer. Set “Download Signed ActiveX plug-in controls”...
- Page 13 Login There are two levels of user authentication, including admin and guest, that can access the IP camera. Administrator is authorized to reset basic mode settings and see live video, while the guest is allowed to see only live video. The default usernames and passwords are as follows: Administrator Username...
- Page 14 -12-...
- Page 15 66-ZSR8122CSM...
Need help?
Do you have a question about the ZSR8122 and is the answer not in the manual?
Questions and answers