Table of Contents
Advertisement
Quick Links
Advertisement
Table of Contents

Related Manuals for Lilin ZR8022EX10


Summary of Contents for Lilin ZR8022EX10
-
Page 1: Quick Installation Guide
ZR8022EX10/20 D/N 1080P HD Auto Focus IR IP Camera Quick Installation Guide... - Page 2 CAUTION Do not drop or strike this equipment Do not install the equipment near any naked flames or heat sources Do not expose this unit to rain, moisture, smoke or dust environment Do not cover the opening of the cabinet with cloth and plastic or to install this unit in poor ventilated places.
-
Page 3: Product Overview
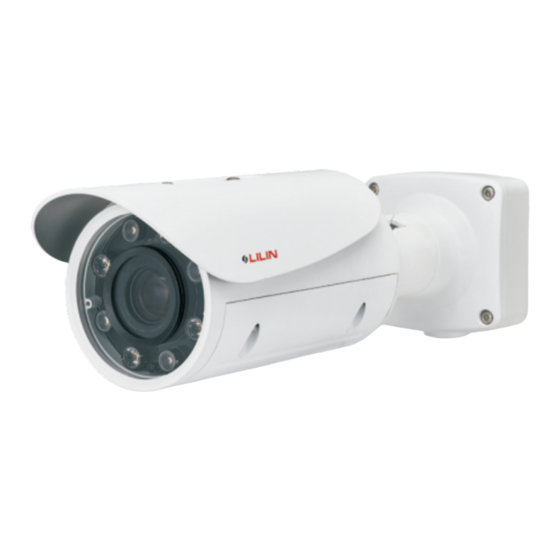
Product Overview ① TOP CASE ⑩ ADJUSTMENT SCREW A ② BOTTOM CASE ⑪ ADJUSTMENT SCREW B ③ LENS ⑫ ADJUSTMENT SCREW C ④ SUN SHIELD ⑬ MICRO SD CARD SLOT ⑤ BOTTOM BOX ⑭ RESET KEY ⑥ TOP BOX Restores the server back to ⑦... -
Page 4: Installation
Installation 1. Remove the camera from the box. Separate the bottom box from the top box using a torx wrench (FIG.1), and remove the safety cable on the bottom box (FIG.2). 2. Secure the bottom box to anywhere you want by tightening the included truss-head screws (M4.0x25) to the mounting holes marked “a”... - Page 5 4. Attach the safety cable to the mounting hole on the bottom box (FIG.7), and connect the network cable and power cable to the camera’s RJ-45 connector and power input, respectively (FIG.8). 5. Use a torx wrench to lock the top box to the bottom box by tightening the screws (FIG.9 &...
- Page 6 6. Adjust the three adjustment screws to turn the camera to the desired position. Then tighten the screws (FIG.11–16). Change the Outlet Position for the Network Cable and Power Cable Loosen the hole plug on the bottom box and secure it to the side hole (FIG.17).
- Page 7 Insert the network cable and power cable through bottom hole on the bottom box (FIG.18), and then connect the network cable and power cable to the camera’s RJ-45 connector and power input, respectively (FIG.8). For watertight installation, please refer to Installation-3. System Architectures For connecting the HD IP cameras to a network, please follow one of the system architectures below:...
-
Page 8: Emergency Factory Default
(2). Use a PoE network switch to connect to the network. (3). Use a PoE power injector and a network switch to connect to the network. Emergency Factory Default To restore the hardware to factory default settings, please follow these steps: 1. -
Page 9: Software Requirements
JPEG or H.264 Full HD video. When you login to the IP camera by Internet Explorer, the security warning dialog box will prompt the installation of the LILIN Universal ActiveX. Click Install to download it. Configuring IP Addresses with IPScan Software... - Page 10 address, subnet mask, gateway, or HTTP port, you can follow the steps below: 1. Run the IPScan software. 2. Click Refresh. All available devices should be listed in the device list. 3. Select your device from the list provided. 4. Change the IP address, subnet mask, gateway, or HTTP port for the IP camera.
- Page 11 4. Change the IP address, subnet mask, gateway, or HTTP port for the IP camera. 5. Click Submit to verify the settings. Internet Browser Settings & Application Required Make sure your Internet browser allows the signed ActiveX plug-in to work on your computer. Set “Download Signed ActiveX plug-in controls”...
- Page 12 Login There are two levels of user authentication, including admin and guest, that can access the IP camera. Administrator is authorized to reset basic mode settings and see live video, while the guest is allowed to see only live video. The default usernames and passwords are as follows: Administrator Username...
- Page 13 66-ZR8022CSM...
Need help?
Do you have a question about the ZR8022EX10 and is the answer not in the manual?
Questions and answers