
Related Manuals for Black Box EMD4000R


Summary of Contents for Black Box EMD4000R
- Page 1 USER MANUAL EMD4000T, EMD4000R EMERALD 4K KVM MATRIX AND EXTENSION 24/7 TECHNICAL SUPPORT AT 1.877.877.2269 OR VISIT BLACKBOX.COM EMERALD EMERALD...
-
Page 2: Table Of Contents
4.2 Auto Connect ......................................12 4.3 Private Connection ....................................12 4.4 Shared Connection ....................................12 5. INSTALLATION .................................... 13 5.1 Emerald Receiver (EMD4000R) Checklist ..............................13 5.2 Emerald Transmitter (EMD4000T) Checklist ............................13 5.3 Installation Options ......................................13 5.4 Connect the Emerald Receiver ..................................14 5.5 Connect the Emerald Transmitter .................................. - Page 3 NEED HELP? LEAVE THE TECH TO US LIVE 24/7 TABLE OF CONTENTS TECHNICAL SUPPORT 1.877.877.2269 8.5 Connections Screen ....................................21 8.5.1 Creating a New Connection ...................................22 8.5.2 Connectiing ........................................23 8.5.3 Edit Connection ........................................23 8.5.4 Remove Connection ......................................24 8.5.5 Bonding ..........................................25 8.6 Control Tab ......................................25 8.6.1 Preferences ........................................26 8.6.2 Network ..........................................31 8.6.3 System ..........................................32...
- Page 4 NEED HELP? LEAVE THE TECH TO US LIVE 24/7 LASER WARNING TECHNICAL SUPPORT 1.877.877.2269 WARNING: Laser. If using an optical fiber SFP+ adapter when connecting an Emerald to a switch or other device, the user must observe precautions for working with a Class 1 laser product. 1.877.877.2269 BLACKBOX.COM...
-
Page 5: Specifications
EMD4000T: (1) DisplayPort, (1) Power, (1) DB9 serial, (1) USB Type B, (1) RJ-45, (2) SFP cages, (2) 3.5-mm audio; Connectors EMD4000R: (1) DisplayPort, (1) Power, (1) DB9 serial, (4) USB Type A, (1) RJ-45, (2) SFP cages, (2) 3.5-mm audio;; Maximum Distance between... -
Page 6: Licensing
NEED HELP? LEAVE THE TECH TO US LIVE 24/7 CHAPTER 1: SPECIFICATIONS TECHNICAL SUPPORT 1.877.877.2269 1.2 LICENSING NOTE: For managed installations with more than 32 users, you will need to use Boxilla KVM AV/IT Manager. The basic Boxilla license (BXAMGR) supports 25 users. Other available licenses for Boxilla are listed below: Š... -
Page 7: Overview
Š Supports video resolutions up to 2K/HD or 4K/UHD Š Supports digital audio 2.2 AVAILABLE MODELS The following models are available: Š Single-Head 4K Transmitter (EMD4000T) and Receiver (EMD4000R) Š 1G 48-Port Network Switch (EMS1G-48) Š 10G 28-Port Network Switch (EMS10G-28) ... -
Page 8: What's Included
LSP442 SFP+ - 10-Gb, Extended Diagnostics, 1310-nm Single-mode Fiber, LC NOTE: References to the Emerald system in this document refer to both Receivers (EMD4000R) and Transmitters (EMD4000T). COMPATIBLE 10G DIRECT ATTACH CABLES FOR NETWORKING COMPATIBLE 10G ACTIVE OPTICAL CABLES FOR NETWORKING... -
Page 9: Applications
NEED HELP? LEAVE THE TECH TO US LIVE 24/7 CHAPTER 2: OVERVIEW TECHNICAL SUPPORT 1.877.877.2269 2.4 APPLICATIONS An Emerald system can be composed of just Receivers and Transmitters. In these types of systems—called unmanaged— there is no central management. Each device needs to be configured individually and upgraded individually. The admin can export the configuration from one Receiver and import it to all other Receivers using a USB Flash Drive. - Page 10 NEED HELP? LEAVE THE TECH TO US LIVE 24/7 CHAPTER 2: OVERVIEW TECHNICAL SUPPORT 1.877.877.2269 Connect your post-production installations located across the globe with Emerald transmitters and receivers. Connection distances are unlimited. FIGURE 2-3. POST-PRODUCTION EXAMPLE 1.877.877.2269 BLACKBOX.COM...
-
Page 11: Configuration
Boxilla is supplied pre-loaded and is straightforward to deploy, requiring only a network connection and a power input to begin operation. The current version of Boxilla provides management of Black Box’s Emerald system. For more information on Boxilla, refer to the Boxilla user manual. -
Page 12: Modes Of Operation
NEED HELP? LEAVE THE TECH TO US LIVE 24/7 CHAPTER 4: MODES OF OPERATION TECHNICAL SUPPORT 1.877.877.2269 The Emerald system supports the following modes: Auto-Login, Auto-Connect, Private Connection, and Shared Connection Modes. 4.1 AUTO LOGIN In Auto-Login Mode, turning on the Emerald Receiver automatically causes a login as a pre-defined user. The user is presented with the permitted connections that have been predefined. -
Page 13: Installation
CHAPTER 5: INSTALLATION TECHNICAL SUPPORT 1.877.877.2269 5.1 EMERALD RECEIVER (EMD4000R) CHECKLIST Before installing your Emerald Receiver, refer to the list below to ensure that you have all the items necessary for installation: Š Emerald Receiver Š External power supply for the Emerald Receiver ... -
Page 14: Connect The Emerald Receiver
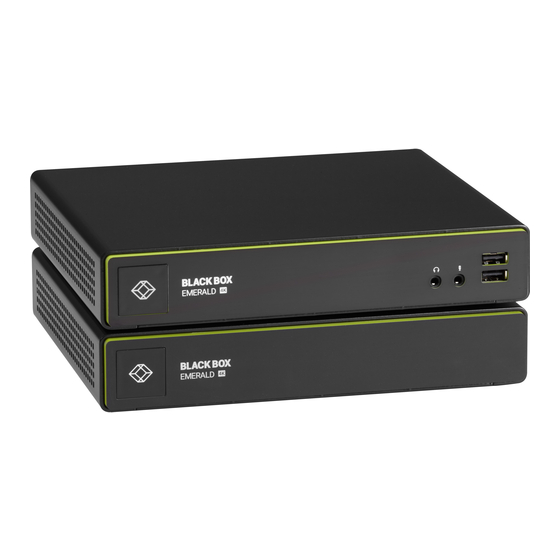
6. Connect from this transceiver to your 10G network switch or directly to the receiver. NOTE: SFP+1 must be used as the primary network connection on the Emerald 4K Receivers. FIGURE 5-1. FRONT VIEW OF EMERALD 4K RECEIVER (EMD4000R) FIGURE 5-2. REAR VIEW OF EMERALD 4K RECEIVER (EMD4000R) 1.877.877.2269... -
Page 15: Connect The Emerald Transmitter
NEED HELP? LEAVE THE TECH TO US LIVE 24/7 CHAPTER 5: INSTALLATION TECHNICAL SUPPORT 1.877.877.2269 TABLE 5-1. EMERALD RECEIVER COMPONENTS NUMBER IN FIGURE 5-1 COMPONENT DESCRIPTION AND 5-2 Power LED Lights green when power is ON (1) 3.5-mm connector Connects to speakers (1) 3.5-mm connector Connects to microphone (2) USB Type A connectors... - Page 16 NEED HELP? LEAVE THE TECH TO US LIVE 24/7 CHAPTER 5: INSTALLATION TECHNICAL SUPPORT 1.877.877.2269 FIGURE 5-3. FRONT VIEW OF THE EMERALD 4K TRANSMITTER (EMD4000T) FIGURE 5-4. REAR VIEW OF THE EMERALD 4K TRANSMITTER (EMD4000T) TABLE 5-2. EMERALD TRANSMITTER COMPONENTS NUMBER IN FIGURE 5-3 COMPONENT DESCRIPTION...
-
Page 17: Starting Up And Default Settings For Ip
NEED HELP? LEAVE THE TECH TO US LIVE 24/7 CHAPTER 5: INSTALLATION TECHNICAL SUPPORT 1.877.877.2269 5.6 STARTING UP AND DEFAULT SETTINGS FOR IP 1. Once everything is connected, press the Power button on the front of the Emerald Receiver. 2. The On-Screen Display (OSD) will appear on the screen. 3. -
Page 18: Networked Installation
3. A transmitter out of the box must be configured on the same subnet. TABLE 6-1. EMERALD SYSTEM DEFAULT NETWORK SETTINGS COMPONENT IP ADDRESS TYPE DEFAULT GATEWAY SUBNET MASK Emerald Receiver (EMD4000R) 192.168.1.21 Static 192.168.1.1 255.255.255.0 Emerald Transmitter (EMD4000T) 192.168.1.22 Static 192.168.1.1... -
Page 19: Operation Of Emerald System
NEED HELP? LEAVE THE TECH TO US LIVE 24/7 CHAPTER 7: OPERATION OF EMERALD SYSTEM TECHNICAL SUPPORT 1.877.877.2269 7.1 LED IDENTIFICATION Front panel There is one LED on the front panel of an Emerald unit (integrated into the power-button on the Receiver) - called the STATUS LED. The STATUS LED will light up when the unit (Receiver or Transmitter) is turned on. -
Page 20: Osd Functions
NEED HELP? LEAVE THE TECH TO US LIVE 24/7 CHAPTER 8: OSD FUNCTIONS TECHNICAL SUPPORT 1.877.877.2269 The Emerald Receiver and Boxilla incorporate an On-Screen Display (OSD) that allows you to view information about the configuration of your system and potentially also allows for setting connections and configuration parameters such as the IP address, depending on the type of user. -
Page 21: Default Username And Password
NEED HELP? LEAVE THE TECH TO US LIVE 24/7 CHAPTER 8: OSD FUNCTIONS TECHNICAL SUPPORT 1.877.877.2269 8.3 DEFAULT USERNAME AND PASSWORD The Emerald Receiver ships with a default username of admin with a blank password (i.e. no password). This user cannot be deleted, but the password can be changed. -
Page 22: Creating A New Connection
NEED HELP? LEAVE THE TECH TO US LIVE 24/7 CHAPTER 8: OSD FUNCTIONS TECHNICAL SUPPORT 1.877.877.2269 By default, there is one connection called “Default Tx - 192.168.1.22” that defines a connection to an Emerald Transmitter with its factory defaults. A maximum of 32 connections can be defined for an Emerald Receiver by default, and these connections can be shared by users as defined by an administrator (different users can have the same connection). -
Page 23: Connectiing
NEED HELP? LEAVE THE TECH TO US LIVE 24/7 CHAPTER 8: OSD FUNCTIONS TECHNICAL SUPPORT 1.877.877.2269 Š Connection Type: Used to define whether a connection is Private or Shared (i.e. other connections of type Shared can join in session and share keyboard, mouse, and video). -
Page 24: Remove Connection
NEED HELP? LEAVE THE TECH TO US LIVE 24/7 CHAPTER 8: OSD FUNCTIONS TECHNICAL SUPPORT 1.877.877.2269 FIGURE 8-4. EDIT CONNECTIONS SCREEN. 8.5.4 REMOVE CONNECTION To remove or delete a connection, an administrator highlights a connection in the list and then clicks on the Remove button on the Connections screen (shown in Figure 8-5). -
Page 25: Bonding
NEED HELP? LEAVE THE TECH TO US LIVE 24/7 CHAPTER 8: OSD FUNCTIONS TECHNICAL SUPPORT 1.877.877.2269 8.5.5 BONDING This assumes that setup is complete on Boxilla and a user has permission to connect to a Bonded connection. See the setup instructions in the Boxilla user manual. -
Page 26: Preferences
NEED HELP? LEAVE THE TECH TO US LIVE 24/7 CHAPTER 8: OSD FUNCTIONS TECHNICAL SUPPORT 1.877.877.2269 2. Network – allows administrator to change network parameters for the Emerald Receiver or Manager. 3. System – allows upgrading of unit firmware, reset unit to factory defaults, and to save/restore unit configuration to a USB drive. 4. - Page 27 NEED HELP? LEAVE THE TECH TO US LIVE 24/7 CHAPTER 8: OSD FUNCTIONS TECHNICAL SUPPORT 1.877.877.2269 Hot-Key The Hot-Key button allows the administrator to change the hot-key configuration. The hot-key is used with the “o” key to terminate the current connection and bring up the OSD. The hot-key with “p” key is used to switch to the previous connection without loading the OSD.
- Page 28 NEED HELP? LEAVE THE TECH TO US LIVE 24/7 CHAPTER 8: OSD FUNCTIONS TECHNICAL SUPPORT 1.877.877.2269 2. Connection Inactivity Timer – This sets a limit on how long a user can be connected to a source (virtual machine, Transmitter etc.) without any keyboard or mouse activity. Once the session reaches the inactivity timer, he/she will be logged out of their connection and return to the OSD.
- Page 29 NEED HELP? LEAVE THE TECH TO US LIVE 24/7 CHAPTER 8: OSD FUNCTIONS TECHNICAL SUPPORT 1.877.877.2269 The Connection Label is enabled through the Control Tab. The Control Tab’s Preferences options are shown in Figure 8-10. FIGURE 8-10. CONNECTION LABEL SETTINGS OPTION IN PREFERENCES SECTION The user can toggle the label on or off by using their hotkey and pressing “L”.
- Page 30 NEED HELP? LEAVE THE TECH TO US LIVE 24/7 TECHNICAL CHAPTER 8: OSD FUNCTIONS SUPPORT 1.877.877.2269 The user can select to always display the connect label or to display it for 5 seconds. In Figure 8-12, a 5 second time out is selected. FIGURE 8-12.
-
Page 31: Network
NEED HELP? LEAVE THE TECH TO US LIVE 24/7 TECHNICAL CHAPTER 8: OSD FUNCTIONS SUPPORT 1.877.877.2269 Figure 8-14 shows the connection label located in the bottom center of the screen, based upon the location selected in Figure 8-13. FIGURE 8-14. CONNECTION LABEL SHOWN IN BOTTOM CENTER OF SCREEN 8.6.2 NETWORK The network screen shown in Figure 8-10 allows an administrator to change the settings for the Emerald Receiver. -
Page 32: System
NEED HELP? LEAVE THE TECH TO US LIVE 24/7 TECHNICAL CHAPTER 8: OSD FUNCTIONS SUPPORT 1.877.877.2269 8.6.3 SYSTEM The System screen shown in Figure 8-16 allows an administrator to upgrade the firmware in the Emerald Receiver, reset it to factory defaults, import/export the configuration to an external USB drive, and perform a system diagnostic. - Page 33 The diagnostics provides information for Black Box to debug customer encountered issues. When this button is clicked the user is asked to save the diagnostics onto a memory stick in the Receiver unit. This file should be sent back to Black Box for analysis.
-
Page 34: Password
NEED HELP? LEAVE THE TECH TO US LIVE 24/7 CHAPTER 8: OSD FUNCTIONS TECHNICAL SUPPORT 1.877.877.2269 8.6.4 PASSWORD The Password button when clicked allows the current user’s password to be changed. This button is only visible to Administrators. FIGURE 8-18. PASSWORD CHANGE 8.6.5 TRANSMITTER The Transmitter button on the Control Tab allows administrators to change the configuration of an Emerald Transmitter (this button is only visible to administrators). - Page 35 NEED HELP? LEAVE THE TECH TO US LIVE 24/7 CHAPTER 8: OSD FUNCTIONS TECHNICAL SUPPORT 1.877.877.2269 Configuring a Transmitter To configure a Transmitter, the IP address must be defined for the target Transmitter. When there is no active IP address defined, the TX Setting window has all the buttons grayed out except for the Apply and Discover buttons.
- Page 36 NEED HELP? LEAVE THE TECH TO US LIVE 24/7 CHAPTER 8: OSD FUNCTIONS TECHNICAL SUPPORT 1.877.877.2269 FIGURE 8-20. TRANSMITTER SETTINGS CONFIGURATION WINDOW - DISCOVER BUTTON If the IP address of the Receiver and Transmitter are not on the same subnet, a router is required to allow them to communicate. This is true even when the Receiver “discovers”...
- Page 37 NEED HELP? LEAVE THE TECH TO US LIVE 24/7 CHAPTER 8: OSD FUNCTIONS TECHNICAL SUPPORT 1.877.877.2269 Transmitter Restore Factory Defaults The administrator can click the Restore button to reset the Transmitter back to factory defaults. If the active IP address is not the address of a valid Emerald Transmitter or this address is unreachable, an error message is returned.
- Page 38 The Transmitter provides diagnostics information for Black Box to debug customer encountered issues. When this button is clicked the user is asked to save the diagnostics onto a memory stick in the Receiver unit. Send this file back to Black Box for analysis.
- Page 39 NEED HELP? LEAVE THE TECH TO US LIVE 24/7 CHAPTER 8: OSD FUNCTIONS TECHNICAL SUPPORT 1.877.877.2269 HID Configurations This setting applies to all transmitters. It changes the USB communication between the Emerald transmitter and the target computer/device. “Default” will pass all available signals including audio, USB-R, USB HID as well as keyboard and mouse connections.
-
Page 40: Managing Users
NEED HELP? LEAVE THE TECH TO US LIVE 24/7 CHAPTER 8: OSD FUNCTIONS TECHNICAL SUPPORT 1.877.877.2269 8.7 MANAGING USERS Users are defined in the Emerald system to provide rights to manage the system, rights to connect to different target devices and set parameters for connections. -
Page 41: Auto Log-On
NEED HELP? LEAVE THE TECH TO US LIVE 24/7 CHAPTER 8: OSD FUNCTIONS TECHNICAL SUPPORT 1.877.877.2269 8.7.2 AUTO LOG ON When the Log-on button is selected and a user is chosen, this user will be automatically logged on after power is applied to unit or after a reboot. - Page 42 NEED HELP? LEAVE THE TECH TO US LIVE 24/7 TECHNICAL CHAPTER 8: OSD FUNCTIONS SUPPORT 1.877.877.2269 The Cancel button should be clicked if the new user is not to be created. CONNECTION FAVORITES Connection favorites provide a quick, convenient mechanism for users to switch between their pre-defined connections. Favorites are configured by the administrator where a maximum of 10 favorites can be assigned to users using a combination of hotkey and [0-9].
-
Page 43: Edit A User
NEED HELP? LEAVE THE TECH TO US LIVE 24/7 CHAPTER 8: OSD FUNCTIONS TECHNICAL SUPPORT 1.877.877.2269 8.7.3 EDIT A USER To edit a user, click on the Edit button. This causes the Edit-User window (shown in Figure 8-29) to be displayed. FIGURE 8-29. -
Page 44: Remove A User
NEED HELP? LEAVE THE TECH TO US LIVE 24/7 CHAPTER 8: OSD FUNCTIONS TECHNICAL SUPPORT 1.877.877.2269 8.7.4 REMOVE A USER To remove a user, highlight the user’s name and press “Remove.” FIGURE 8-30. REMOVE USER When the Remove button is clicked, a pop-up window is displayed to prompt confirmation that this user is to be deleted. Click the Yes button to remove the user. -
Page 45: Information Tab
NEED HELP? LEAVE THE TECH TO US LIVE 24/7 CHAPTER 8: OSD FUNCTIONS TECHNICAL SUPPORT 1.877.877.2269 8.8 INFORMATION TAB This tab shows the unit information and the network information. FIGURE 8-31. INFORMATION TAB 1.877.877.2269 BLACKBOX.COM... -
Page 46: Appendix A. Emerald Video Resolutions Supported
NEED HELP? LEAVE THE TECH TO US LIVE 24/7 TECHNICAL APPENDIX A: EMERALD VIDEO RESOLUTIONS SUPPORTED SUPPORT 1.877.877.2269 The Emerald supports the resolutions listed below: Š 640 x 480 @ 60 Hz Š 640 x 480 @ 75 Hz ... -
Page 47: Appendix B. Configuring Windows 7 Virtual Machines For Emerald
NEED HELP? LEAVE THE TECH TO US LIVE 24/7 APPENDIX B: CONFIGURING WINDOWS VIRTUAL MACHINES TECHNICAL SUPPORT 1.877.877.2269 A few properties must be configured on a target Windows Virtual Machine for Emerald to connect with it. On the Windows Virtual Machine click on the Start button and launch a command window. Then launch group policy editor – gpedit. msc. -
Page 48: Appendix C. Emerald Network Protocols Overview
For management purposes some other ports are used. The Black Box Discovery protocol uses UDP Multicast Group 224.0.1.249 (port 39150). This is sent by the Boxilla Manager to discover Emerald devices in the network. The router must allow UDP Multicast forwarding to allow devices on subnet different to where Boxilla is located to be discovered. -
Page 49: Appendix D. Troubleshooting
Sluggish Mouse: When using the Emerald, you may find that the mouse is not being very responsive, or has a noticeable delay. This can typically occur if the video card is using Dithering technology. You can contact Black Box to get a small utility to disable video card dithering on AMD graphics cards. - Page 50 NEED HELP? LEAVE THE TECH TO US LIVE 24/7 APPENDIX D: TROUBLESHOOTING TECHNICAL SUPPORT 1.877.877.2269 21 BRAND_CHECK_FAIL This is not a correct upgrade file for Emerald Please check release notes for correct version and compatibility information. 22 CLASS_CHECK_FAIL Can’t upgrade Transmitter with Receiver file or visa versa. Please check release notes for correct version and compatibility information.
-
Page 51: Appendix E. Setting Up Emerald 4K With Share Mode
Š IGMP snooping must be enabled at the switch level and at the VLAN to support Share Mode. NOTE: On the Black Box switches, it is not possible to enable IGMP snooping on the default VLAN 1. Therefore, the following steps need to be taken:... -
Page 52: Appendix F. Regulatory Information
NEED HELP? LEAVE THE TECH TO US LIVE 24/7 APPENDIX F: REGULATORY INFORMATION TECHNICAL SUPPORT 1.877.877.2269 F.1 FCC STATEMENT This equipment has been found to comply with the limits for a Class A digital device, pursuant to Part 15 of the FCC Rules. These limits are designed to provide reasonable protection against harmful interference when the equipment is operated in a commercial environment. -
Page 53: Nom Statement
NEED HELP? LEAVE THE TECH TO US LIVE 24/7 APPENDIX F: REGULATORY INFORMATION TECHNICAL SUPPORT 1.877.877.2269 F.2 NOM STATEMENT 1. Todas las instrucciones de seguridad y operación deberán ser leídas antes de que el aparato eléctrico sea operado. 2. Las instrucciones de seguridad y operación deberán ser guardadas para referencia futura. 3. -
Page 54: Appendix G. Disclaimer/Trademarks
G.1 DISCLAIMER Black Box Network Services shall not be liable for damages of any kind, including, but not limited to, punitive, consequential or cost of cover damages, resulting from any errors in the product information or specifications set forth in this document and Black Box Network Services may revise this document at any time without notice. - Page 55 NEED HELP? LEAVE THE TECH TO US LIVE 24/7 NOTES TECHNICAL SUPPORT 1.877.877.2269 __________________________________________________________________________________________________ __________________________________________________________________________________________________ __________________________________________________________________________________________________ __________________________________________________________________________________________________ __________________________________________________________________________________________________ __________________________________________________________________________________________________ __________________________________________________________________________________________________ __________________________________________________________________________________________________ _________________________________________________________________________________________________ __________________________________________________________________________________________________ __________________________________________________________________________________________________\ __________________________________________________________________________________________________ ________________________________________________________________________________________________ __________________________________________________________________________________________________ __________________________________________________________________________________________________ __________________________________________________________________________________________________ __________________________________________________________________________________________________ __________________________________________________________________________________________________ 1.877.877.2269 BLACKBOX.COM...
- Page 56 NEED HELP? LEAVE THE TECH TO US LIVE 24/7 TECHNICAL SUPPORT 1.877.877.2269 © COPYRIGHT 2020, 2022. BLACK BOX CORPORATION. ALL RIGHTS RESERVED. EMERALD_USER_4K_REV6.3.3-3-2022.PDF...
Need help?
Do you have a question about the EMD4000R and is the answer not in the manual?
Questions and answers