Table of Contents
Advertisement
Quick Links
Mini Extender Kit for DVI-D and Stereo Audio over Fiber
Extend DVI-D video and stereo audio up to
1.5 kilometers over a strand of single-mode fiber or
distribute DVI-D and stereo audio to 32 displays.
Customer
Order toll-free in the U.S.: Call 877-877-BBOX (outside U.S.
Support
call 724-746-5500) FREE technical support 24 hours a day, 7 days
Information
a week: Call 724-746-5500 or fax 724-746-0746 Mailing address:
Black Box Corporation, 1000 Park Drive, Lawrence, PA 15055-1018
Web site: www.blackbox.com • E-mail: info@blackbox.com
AVX-DVI-FO-MINI
AVX-DVI-FO-MINI-RX
AVX-DVI-FO-SPCS
AVX-DVI-FO-SP4
AVX-DVI-FO-SP8
AVX-DVI-FO-USBPS
BLACK BOX
®
Advertisement
Table of Contents

Related Manuals for Black Box AVX-DVI-FO-MINI


Summary of Contents for Black Box AVX-DVI-FO-MINI
-
Page 1: Black Box
Order toll-free in the U.S.: Call 877-877-BBOX (outside U.S. Support call 724-746-5500) FREE technical support 24 hours a day, 7 days Information a week: Call 724-746-5500 or fax 724-746-0746 Mailing address: Black Box Corporation, 1000 Park Drive, Lawrence, PA 15055-1018 Web site: www.blackbox.com • E-mail: info@blackbox.com... -
Page 2: Instrucciones De Seguridad
FCC and IC RFI Statements/NOM Statement FEDERAL COMMUNICATIONS COMMISSION AND INDUSTRY CANADA RADIO FREQUENCY INTERFERENCE STATEMENTS This equipment generates, uses, and can radiate radio-frequency energy, and if not installed and used properly, that is, in strict accordance with the manufacturer’s instructions, may cause inter ference to radio communication. - Page 3 NOM Statement 4. Todas las instrucciones de operación y uso deben ser seguidas. 5. El aparato eléctrico no deberá ser usado cerca del agua—por ejemplo, cerca de la tina de baño, lavabo, sótano mojado o cerca de una alberca, etc. 6.
- Page 4 NOM Statement 16. El cable de corriente deberá ser desconectado del cuando el equipo no sea usado por un largo periodo de tiempo. 17. Cuidado debe ser tomado de tal manera que objectos liquidos no sean derramados sobre la cubierta u orificios de ventilación. 18.
-
Page 5: Trademarks Used In This Manual
Trademarks Used in this Manual Trademarks Used in this Manual Black Box and the Double Diamond logo are registered trademarks of BB Technologies, Inc. Any other trademarks mentioned in this manual are acknowledged to be the property of the trademark owners. -
Page 6: Table Of Contents
Overview ....................8 Introduction ..................8 Features ..................... 8 What’s Included ................9 Hardware Description ..............10 2.4.1 AVX-DVI-FO-MINI and AVX-DVI-FO-MINI-RX ....10 2.4.2 AVX-DVI-FO-SPCS ..............11 2.4.3 AVX-DVI-FO-SP4 ..............12 2.4.4 AVX-DVI-FO-SP8 ..............13 2.4.5 AVX-DVI-FO-USBPS ..............14 System Configuration ...............14 2.5.1 AVX-DVI-FO-MINI and AVX-DVI-FO-MINI-RX ....14 2.5.2 AVX-DVI-FO-SPCS ..............15... -
Page 7: Specifications
Chapter 1: Specifications 1. Specifications Color Depth — 24-bit true color Data Rate — 5 Gbps (2.5 Gbps per single wavelength) Distance — Multimode cable: 1640.4 ft. (500 m); Single-mode cable: 4921.3 ft. (1.5 km) Fiber Type — Single-mode or multimode Optical Budget —... -
Page 8: Overview
Chapter 2: Overview 2. Overview 2.1 Introduction The DVI Extender transmits high-quality video signal formats and audio to a remote screen, without compromising the original media quality. The DVI Extender delivers a full HD resolution signal through one fiber optic cable up to 1.5 kilometers. It’s an ideal solution for systems where high-resolution and high-quality video signals need to be displayed over long distances. -
Page 9: What's Included
Chapter 2: Overview 2.3 What’s Included Your package should contain the following items. If anything is missing or damaged, contact Black Box Technical Support at 724-746-5500 or info@blackbox.com. AVX-DVI-FO-MINI: • (1) Mini Fiber Transceiver • (1) Mini Fiber Receiver • (2) 5-VDC wallmount power supplies with international adapters for U.S., U.K., AU, and EU •... -
Page 10: Hardware Description
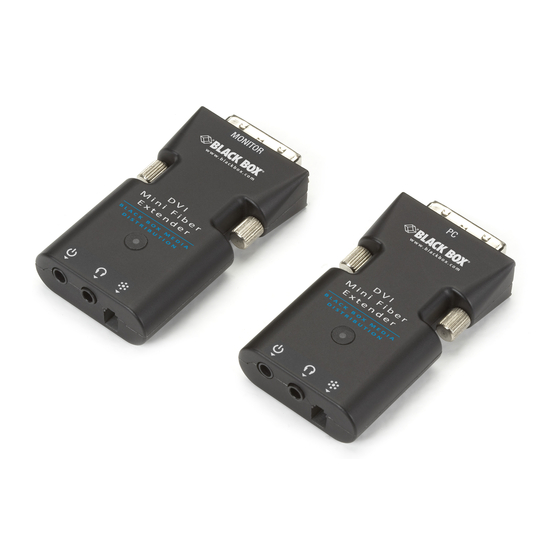
Chapter 2: Overview 2.4 Hardware Description 2.4.1 AVX-DVI-FO-MINI and AVX-DVI-FO-MINI-RX Figure 2-1 shows the transmitter and receiver kit (AVX-DVI-O-MINI). Table 2-1 describes its components. The receiver is also sold separately (AVX-DVI-FO-MINI-RX). Figure 2-1. Transmitter and Receiver. 724-746-5500 | blackbox.com Page 10... -
Page 11: Avx-Dvi-Fo-Spcs
Chapter 2: Overview Table 2-1. Transmitter and Receiver components. Number Component Description DVI-D connector Links to monitor DVI-D connector Connects to PC Power connector Connects to 5-VDC power input Stereo audio out Audio in to monitor/speakers (1) LC connector Links to fiber interconnect Power in Connects to 5-VDC power input Stereo audio in... -
Page 12: Avx-Dvi-Fo-Sp4
Chapter 2: Overview Figure 2-3. AVX-DVI-FO-SPCS side panel 2. Table 2-2. AVX-DVI-FO-SPCS components. Number Component Description (1) LC connector Links to fiber interconnect. (2) LC connectors Link to fiber devices. 2.4.3 AVX-DVI-FO-SP4 Figures 2-4 shows the side panel of the AVX-DVI-FO-SP4. Table 2-3 describes its components. -
Page 13: Avx-Dvi-Fo-Sp8
Chapter 2: Overview Table 2-3. AVX-DVI-FO-SP4 components. Number Component Description (1) LC connector Links to fiber interconnect. (4) LC connectors Link to fiber devices. 2.4.4 AVX-DVI-FO-SP8 Figure 2-5 shows the side panel of the AVX-DVII-FO-SP8. Table 2-4 describes its components. The panel on the opposite side is blank. Figure 2-5. -
Page 14: Avx-Dvi-Fo-Usbps
Chapter 2: Overview 2.4.5 AVX-DVI-FO-USBPS The AVX-DVI-FO-USBPS is a USB Type A male to a 1.35-mm barrel plug. It can supply 5-VDC to the AVX-DVI-FO-MINI transmitter and/or receiver. USB Type A male 1.35-mm barrel connector connector Figure 2-6. AVX-DVI-FO-USBPS. 2.5 System Configuration 2.5.1 AVX-DVI-FO-MINI and AVX-DVI-FO-MINI-RX... -
Page 15: Avx-Dvi-Fo-Spcs
Chapter 2: Overview 2.5.2 AVX-DVI-FO-SPCS Figure 2-8 shows an application using the AVX-DVI-FO-SPCS mini extenders. Transmitter AVX-DVI-FO-SPCS Mini Extenders Receivers Figure 2-8. AVX-DVI-FO-SPCS. 724-746-5500 | blackbox.com Page 15... -
Page 16: Avx-Dvi-Fo-Sp4
Chapter 2: Overview 2.5.3 AVX-DVI-FO-SP4 Figure 2-9 shows an application using an AVX-DVI-FO-SP4 mini extender. Receiver Receiver AVX-DVI-FO-SP4 Mini Extender Transmitter Receiver Receiver Figure 2-9. AVX-DVI-FO-SP4. 724-746-5500 | blackbox.com Page 16... -
Page 17: Avx-Dvi-Fo-Sp8
Chapter 2: Overview 2.5.4 AVX-DVI-FO-SP8 Figure 2-10 shows an application using an AVX-DVI-FO-SP8 mini extenders. Receivers Receivers AVX-DVI-FO-SP48 Mini Extender Transmitter Receivers Receivers Figure 2-10. AVX-DVI-FO-SP8. 724-746-5500 | blackbox.com Page 17... -
Page 18: Installation
Chapter 3: Installation 3. Installation 3.1 Connections Connect the transmitter module to the DVI port on the PC/video card and connect the receiver module to the DVI port on the digital display device. Use the DVI Extender with an LC fiber optic cable (single-mode optical fiber: 9/125 µm). - Page 19 Chapter 3: Installation • Connect the DC power to the transmitter and power on the monitor. Figure 3-3. DC power on transmitter. • Use a paper clip to press the switch located on the transmitter for a moment. Figure 3-4. Switch on the transmitter. •...
-
Page 20: Installation Steps
Chapter 3: Installation 3.3 Installation Steps 1. Connect the transmitter to the DVI source. Figure 3-5. DVI source connector. Figure 3-6. Transmitter connected to DVI source. 2. Connect the receiver to the monitor. Figure 3-7. DVI connector on monitor. 724-746-5500 | blackbox.com Page 20... - Page 21 Chapter 3: Installation Figure 3-8. Power on the monitor. 3. Connect the DC power to the transmitter and the receiver. Figure 3-9. DC power on the transmitter. 724-746-5500 | blackbox.com Page 21...
- Page 22 Chapter 3: Installation Figure 3-10. DC power on the receiver. A blue light illuminates while the power is on. 4. Connect the fiber cable to the transmitter and the receiver. Figure 3-11. Fiber cable on the transmitter. 724-746-5500 | blackbox.com Page 22...
- Page 23 Chapter 3: Installation Figure 3-12. Fiber cable on the receiver. 5. Power on the display and restart the DVI source. The LED on the transmitter shows a violet light while the transmitter is receiving a normal video signal from the DVI source. Check your DVI source if the LED does not show any activity.
- Page 24 Chapter 3: Installation The extender supports audio extension. • Connect the transmitter to the DVI source and audio source. • Connect the receiver to the display and the speaker(s). • Connect the fiber cable between the transmitter and the receiver or connect any splitters.
-
Page 25: Troubleshooting
Chapter 4: Troubleshooting 4. Troubleshooting 4.1 Problems/Solutions Problem: No image Solutions: 1. Make sure the PC power is on. 2. Check whether the computer and the monitor are properly connected. 3. Turn the PC power on and off. 4. Make sure the fiber cable between the transmitter and the receiver is properly connected. -
Page 26: Contacting Black Box
• Package it carefully. We recommend that you use the original container. • If you are returning the unit, make sure you include everything you received with it. Before you ship for return or repair, contact Black Box to get a Return Authorization (RA) number. - Page 27 NOTES 724-746-5500 | blackbox.com Page 27...
- Page 28 724-746-5500 or blackbox.com. About Black Box Black Box provides an extensive range of networking and infrastructure products. You’ll find everything from cabinets and racks and power and surge protection products to media converters and Ethernet switches all supported by free, live 24/7 Tech support available in 30 seconds or less.
Need help?
Do you have a question about the AVX-DVI-FO-MINI and is the answer not in the manual?
Questions and answers