
Related Manuals for Digital Projection Titan Pro Series III


Summary of Contents for Digital Projection Titan Pro Series III
- Page 1 USER GUIDES INSTALLATION AND QUICK-START GUIDE CONNECTION GUIDE OPERATING GUIDE Titan Pro series III High Brightness Digital Video Projector Rev A May 2012 112-884A...
- Page 2 Product revision Because we at Digital Projection continually strive to improve our products, we may change specifications and designs, and add new features without prior notice. Projectors built prior to this revision of the Operating Guide may therefore not include all the features described.
- Page 3 INSTALLATION AND QUICK-START GUIDE Titan Pro series III High Brightness Digital Video Projector Rev A May 2012...
-
Page 4: Table Of Contents
Digital Projection CONTENTS Installation and Quick-Start Guide Titan Pro series III CONTENTS What’s in the Box? Operating the Projector ................Inst_1 ..............Inst_9 Switching the Projector On ..............Inst_9 Getting to Know the Projector ............Inst_2 Selecting an Input Signal or Test Pattern ...........Inst_9 Front and rear views ................Inst_2... -
Page 5: What's In The Box
Digital Projection WHAT'S IN THE BOX? Installation and Quick-Start Guide Titan Pro series III What’s in the Box? Notes Make sure your box contains everything listed. If any pieces are missing, contact your dealer. You should save the original box and packing materials, in case you ever need to ship your Projector. -
Page 6: Getting To Know The Projector
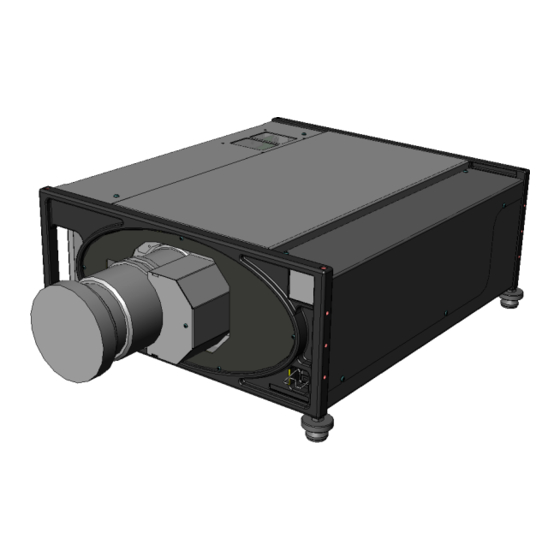
Digital Projection GETTING TO KNOW THE PROJECTOR Installation and Quick-Start Guide Titan Pro series III Getting to Know the Projector Notes Front and rear views For full details of how to use the controls and the menu system, see air inlets the Operating Guide. -
Page 7: Remote Control
Digital Projection GETTING TO KNOW THE PROJECTOR Installation and Quick-Start Guide Titan Pro series III Control panel Remote control Notes The indicators on the control panel are as follows: Power off = NO POWER green = normal RUNNING mode amber = STANDBY mode... -
Page 8: Connection Panel Indicators
Digital Projection GETTING TO KNOW THE PROJECTOR Installation and Quick-Start Guide Titan Pro series III Connection panel indicators Notes The indicators on the rear connection panel are as follows: All on = Power-On Self Test For full details of how to use the... -
Page 9: Positioning The Screen And Projector
Digital Projection POSITIONING THE SCREEN AND PROJECTOR Installation and Quick-Start Guide Titan Pro series III Positioning the Screen and Projector Notes • Install the screen, ensuring that it is in the best position for viewing by your audience. Always allow the lamp to cool for •... -
Page 10: Fitting And Adjusting The Optional Rigging Frame
Digital Projection POSITIONING THE SCREEN AND PROJECTOR Installation and Quick-Start Guide Titan Pro series III Fitting and adjusting the optional Rigging Frame Notes Fitting • Always allow the lamp to cool for Remove the four adjustable feet. 5 minutes before: •... -
Page 11: Redirecting The Air Outlet Duct
Digital Projection POSITIONING THE SCREEN AND PROJECTOR Installation and Quick-Start Guide Titan Pro series III Redirecting the Air Outlet Duct Notes The duct can be set to blow upwards whether the projector is in desktop or ceiling mode, as shown below. -
Page 12: Fitting The Lens
Digital Projection FITTING THE LENS Installation and Quick-Start Guide Titan Pro series III Fitting the Lens Notes • Turn the lens release lever clockwise so Always allow the lamp to cool for that it is pointing upwards, to open the 5 minutes before: lock fully. -
Page 13: Operating The Projector
Digital Projection OPERATING THE PROJECTOR Installation and Quick-Start Guide Titan Pro series III Operating the Projector Notes Switching the Projector On • Connect the power cable between the mains supply and the projector. Switch on at the switch next to the power connector. -
Page 14: Adjusting The Lens
Digital Projection OPERATING THE PROJECTOR Installation and Quick-Start Guide Titan Pro series III Adjusting the Lens Notes • The lens can be adjusted using the Lens Menu , which is available from the Global Settings Menu , or: When any of the three Lens... -
Page 15: Switching The Projector Off
Digital Projection OPERATING THE PROJECTOR Installation and Quick-Start Guide Titan Pro series III Switching the Projector Off Notes • Press on the remote control or the control panel, and hold for 3 seconds, to switch the projector OFF. The power indicator on the control panel will show amber, the lamp will be off and the projector will be in STANDBY mode. - Page 16 CONNECTION GUIDE Titan Pro series III High Brightness Digital Video Projector Rev A May 2012...
- Page 17 Digital Projection CONTENTS Connection Guide Titan Pro series III CONTENTS Signal Inputs and Outputs Control Connections ............Conn_1 ............... Conn_5 Update Port ................Conn_5 Rear Connection Panel ..............Conn_1 Conn_1 Service Port................Conn_5 (input 1) ..................HDMI Conn_1 Wired Remote Control..............Conn_5 (input 2) ..................
-
Page 18: Signal Inputs And Outputs
Digital Projection SIGNAL INPUTS AND OUTPUTS Connection Guide Titan Pro series III Signal Inputs and Outputs Notes Rear Connection Panel For a complete listing of pin configurations for all signal and VGA (input 1) • control connectors, see Wiring in the menu. -
Page 19: Side Connection Panel
Digital Projection SIGNAL INPUTS AND OUTPUTS Connection Guide Titan Pro series III Side Connection Panel Notes MAIN/DVI (input 9) • Single or Dual Link DVI-D input For a complete listing of pin configurations for all signal and SUB/HDMI (input 10) control connectors, see Wiring •... -
Page 20: 3D Connections
Digital Projection SIGNAL INPUTS AND OUTPUTS Connection Guide Titan Pro series III 3D Connections Notes 3D sources up to 60Hz requiring frame doubling and left/right interleaving • Connect to any of the Inputs on the Rear Connection Panel. For a complete listing of pin •... -
Page 21: Supported Signal Input Modes
Digital Projection SUPPORTED SIGNAL INPUT MODES Connection Guide Titan Pro series III Supported Signal Input Modes Notes Signal Resolution Refresh Total Horizontal Rate number Frequency ( Hz ) of lines (kHz) SDTV 480i 720 x 480 15.73 ü ü ü... -
Page 22: Control Connections
Digital Projection CONTROL CONNECTIONS Connection Guide Titan Pro series III Control Connections Notes Update Port For a complete listing of pin • The Update Port is used to download via LAN, firmware updates issued from time to time configurations for all signal and by Digital Projection. -
Page 23: Wiring Details
Digital Projection WIRING DETAILS Connection Guide Titan Pro series III Wiring Details Notes Signal inputs and outputs Component input For full details of all input settings, see the Global Settings/Input 4 x 75 ohm BNC Configuration menu, and the RGsB... -
Page 24: Dvi-I Input
Digital Projection WIRING DETAILS Connection Guide Titan Pro series III DVI-I input Notes 24 way D-type connector TMDS Data 2- TMDS Data 2+ For full details of all input settings, TMDS Data 2 Shield see the Global Settings/Input unused Configuration menu, and the... -
Page 25: Hdmi Input
Digital Projection WIRING DETAILS Connection Guide Titan Pro series III HDMI input Notes 19 way type A connector TMDS Data 2+ TMDS Data 2 Shield For full details of all input settings, TMDS Data 2- see the Global Settings/Input TMDS Data 1+... -
Page 26: S-Video Input
Digital Projection WIRING DETAILS Connection Guide Titan Pro series III S-Video input Notes 4 pin mini-DIN Y Ground C Ground For full details of all input settings, Luminance (Y) see the Global Settings/Input pin view of female connector Chrominance (C) -
Page 27: Control Connections
Digital Projection WIRING DETAILS Connection Guide Titan Pro series III Control connections Notes Sleeve Wired Remote control connection 3.5mm mini jack Note that plugging in the remote control cable will disable the infra- Power red. Ring Signal Ring Sleeve Ground... -
Page 28: Lan Connection
Digital Projection WIRING DETAILS Connection Guide Titan Pro series III LAN connection Notes TCP Port number 10001 Only one remote connection (RS232 or LAN) should be used at any one 10BaseT Unshielded Twisted Pair cable time. The standard wire colours as as follows:... - Page 29 OPERATING GUIDE Titan Pro series III High Brightness Digital Video Projector Rev A May 2012...
- Page 30 Digital Projection CONTENTS Operating Guide Titan Pro series III CONTENTS Using the Remote Control and the Control Panel ..Op_1 Input Settings Menu ................Op_15 Picture ..................Op_15 Using the Menus ..................Op_2 Colour Trim................... Op_16 Menus and sub-menus ................Op_2 Geometry ..................
-
Page 31: Using The Remote Control And The Control Panel
Digital Projection USING THE REMOTE CONTROL AND THE CONTROL PANEL Operating Guide Titan Pro series III Using the Remote Control and the Control Panel Notes OSD On/Off For full details of how to use the both open the Messaging Transmit menu system, see later in this guide. -
Page 32: Using The Menus
Digital Projection USING THE MENUS Operating Guide Titan Pro series III Using the Menus Notes Use the buttons on the projector control panel or on the remote control, to access the menu system. Some menu options and controls • To open or close the on-screen display (OSD), press may not be available due to settings in other menus. -
Page 33: Sliders
Digital Projection USING THE MENUS Operating Guide Titan Pro series III Sliders Notes • To use a slider, press to adjust it. Some menu options and controls may not be available due to settings in other menus. These will be greyed-out on the actual menu. -
Page 34: Editing Fields
Digital Projection USING THE MENUS Operating Guide Titan Pro series III Editing fields Notes Some features require a text or numeric field to be edited. • Some menu options and controls To edit a field, first select it using , then press may not be available due to settings •... -
Page 35: A Tour Of The Menus
More information about this menu can be found later in this section. Information Information about the projector, the current input source, and about Digital Projection. More information about this menu can be found later in this section. Rev A May 2012... -
Page 36: Global Settings Menu
Digital Projection A TOUR OF THE MENUS Operating Guide Titan Pro series III Global Settings Menu Notes Global Settings are those that affect the whole projector, regardless of which input is being used or what signal type is being displayed. - Page 37 Digital Projection A TOUR OF THE MENUS Operating Guide Titan Pro series III Picture Notes These settings in the Global Picture Menu affect all images, regardless of which input is being used or what signal type is being displayed. See also Using the Menus, earlier in this guide and Menu Map, later in this guide.
-
Page 38: Edge Blend
Digital Projection A TOUR OF THE MENUS Operating Guide Titan Pro series III Edge Blend Notes When several projectors are used to create a large tiled image, the edges need to be blended to avoid the overlaps appearing brighter than See also Using the Menus, earlier the rest of the image. -
Page 39: Pip
Digital Projection A TOUR OF THE MENUS Operating Guide Titan Pro series III Notes Two images can be combined, in three different ways using this feature. The PIP menu is See also Using the Menus, earlier available only when in the Projector menu is set to... -
Page 40: Advanced Geometry
Which settings are available in these menus depends on: Warp • Using an external Digital Projection computer application, up to eight customised warp maps can be created and uploaded to the - which Mode is selected in the first projector. If is selected, and any warp maps have been uploaded, you can select from the drop-down list. -
Page 41: Input Configuration
Digital Projection A TOUR OF THE MENUS Operating Guide Titan Pro series III Input Configuration Notes These menus allow adjustment of various technical parameters specific to each of the signal inputs, regardless of which input is being used. See also Using the Menus, earlier in this guide and Menu Map, later in this guide. -
Page 42: Lamp
Digital Projection A TOUR OF THE MENUS Operating Guide Titan Pro series III Lamp Notes See also Using the Menus, earlier in this guide and Menu Map, later in this guide. Main Menu Global Settings Lamp The number of lamps is dependent on the projector model. -
Page 43: On Screen Display
Digital Projection A TOUR OF THE MENUS Operating Guide Titan Pro series III On Screen Display Notes See also Using the Menus, earlier in this guide and Menu Map, later in this guide. Main Menu Global Settings On Screen Display •... -
Page 44: Network
Digital Projection A TOUR OF THE MENUS Operating Guide Titan Pro series III Network Notes The fields at the bottom of the menu show the current settings. Any new settings will not be effective until the projector has been turned off, See also Using the Menus, earlier then back on again. -
Page 45: Input Settings Menu
Digital Projection A TOUR OF THE MENUS Operating Guide Titan Pro series III Input Settings Menu Notes The Input Settings are those that affect ONLY the input being displayed. When a new input mode (video or graphics standard) is detected, eg See also Using the Menus, earlier NTSC, HDTV 1080p or SVGA, these settings are saved so that they can be recalled next time that input mode is displayed. -
Page 46: Colour Trim
Digital Projection A TOUR OF THE MENUS Operating Guide Titan Pro series III Notes See also Using the Menus, earlier Colour Trim in this guide and Menu Map, later in this guide. Main Menu Input Settings Colour Trim When a new input mode is detected (eg NTSC, HDTV 1080p, SVGA etc), •... -
Page 47: Geometry
Digital Projection A TOUR OF THE MENUS Operating Guide Titan Pro series III Geometry Notes See also Using the Menus, earlier in this guide and Menu Map, later in this guide. <-- stretched -> Main Menu Source : fills the DMD height... - Page 48 Digital Projection A TOUR OF THE MENUS Operating Guide Titan Pro series III continued Input Settings Menu, Geometry Submenu Notes See also Using the Menus, earlier in this guide and Menu Map, later in this guide. Main Menu Input Settings...
-
Page 49: 3D Menu
Digital Projection A TOUR OF THE MENUS Operating Guide Titan Pro series III 3D Menu Notes See also Using the Menus, earlier in this guide and Menu Map, later in this guide. Main Menu Input Settings • 3D Enable as required. -
Page 50: System Menu
Digital Projection A TOUR OF THE MENUS Operating Guide Titan Pro series III System Menu Notes See also Using the Menus, earlier in this guide and Menu Map, later in this guide. Main Menu System Power On command has no function when seen on the projector •... -
Page 51: Information Menu
Titan Pro series III Information Menu Notes The sub-menus give information about lamp operating times, software and hardware configurations, the input source and Digital Projection. See also Using the Menus, earlier in this guide and Menu Map, later in Projector this guide. -
Page 52: Menu Map
Digital Projection MENU MAP Operating Guide Titan Pro series III Menu Map Notes Main Menu Sub Menus Some of the information in this menu Input Selection map is summarised. See the actual menu on the projector for full detail. CVBS 1, CVBS 2, S-Video, Component, VGA, 3G-SDI, DVI, HDMI, Test Pattern, Main/DVI, Sub/HDMI, Dual Pipe... - Page 53 Digital Projection MENU MAP Operating Guide Titan Pro series III Main Menu Sub Menus Notes Global Settings (continued) Advanced Geometry Some of the information in this menu Mode Off, Keystone, Cornerstone, Rotation, Warp map is summarised. See the actual Warp Map menu on the projector for full detail.
-
Page 54: Input Settings
Digital Projection MENU MAP Operating Guide Titan Pro series III Main Menu Sub Menus Notes Input Settings Picture Some of the information in this menu Brightness map is summarised. See the actual menu on the projector for full detail. Contrast... -
Page 55: Web Configuration Utility
Digital Projection WEB CONFIGURATION UTILITY Operating Guide Titan Pro series III Web Configuration Utility Notes The LAN IP Address of the projector can be set by using the Network submenu, which can be found in the For full details of how to use the... - Page 56 Digital Projection WEB CONFIGURATION UTILITY Operating Guide Titan Pro series III Notes For full details of how to use the menu system, see earlier in this Guide. • Sliders are represented by similar sliders, as in the slider Array Width shown here.
Need help?
Do you have a question about the Titan Pro Series III and is the answer not in the manual?
Questions and answers