Table of Contents
Advertisement
Quick Links
INSTALLER: Leave this manual with the appliance.
CONSUMER: Retain this manual for future reference.
These instructions are supplementary to the
Installation and Operating Instructions supplied
with the fireplace and should be kept together.
Refer to the Installation and Operating Instructions
for proper gas supply, safety requirements and
operating instructions
170223-20
TC36D
BLACK DIAMOND
BURNER KIT
INSTRUCTIONS
SKU# 22150014
For TC36D & TC36D Arch
Series D Fireplaces
SKU# 22150014
100005909
Advertisement
Table of Contents

Related Manuals for Town & Country Fireplaces 22150014


Summary of Contents for Town & Country Fireplaces 22150014
- Page 1 Refer to the Installation and Operating Instructions for proper gas supply, safety requirements and operating instructions TC36D BLACK DIAMOND BURNER KIT INSTRUCTIONS SKU# 22150014 For TC36D & TC36D Arch Series D Fireplaces 170223-20 SKU# 22150014 100005909...
-
Page 2: Contents Of Package
1. Remove access cover from the valve control center at the inside right hand side of the rebox (Figure 2). Figure 2: Access cover to valve control center. 100005909 SKU# 22150014 170223-16... - Page 3 2. Remove 2 screws from the air channel and attach the lower rear panel to the rebox with these screws (Figure 3). 3. Attach the manifold bracket to the oor shield in the bottom of the rebox with one screw (Figure 4). Figure 4: Attaching manifold bracket. 100005909 SKU# 22150014 170223-16...
- Page 4 5. Feed the ignition and sensor wires through the bulkhead plate (Figure 6) to the interface module. Ignition and sensor wires Bulkhead plate Figure 6: Ignition and sensor wire routing. 100005909 SKU# 22150014 170223-16...
- Page 5 Figure 7: Interface module. 6. Attach the ignition and sensor wires to the Interface module as shown in Figure 7. 7. Reinstall the valve control center access panel (Figure 8). Figure 8: Re-install access cover to valve control center. 100005909 SKU# 22150014 170223-16...
-
Page 6: Panel Installation
2. Position upper rear panel on top of lower rear panel and slip in behind the right panel (Figure 10). Figure 10: Install upper rear panel. 100005909 SKU# 22150014 170223-16... - Page 7 (Figure 11). Secure both side panels with the previously removed panel retainer. 4. Install burner shield by tipping the shield into the rebox, feed the pilot assembly through the opening in the shield (Figure 12). Figure 12: Installing burner shield. 100005909 SKU# 22150014 170223-16...
- Page 8 6. Attach the burner tray to the burner shield using two screws at the back of the tray (Figure 14). Ensure that front mounting holes are aligned under tray before tightening. Figure 14: Attaching burner tray to burner shield. 100005909 SKU# 22150014 170223-16...
- Page 9 Figure 15: Installing front media spacer. 7. Install front media spacers (Figure 15). 8. Install rear media spacer (Figure 16). Figure 16: Installing rear media spacer. 100005909 SKU# 22150014 170223-16...
- Page 10 9. Install burner by tilting burner tube through the tray. Ensure that the orice has entered the tube (Figure 17 and Figure 18). Set the air shutter to fully open for Propane or fully closed for Natural gas. Orifice Inlet tube Figure 18: Orice and inlet tube. 100005909 SKU# 22150014 170223-16...
- Page 11 Four holes must line up to set each screw. Some pressure may need to be applied to the front t ray support on the shield to align the holes (Figure 20). Figure 20: Securing center media spacer. 100005909 SKU# 22150014 170223-16...
- Page 12 Figure 21: Applying glass media. 11. Apply just enough glass media to cover the burner assembly (Figure 21). NOTE: Too much glass media over the burner will cause sooting with the use of propane gas. 100005909 SKU# 22150014 170223-16...
-
Page 13: Propane Conversion
1. Ensure the burner, pilot and gas supply are turned off, and the appliance has cooled. 2. With a ½” wrench remove the natural gas orifice (Figure 22) and replace with propane orifice (marked “LI”) (Figure 23). 100005909 SKU# 22150014 170223-16... - Page 14 4. Remove the pilot shield from the burner tray by removing two screws (Figure 24). 5. With a 7/16” wrench, loosen the pilot head on the pilot assembly (Figure 25) Figure 25: Loosening the pilot head. 100005909 SKU# 22150014 170223-16...
- Page 15 6. Slide the pilot adjustment band over and ensure that the hole in the orice band is showing. Figure 26 indicates that the pilot is in the Natural Gas position. Figure 27 indicates that the pilot is in the Propane Gas position. Hole in Band Figure 25: Loosening the pilot head. 100005909 SKU# 22150014 170223-16...
- Page 16 Company Address The above accepts the responsibility that this conversion has been properly performed. Figure 28: Propane Conversion Label. For complete valve conversion installation instructions, refer to the instruction book included in the SIT conversion kit. 100005909 SKU# 22150014 170223-16...
-
Page 17: Gas Pressure Check
Figure 30: Attaching test extension. Correct gas pressure requirement: Supply Pressure Natural Gas Propane Minimum 5.0” wc 12.5” wc Maximum 13.9” wc 13.9” wc Manifold Pressure Maximum 3.5” wc 10.0” wc Minimum 1.6” wc 6.4” wc 100005909 SKU# 22150014 170223-16... -
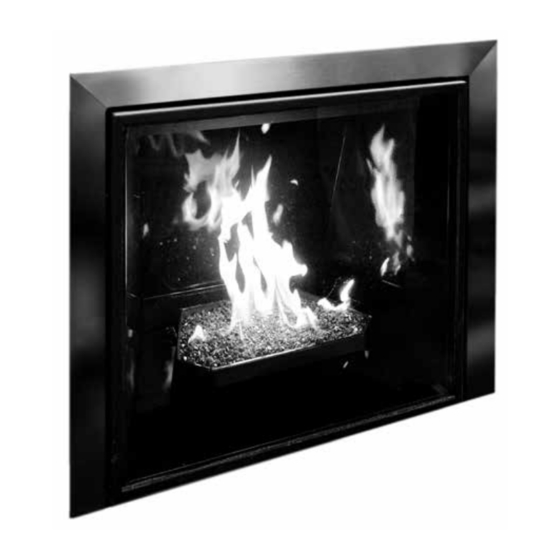
Page 18: Burner Flame Adjustment
The flame should be just orange and “lazy”. It should NEVER be set to create sooting on inter- nal parts and window glass. Allow the fireplace to run for 30 minutes before evaluating flame appearance. See Figure 31 for an example of what a desireable flame pattern should look like. 100005909 SKU# 22150014 170223-16... -
Page 19: Parts Diagram
4..MANIFOLD ......TC36.9788WLD HARDWARE PACKAGE ......TC36.HK03 5..DORMONT FITTING ...... 5019.221 6..MEDIA SPACER, REAR ......9634 Not sold separately 7..PILOT SHIELD ......9626.002 8..MEDIA SPACER, CENTER .... 9635.001 9..MEDIA SPACER, FRONT ....9634.5 100005909 SKU# 22150014 170223-16... - Page 20 © 2017 Copyright Pacific Energy Fireplace Products LTD Reproduction, adaptation, or translation without prior written permission is prohibited, except as allowed under the copyright laws. For technical support, please contact your retailer Web site: www.townandcountryfireplaces.net 2975 Allenby Rd., Duncan, BC V9L 6V8 Printed in Canada...
Need help?
Do you have a question about the 22150014 and is the answer not in the manual?
Questions and answers