Avonic CM-CON100 User Manual
Ptz camera controller
Hide thumbs
Also See for CM-CON100:
- User manual (33 pages) ,
- User manual (13 pages) ,
- User manual (12 pages)
Table of Contents
Advertisement
Quick Links
Advertisement
Table of Contents

Subscribe to Our Youtube Channel
Related Manuals for Avonic CM-CON100


Summary of Contents for Avonic CM-CON100
- Page 1 PTZ Camera Controller CM-CON100 www.avonic.com User Manual | Version 1.1.1...
-
Page 2: Table Of Contents
Join Avonic ................ -
Page 3: Introduction
For any questions or suggestions, contact your reseller or the local distributor of Avonic. Find the local distri- butor on the website of Avonic. For the most recent version of the manual or datasheet, look at the Avonic website: www.avonic.com. -
Page 4: Safety Notes
Avonic or an Avonic Authorized Service Provider. Repairs by service providers other than Avonic or an Avonic Authorized Service Provider may not involve the use of Avonic genuine parts and may affect the safety and functionality of the device. You can find more information about repairs and service at www.avonic.com. - Page 5 Power adapter To operate the Avonic power adapter safely and reduce the possibility of heat-related injury or damage, plug the power adapter directly into a power outlet. Don’t use the power adapter in wet locations, and don’t connect or disconnect the power adapter with wet hands. Stop using the power adapter and any cables if any of the following conditions exist: •...
-
Page 6: Package Contents And Accessories
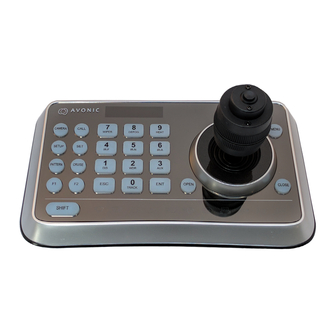
Note that a cable with RS485 and RS232 connection is attached to the controller, but not pictured below. PRODUCT OVERVIEW The Avonic CM-CON100 is a compact PTZ camera controller. With this controller it is possible to control up to 255 camera’s and using up to 255 presets. -
Page 7: Installation
Zoom / Focus Switch Key. Switch Zoom/ Focus - Press Joystick button to switch to focus and (See also no. 8.) twitch joystick right and left to focus in and out. - Press button again to switch to Zoom. Back to top www.avonic.com... -
Page 8: Connection Diagram
RS232 Cable PTZ Camera Power (DC12V) Power Supply VISCA network connection diagram When connecting multiple cameras through RS-232, use daisy chaining network architecture. Max cable length for RS-232 is 10-15m. RS-232 RS-232 RS-232 Controller Camera Camera Camera www.avonic.com Back to top... -
Page 9: Rs485 Network Connection Diagram
Camera address number (1, 2 or n) Communication settings as baud rate (9600), parity, etc. See page 12 (Camera Settings) for more information. The following section of this manual describes how to set up the controller. Back to top www.avonic.com... -
Page 10: Operation Instructions
See also the picture below. Note that it is very easy to confuse both menu’s! So keep always in mind in which menu you are. See page 12 for the SETUP menu and page 11 for the NON-Setup Menu. www.avonic.com Back to top... -
Page 11: Non-Setup Menu
How to switch to another camera See page 12 how to set an ID for your camera, if you have multiple camera’s to control with the CON100. Press in the NON-Setup Menu camera number Press the camera button www.avonic.com Back to top... -
Page 12: Camera Setting
Time Setting Hours / Minutes / Seconds Move the joystick down and right to enter the Time Setting menu. Move to change the numbers and to change hours, minutes and seconds. Press to save the time. www.avonic.com Back to top... -
Page 13: Volume Setting
CON-100: 7 7 8 8 9 6 Note: In non-setup menu status, quickly lock function can be realized by simply pressing SHIFT + ENT . “USER PIN”or “ADMIN PIN” is required for operating the controller again. www.avonic.com Back to top... -
Page 14: Joystick Calibration
Note also that it is possible to easily confuse the preset functionality with setting up camera (protocol ) Address and ID number! (see page 12) Keep always in mind in which feature and menu you are. www.avonic.com Back to top... -
Page 15: Speed Setting
With the menu button next to the joystick, you can open the OSD menu of the camera to make changes in the settings of the camera itself. If you are using an Avonic camera in combination with the CON100, you can... -
Page 16: Maintenance
Check the net power Check the power supply Check if the serial cable is attached to a camera Serial functionality issues • Cannot control camera Check serial cable(s) and the RJ45 termination Reset to factory default Back to top www.avonic.com...
Need help?
Do you have a question about the CM-CON100 and is the answer not in the manual?
Questions and answers