Avonic CM-CON100 User Manual
Ptz camera controller
Hide thumbs
Also See for CM-CON100:
- User manual (33 pages) ,
- User manual (16 pages) ,
- User manual (10 pages)

Subscribe to Our Youtube Channel
Related Manuals for Avonic CM-CON100


Summary of Contents for Avonic CM-CON100
- Page 1 CM-CON100 Avonic PTZ Camera Controller User Manual Version 2.2 Update notes: Preset instructions added Join Avonic linkedin.com/company/avonic twitter.com/avonic facebook.com/avonic www.avonic.eu...
-
Page 2: Table Of Contents
Connecting multiple cameras by RS485 ....................8 Addressing Multiple Cameras ......................9 Operation Instructions ..............10 Menu ..............................10 Set/Call Preset Position ........................12 Delete Preset Position ........................12 What to do if the admin pin is lost ....................13 www.avonic.eu... -
Page 3: Introduction
Before cleaning, unplug the power cable. Use a soft, damp cloth to clean the device, do not use strong or abrasive detergent to clean that will damage the device. • If you wish to dispose this product, please contact Avonic to obtain info about the recycle procedure. Maintenance Before cleaning, unplug the power cable. -
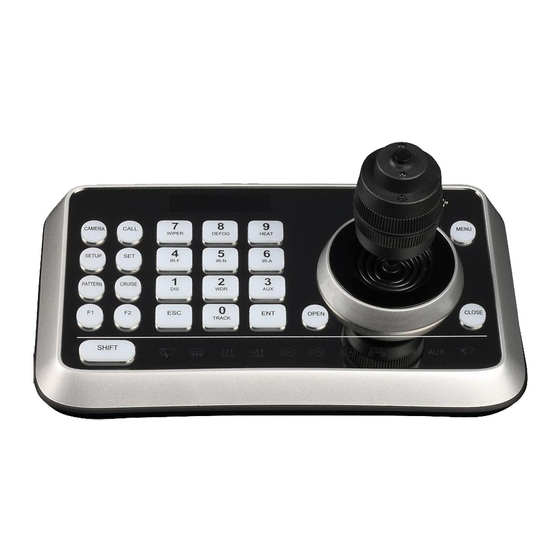
Page 4: Product Overview
Product Overview The Avonic CM-CON100 is a compact PTZ camera controller. With this controller it is possible to control up to 255 camera's and using up to 255 pre-sets. The controller supports the Visca, Pelco-D and Pelco-P protocol and can be connected with RS232/485. -
Page 5: Product Description
“confirm” key in a menu. Joystick This joystick is used to Pan, Tilt, Zoom and Focus Non-Menu State: Left/Right/Up/Down: Pan/Tilt the camera correspondingly Twist clockwise: Zoom In, Twist anti-clockwise: Zoom Out; Press Zoom/ Focus Switch Key and Twist: Focus Near/Far Menu State: www.avonic.eu... - Page 6 Operation: Press this key, the red cross indicatorlight near the joystick will go out, twist the joystick to zoom in / out; press this key again, the red cross indicatorlight will be lightened, twist the joystick adjust focus value. www.avonic.eu...
-
Page 7: Installation
Connection Diagram Power + RS-232 + RS-485 Connecting multiple cameras by RS232 The VISCA protocol supports up to 7 cameras and can be cascaded by connecting RS232-out from each camera to RS232-in of the following according to the picture: www.avonic.eu... -
Page 8: Connecting Multiple Cameras By Rs485
To connect multiple cameras by RS485, the cameras need to get attached to a 2-wire twisted pair bus that is terminated at both ends with a 120 Ω impedance resistor. The maximum distance from the bus to the camera or controller is 5 meters www.avonic.eu... -
Page 9: Addressing Multiple Cameras
2. Camera address number (1, 2 or n) 3. Communication settings as baud rate (9600), parity, etc. See the Operation Instruction in the manuals of the cameras for more detail. The following section of this manual describes how to set up the controller. www.avonic.eu... -
Page 10: Operation Instructions
“CAMERA SETTING” : Camera ID 0-255, use num keys, press ENT to confirm Protocol setting PELCO D/PELCO P PROTOCOL: /VISCA PELCO D Baud rate setting 2400/4800/9600 / BAUD RATE: 19200/38400 2400 Address Setting 0-255 ADDRESS: 1 Increment 1-20 INCREMENT: www.avonic.eu... - Page 11 Zoom tele Twist the joystick ZOOM TELE clockwise to the limit and press ENT Zoom wide Twist the joystick anti ZOOM WIDE clockwise to the limit and press ENT Free state Need not any FREE STATE operation, press ENT www.avonic.eu...
-
Page 12: Set/Call Preset Position
CALL PRESET: 1 preset position 1 Delete Preset Position Operation Button Screen Comment Call Preset 1 Press Current position CALL PRESET: 1 moves to preset 1 Delete Preset 1 Long Press on Set Preset 1 is now empty. CLR PRESET: 1 www.avonic.eu... -
Page 13: What To Do If The Admin Pin Is Lost
What to do if the admin pin is lost By default the admin pin is set to 111111. If this pin is changed and is lost, use the following code to regain access to the con-100: 778896 www.avonic.eu...
Need help?
Do you have a question about the CM-CON100 and is the answer not in the manual?
Questions and answers