Advertisement
Quick Links
Advertisement

Related Manuals for Avonic CON100


Summary of Contents for Avonic CON100
- Page 1 PTZ Camera Controller CON100 www.avonic.com | User Manual AV-CON100 | Version 1.2...
- Page 2 “look and feel” and arrangement of such Content, contained in this Manual is owned, controlled or licensed by or to Avonic, and is protected by trade dress, copyright, patent and trademark laws, and various other intellectual property rights and unfair competition laws.
- Page 3 EU Declaration of Conformity The Avonic Declaration of Conformity is in accordance with EN ISO/IEC 17050-1 and generated using the ProductIP compliance platform. Table 1: EU Declaration of Conformity CE DECLARATION OF CONFORMITY 1. Models No: CM-CON100 2. Brand Name: Avonic 3.
- Page 4 Important Information Liability Avonic will NOT be held responsible for any damage or injury caused by unqualified persons carrying out these tasks, or by not following the instructions in this Manual. Intended Use and Non-Intended Use Installation The following applies to the installation of the CON100: •...
- Page 5 The following acronyms are used in this Manual: Internet Protocol On-Screen Display Pan / Tilt / Zoom Power Supply RS232 Recommend Standard 232 RS485 Recommend Standard 485 Stock Keeping Unit VISCA Video System Control Architecture User Manual AV-CON100 | www.avonic.com...
- Page 6 PTZ Controls......................19 Zoom and Focus....................19 SET/ CALL Preset Position..................19 Delete Preset Position..................20 How to switch to another camera.................20 Setup Menu........................20 Buttons to control the camera (setup menu)............21 1. Camera Setting....................21 User Manual AV-CON100 | www.avonic.com...
- Page 7 OSD Menu (Camera)..................... 25 Buttons to control the OSD menu of the camera........... 25 OSD menu instructions..................25 Maintenance...........................26 Maintenance......................... 26 Usage Precautions......................26 Transport and Storage......................27 Disposal and Recycling......................28 Troubleshooting........................29 General.........................29 Power Issues........................ 29 Serial functionality issues....................29 User Manual AV-CON100 | www.avonic.com...
- Page 8 This Manual describes the safety precautions and the instructions for safe unpackaging, installation, operation, maintenance and disposal of the Avonic CON100. In this Manual, the Avonic CON100 is referred to as the 'Product'. Target Audience This Manual is developed for installation technicians who install the Product at client sites, and for IT professionals who are responsible for operating the Product.
- Page 9 Power the Product ONLY with the included cable and power adapter. Other adapters may not meet applicable safety standards, and could pose a risk of death or injury when connected. Intended Use This Product is intended to control the Avonic PTZ cameras. See also section Intended Use and Non-Intended on page iv for details.
- Page 10 • Don’t open this Product and don’t attempt to repair it yourself. Disassembling the Product may damage it or may cause injury to you. • If this Product is damaged, malfunctioning, or if it comes into contact with liquid, contact Avonic or an Avonic Authorized Service Provider.
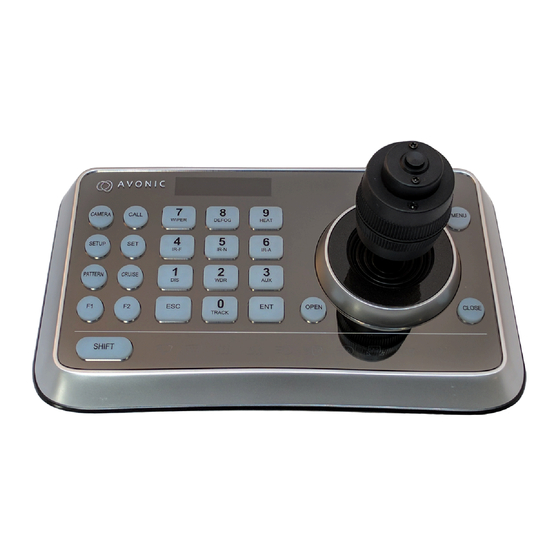
- Page 11 Product Overview Description The Avonic CM-CON100 is a compact PTZ camera controller. With this controller it is possible to control up to 255 camera’s and using up to 255 presets. The controller supports the Visca, Pelco-D and Pelco-P protocol and can be connected with RS232/485. The Avonic CM-CON100 is therefore compatible with the Avonic camera’s as well with other brands that supports these protocols.
- Page 12 The following tables contains an overview of the package contents of the Product. Quantity Description Avonic SKU 1 pc PTZ Camera Controller CM-CON100 1 pc Power Supply CM-CON100-PSU Each item is visualized below and referenced by the associated number in the table above: Figure 3: Package Contents User Manual AV-CON100 | www.avonic.com...
- Page 13 The CON100 should be in its protective foam as follows: Figure 4: Controller in Foam 3. Verify that the plastic bag is sealed. If this is NOT the case, contact Avonic and stop here. 4. Break the seal of the sealed bag.
- Page 14 White Balance). You can access all other settings through the OSD Menu of the camera using the controller. The CON100 can be connected via a serial connection to (RS-232, RS-485) to one or two cameras. See below: The controller has 3 wires: •...
- Page 15 Execute the following steps to connect the controller to the back of the camera(s) via RS-232: 1. Make the connection using daisy chaining network architecture. 2. Keep in mind that the maximum cable length for RS-232 is 10-15m. Figure 9: RS-232 Network Connection Diagram User Manual AV-CON100 | www.avonic.com...
- Page 16 120Ω-impedance resistor. 2. Ensure that the maximum distance from the bus to the camera or controller is 5m. If you use only ONE camera, the impedance resistor is not needed. Figure 10: RS-485 Network Connection Diagram User Manual AV-CON100 | www.avonic.com...
- Page 17 Operation This chapter will explain the operation instructions for using the CON100. Connections Before using the CON100 for the first time, the buttons and their functionalities will be explained. See below: Name Functionality OLED Screen Displays status of current operation...
- Page 18 If you have connected the cables to your camera (see previous chapter) the CON100 will start automatically. When the CON100 is for the first time ON, you will see that it will display the User PIN. 1. Press to fill in the pin. The initial pin is “111111”.
- Page 19 SET/ CALL Preset Position With the CON100 it is possible to set the camera in a desired position as a preset. You can call that preset when you need it. Follow the instructions below to Set a Preset: 1.
- Page 20 4. It is also possible to use the Escape button to leave a menu feature, or delete a wrong insert. User Manual AV-CON100 | www.avonic.com...
- Page 21 Sets the rate at which information is send between controller and camera Address Sets a specific (protocol) address for a camera. Increment Batches program camera’s in the system with the same baudrate, protocol for multiple camera’s. So you can control multiple camera’s at the same time. User Manual AV-CON100 | www.avonic.com...
- Page 22 Enter to save the volume. 4. Backlight Setting The backlight setting will lighten the buttons of the CON100 to help to see the buttons in dark area’s. 1. Move the to change the backlight setting and press to save the setting.
- Page 23 (old PIN). 4. Enter now the new PIN and confirm this by pressing Enter. • If the PIN has been changed and is lost, use the following mastercode to regain access to the CON100: 7 7 8 8 9 6 •...
- Page 24 MENU button! It is possible that the preset made using the PATTERN, CRUISE or MENU button will be overridden by the CON100 and will not work. For a correct functionality of the presets, stick always to 255 presets and do not make, for example, two presets number 2, 3, 4, 5 etc! •...
- Page 25 OSD Menu (Camera) The CON100 can be used to navigate through the OSD menu of the camera in order to make changes to the settings of the camera. You can download the camera manual on the Avonic website to read about the functionality of the OSD menu.
- Page 26 • Use a soft cloth or tissue to clean the camera cover. • Please use the soft dry cloth to clean the lens. If the CON100 is very dirty, clean it with diluted neutral detergent. Do not use any type of solvents, which may damage the surface.
- Page 27 Transport and Storage The CON100 must be transported in its original packaging box. Inside the box, it is recommended to wrap the CON100 in the original plastic bag and to place it in the protective foam. Specific guidelines apply to the environmental temperature and humidity when operating and storing the CON100.
- Page 28 In general, the term 'E-Waste' applies to items of all types of electrical and electronic equipment and its parts that have been discarded by the owner as waste without the intention of re-use. Avonic outsources the disposal and recycling of its E-Waste camera materials to the Stichting Open. https://stichting-open.org/ for more information about the disposal and recycling.
- Page 29 Troubleshooting General 1. Turn the CON100 off and on again and check if the problem persists. 2. If it does, restore to the factory default. Power Issues No display and no button lights: 1. Check the net power. 2. Check the power supply.
- Page 30 PTZ Camera Controller CON100 Version 1.2 © March 2022...
Need help?
Do you have a question about the CON100 and is the answer not in the manual?
Questions and answers