
Subscribe to Our Youtube Channel
Related Manuals for Avonic AV-CON300-IP


Summary of Contents for Avonic AV-CON300-IP
- Page 1 PTZ Camera controller over IP and serial AV-CON300-IP www.avonic.com | User Manual AV-CON300-IP | Version 1.2...
-
Page 2: Disclaimer, Contact And Ce Marking
“look and feel” and arrangement of such Content, contained in this Manual is owned, controlled or licensed by or to Avonic, and is protected by trade dress, copyright, patent and trademark laws, and various other intellectual property rights and unfair competition laws. -
Page 3: Eu Declaration Of Conformity
EU Declaration of Conformity The Avonic Declaration of Conformity is in accordance with EN ISO/IEC 17050-1 and generated using the ProductIP compliance platform. Table 1: EU Declaration of Conformity EC DECLARATION OF CONFORMITY 1. Models No: AV-CON300-IP 2. Brand Name: Avonic 3. -
Page 4: Important Information
Important Information Liability Avonic will NOT be held responsible for any damage or injury caused by unqualified persons carrying out these tasks, or by not following the instructions in this Manual. Intended Use and Non-Intended Use Installation The following applies to the installation of the CON300-IP: •... -
Page 5: Symbols Used In This Manual
The following acronyms are used in this Manual: Internet Protocol On-Screen Display Pan / Tilt / Zoom Power Supply RS232 Recommend Standard 232 RS485 Recommend Standard 485 Stock Keeping Unit VISCA Video System Control Architecture User Manual AV-CON300-IP | www.avonic.com... -
Page 6: Table Of Contents
Menu structure....................21 Shortcuts........................26 PTZ Operation and (Zoom) Rocker Button............. 26 Camera selection....................26 Switch between Serial and IP mode..............27 Set, call or delete a preset...................28 Focus, exposure and white-balance...............29 OSD menu of the camera..................30 Maintenance...........................31 User Manual AV-CON300-IP | www.avonic.com... - Page 7 Maintenance......................... 31 Usage Precautions......................31 Transport and Storage......................32 Disposal and Recycling......................33 Troubleshooting........................34 General.........................34 Power Issues........................ 34 Serial functionality issues....................34 IP functionality issues....................34 User Manual AV-CON300-IP | www.avonic.com...
-
Page 8: Introduction
This Manual describes the safety precautions and the instructions for safe unpackaging, installation, operation, maintenance and disposal of the Avonic CON300-IP. In this Manual, the Avonic CON300-IP is referred to as the 'Product'. Target Audience This Manual is developed for installation technicians who install the Product at client sites, and for IT professionals who are responsible for operating the Product. -
Page 9: Safety
Manual before unpacking, installing and using this Product. Keep the Manual in a safe place for future reference or download it from www.avonic.com. Intended Use This Product is intended to control one or more (Avonic) PTZ cameras. See also section Intended Use and Non-Intended Use for details. -
Page 10: Ventilation
• Don’t open this Product and don’t attempt to repair it yourself. Disassembling the Product may damage it or may cause injury to you. • If this Product is damaged, malfunctioning, or if it comes into contact with liquid, contact Avonic or an Avonic Authorized Service Provider. -
Page 11: Product Overview
Iris, Brightness, White Balance and R/B color correction can be controlled easily. Access all other settings of the camera easily through the OSD of the camera using the controller. Mix ‘n match serial and IP control Due to the added IP functionality the AV-CON300-IP is a true hybrid solution for new and existing installations. User Manual AV-CON300-IP | www.avonic.com... -
Page 12: Unpacking
Take note that the Phoenix Connector is already plugged in at the back of the controller. Each item is visualized below and referenced by the associated number in the table above: Figure 3: Package Contents User Manual AV-CON300-IP | www.avonic.com... -
Page 13: Unpacking The Controller
CON300-IP in box CON300-IP Accessories (PSU and RJ45 cable) 3. Verify that the plastic bag is sealed. If this is NOT the case, contact Avonic and stop here. 4. Break the seal of the sealed bag. 5. Take the CON300-IP out of the bag. -
Page 14: Installation
(2), or connect the Phoenix connector to the 5-pin Phoenix interface (3) for a serial connection (via a 2-pin Phoenix connector to the camera). 3. Switch the power to ON (6). User Manual AV-CON300-IP | www.avonic.com... -
Page 15: Rj45 To Mini Din-8 Plug
RJ45 to Mini DIN-8 plug The Avonic AV-CON300-IP comes with a single RS232 connecting cable with RJ45 plug to Mini DIN-8 plug. With this cable only 1 channel can be connected to the controller. This channel can control up to 7 (VISCA) or up to 10 (PELCO) cameras. -
Page 16: Ip (Network) Connection
• Parity bit: none. IP (Network) Connection Execute the following steps to connect the controller and an Avonic PoE camera to a LAN: Connect the controller and the camera to a (PoE) switch. Use for this an Ethernet connection. See... -
Page 17: Rs-485 Network Connection
120Ω-impedance resistor. 2. Ensure that the maximum distance from the bus to the camera or controller is 5m. If you use only ONE camera, the impedance resistor is not needed. Figure 7: RS-485 Network Connection Diagram User Manual AV-CON300-IP | www.avonic.com... -
Page 18: Operation
This is an integrated on-screen menu that can be accessed within the CON300-IP to change specific functions in order to control the camera. The OSD Menu is visible on the screen on the controller. Figure 8: OSD menu structure User Manual AV-CON300-IP | www.avonic.com... -
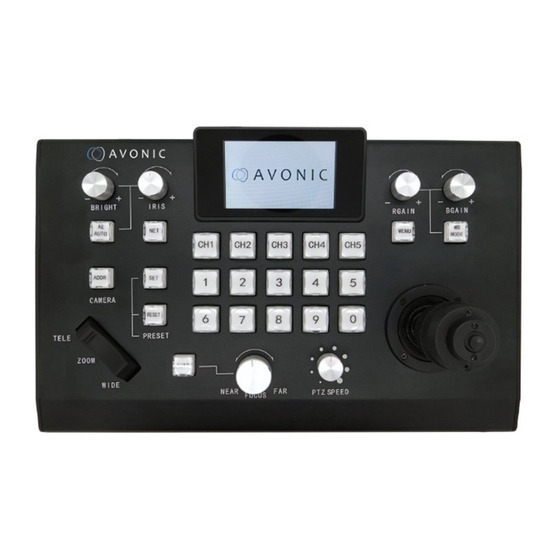
Page 19: Button Overview
Zoom in and out ‘rocker’ button Control of PTZ speed Toggle button between Net and Serial mode Position (Number) Keys [0~9] Red gain PTZ control joystick Blue gain Joystick button Toggle menu on/off Information Display User Manual AV-CON300-IP | www.avonic.com... -
Page 20: First Start
5. Enter the IP address you want to give for the CON300-IP and click the joystick button to confirm. 6. Leave the menu of the controller. The IP address will automatically saved. See also Ethernet. Figure 9: Example of the Ethernet settings User Manual AV-CON300-IP | www.avonic.com... -
Page 21: Menu Structure
Channel if you want to control your camera(s) over IP. Select Channel 1 - 6 to control a camera that is assigned to that channel, using a serial connection (VISCA/ PELCO-D/PELCO-P). Use the NET button on the controller to switch between the VISCA over IP and serial modes. VISCA over IP User Manual AV-CON300-IP | www.avonic.com... - Page 22 2. Choose the compatibility mode with which your camera is compatible with and click the joystick button to confirm: • Standard (Avonic CM4x or CM7x camera) • Legacy (Avonic CM6x camera) • Auto (The controller will automatically recognise the camera model to select the correct compatibility mode for that camera.
- Page 23 Visca over Serial Follow instructions below to control the camera using Visca over Serial: 1. Choose the compatibility mode: standard (Avonic CM4x/ CM7x camera), Legacy (Avonic CM6x camera), or Auto (assigns automatically the correct compatibility mode). 2. Select channel if you want to control the camera using the...
- Page 24 3. Enter Joystick calibration. A warning appears that you must not touch the Joystick for 5 seconds. After that the JOYSTICK is automatically calibrated and a screen is popping up that the calibration was successful. Buzzer User Manual AV-CON300-IP | www.avonic.com...
- Page 25 2. Select Yes if you want to reset the device and click the joystick button. The controller will reset all settings and display the rocker switch calibration. Follow instructions on screen to complete the reset. User Manual AV-CON300-IP | www.avonic.com...
-
Page 26: Shortcuts
This can be done in the menu of the CON300-IP. See the links above. IP camera selection Press to select a channel to which the cameras is assigned. Select the camera from a list of IP addresses. User Manual AV-CON300-IP | www.avonic.com... -
Page 27: Switch Between Serial And Ip Mode
Serial mode display In serial mode you will see on the display: 1. Status of current protocol and address in use. 2. Actual send/receive status and status of the LAN connection. 3. Status of current command. User Manual AV-CON300-IP | www.avonic.com... -
Page 28: Set, Call Or Delete A Preset
Follow instructions below to delete a preset: 1. Press RESET (button will light up) and the NUMBER button of the preset you want to delete. 2. Press RESET button again (button will light off) to return to normal operation. User Manual AV-CON300-IP | www.avonic.com... -
Page 29: Focus, Exposure And White-Balance
There is no need to touch the WB mode, AE auto and auto focus buttons again to set the auto function of these settings OFF. As soon as you touch the turning knobs, it will switch to the manual mode of these settings. User Manual AV-CON300-IP | www.avonic.com... -
Page 30: Osd Menu Of The Camera
5. Twist the Joystick clockwise to choose a feature of the menu setting. 6. Twist the Joystick anti-clockwise the change the value of the feature. 7. Press the Menu button to go one level up in the OSD menu, or to leave the OSD menu. User Manual AV-CON300-IP | www.avonic.com... -
Page 31: Maintenance
Do not use any type of solvents, which may damage the surface. Usage Precautions Take the following precautions: • Do not operate close to powerful electromagnetic radiation, such as TV or radio transmitters, etc. User Manual AV-CON300-IP | www.avonic.com... -
Page 32: Transport And Storage
CON300-IP in the original plastic bag and to place it in the protective foam. Specific guidelines apply to the environmental temperature and humidity when operating and storing the CON300-IP. See 'Operating humidity' and 'Storage temperature' in the provided Datasheet for the applicable values. User Manual AV-CON300-IP | www.avonic.com... -
Page 33: Disposal And Recycling
In general, the term 'E-Waste' applies to items of all types of electrical and electronic equipment and its parts that have been discarded by the owner as waste without the intention of re-use. Avonic outsources the disposal and recycling of its E-Waste camera materials to the Stichting Open. https://stichting-open.org/ for more information about the disposal and recycling. -
Page 34: Troubleshooting
IP functionality issues Cannot control camera (controller is not responding): • Check network cable. • Check if the controller is in the same subnet as camera. • Reset the factory default by choosing controller menu option 11. User Manual AV-CON300-IP | www.avonic.com... - Page 35 PTZ Camera controller over IP and serial AV-CON300-IP Version 1.2 © April 2022...
Need help?
Do you have a question about the AV-CON300-IP and is the answer not in the manual?
Questions and answers