Advertisement
Quick Links
Advertisement

Subscribe to Our Youtube Channel
Related Manuals for Avonic CM-CON-300


Summary of Contents for Avonic CM-CON-300
- Page 1 PTZ Camera controller over IP and serial AV-CON300-IP www.avonic.eu User Manual | Version 1.1...
- Page 2 Join Avonic ................
- Page 3 Contact For any questions or suggestions, contact your reseller or the local distributor of Avonic. Find the local distributor on the website of Avonic. For the most recent version of the manual or datasheet, look at the Avonic website: www.avonic.eu Join Avonic facebook.com/avonicPTZ...
- Page 4 AV-CON300-DIN PRODUCT OVERVIEW The Avonic AV-CON300-IP is an advanced PTZ camera controller with serial and ip controlling capabilities. With this controller it is possible to control up to 255 cameras and using up to 10 presets per camera. The controller supports the Visca, Visca over IP, Pelco-D and Pelco-P protocol and can be connected with standard RJ45 connnectors for easy integration .
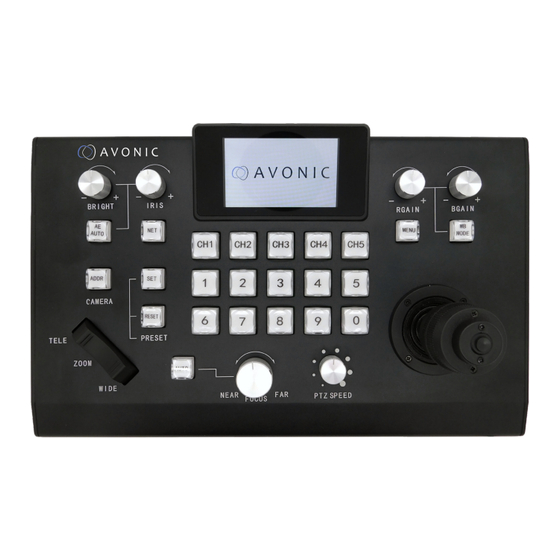
- Page 5 Power switch RJ45 channels (CH1-CH5) Serial Control The Avonic AV-CON300 comes with a single RS232 connecting cable with RJ45 plug to Mini DIN-8 plug. With this cable only 1 channel can be connected to the controller. This channel can control up to 7 (VISCA) or up to 10 (PELCO) cameras.
- Page 6 RJ-45 Mini DIN-8 Back to top www.avonic.eu...
- Page 7 Serial Communication Control COM port settings In default working mode, an Avonic camera is able to connect to the Con300ip controller with RS-232 or RS-485 serial interface. The camera can be controlled via RS-232, the parameters of RS-232C are as follows: •...
- Page 8 5m. IP network connection diagram Connect an Avonic ip controller to a LAN using a standard lan switch. Addressing is done via IP, the Visca address in a visca over ip environment is always 1.
- Page 9 Real Time Refresh Ethernet DHCP IP Address Subnet Mask Gateway Serial Port Baud Rate CH1 ~ CH5 Instruction Repeater Rocker PAN reverse TILT reverse Rocker Switch Correct Buzzer ON/OFF Sleep Time Language About Device Reset Device Back to top www.avonic.eu...
- Page 10 Toggle button between Net and Serial mode Position Key [0~9] Red gain PTZ control joystick Blue gain Joystick button Toggle menu on/off Information Display Twist: Cockwise = Zoom In/Enter in menu Anti Clockwise = Zoom Out/Back in menu Back to top www.avonic.eu...
- Page 11 Compatible Standard (CM4X/CM7X)/ Legacy (CM6X)/ Sony 2.2.2. Transport Protocol: UDP/TCP 2.2.3 UDP/TCP Port: enter portnumber (1259 is standard) 2.2.4 IP Address: edit IP address of the to be controlled camera Select Item Change Value [Menu] Back Back to top www.avonic.eu...
- Page 12 IP address using numerical buttons, click joystick for OK 3. Subnet Mask specify Subnet Mask using numerical buttons, click joystick for OK 4. Gateway specify Gateway using numerical buttons, click joystick for OK Select Item Change Value [Menu] Back Back to top www.avonic.eu...
- Page 13 1 minute, click joystick for OK 5 minutes, click joystick for OK 30 minutes, click joystick for OK No Sleep, click joystick for OK Select Item [Menu] Back 9. Language Language No settings to be made Select Item [Menu] Back Back to top www.avonic.eu...
- Page 14 Select Item [Menu] Back 11. Reset Device Reset Device 1. NO click joystick for OK 2. Yes click joystick for OK, controller will reset all settings and present the rocker switch calibration. Select Item [Menu] Back Back to top www.avonic.eu...
- Page 15 IP Mode Display In IP mode the display looks like the picture below. status of the current protocol and address in use. actual send/receive status and status of the lan connection. status of current command Back to top www.avonic.eu...
- Page 16 Press the Position Key [0~9] of the desired preset, in total 10 presets (including preset 0) are available per ca- mera through the AV-CON-300-IP. 6. Delete Preset Press [RESET] (key light on) and the Position Key [0~9]. Press [RESET] (key light off) again to return to normal ope- ration. Back to top www.avonic.eu...
- Page 17 The [JOYSTICK] navigates up and down through the menu. To choose an menu item, twist the [JOYSTICK] to TELE (clockwise). To change a value of a menu setting, move the [JOYSTICK] to the left or the right. The [MENU] button moves the menu up one level. Back to top www.avonic.eu...
- Page 18 After an IP address has been deleted or changed in the Manage Custom Address menu it will remain in the cache memory of the previously assigned [CH] button, therefor it is important ot reassign this [CH] Button to another IP address, or the same if changes were made. Back to top www.avonic.eu...
- Page 19 - Check if the controller is in the same subnet as camera - Reset the factory default by choosing menu option 11. Serial functionality issues • Cannot control camera - Check serial cable(s) and the RJ45 termination - Reset the factory default by choosing menu option 11. Back to top www.avonic.eu...
- Page 20 SPECIFICATIONS Back to top www.avonic.eu...
Need help?
Do you have a question about the CM-CON-300 and is the answer not in the manual?
Questions and answers