
Subscribe to Our Youtube Channel
Related Manuals for FOS Technologies LUMINUS TABLE


Summary of Contents for FOS Technologies LUMINUS TABLE
- Page 1 User’s Manual FOS Luminus Table USER’S MANUAL Before you operate this fixture read the manual carefully. Always make sure to include the manual if you pass/rent/sell the fixture to another user.
-
Page 2: Table Of Contents
User’s Manual TABLE OF CONTENT 1. WARNING ………………………………….….…….…………………………….………………………………………….2 1.1 Safety Instructions ………………………………………………….……………………………………………………….2 1.2 Rigging …………………………………………………………………………………………………………………….….…3 2. PRODUCT INTRUDUCTION …………………………………………………………………………….……………3 2.1 Items Included in the Tour Pack. ….…………………………….…….…….…….…………………….……..3 2.2 Product Overview…………………………………………………………………….……………………………………….3 2.2.1 Fixture Elements and Connectors …………………………………….………………….……………….4 2.2.2 Fixture Control Panel ……………………………………………………………………….……………….4 2.2.3 Fixture Dimensions ………………………………………..……………………………….………………..5 2.3 Storing the Fixture ………………………………..……………………….…….……….………………………………5 2.4 Specifications ……………………………………………….………………………………….……….……………………... -
Page 3: Warning
User’s Manual 1. WARNING 1.1 Safety Instructions This product guide contains important information about the safe installation and use of this product. Please read and follow these instructions carefully and keep this manual in a safe place for future reference. When unpacking and before disposing of the carton, check there is no transportation damage before using the product. -
Page 4: Rigging
User’s Manual IMPORTANT: The manufacturer will not accept liability for any resulting damages caused by the non-observance of this manual or any unauthorized modification to the fixture. 1.2 Rigging Concerning rigging, trussing for this fixture, please follow the European and national guidelines. Only the qualified technicians are allowed for the device installation, The fixture must never be mounted for a possible swinging position, and a safety cord attached must always be used. -
Page 5: Fixture Elements And Connectors
User’s Manual hours in auto run mode and around 12 hours in running single color. Table light Q6 can operate in wireless DMX mode, Master/Slave mode, and also in auto run mode. IR controller is supplied to make remote control as well. Its magnetic base helps it to stand right in the center of table or on any metal surface. -
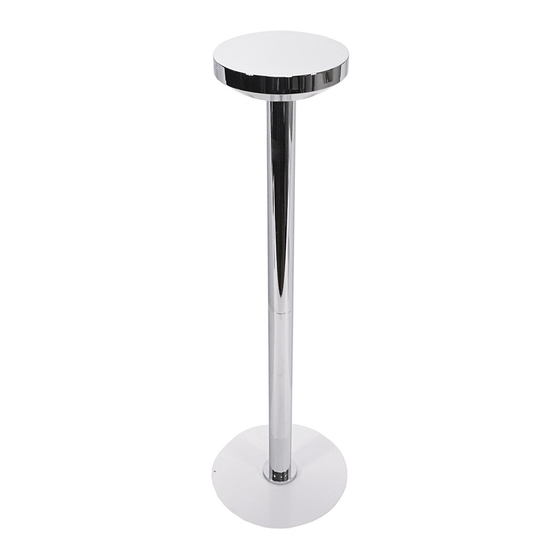
Page 6: Fixture Dimensions
User’s Manual 1. Menu to select the programming functions 2. Enter Enter the current menu or confirm the current function value 3. Up Scroll “UP” through the menu list to increase the value of the current function 4. Down Scroll “DOWN” through the menu list to decrease value of the current function 2.2.3 Fixture Dimensions Fixture Tour Pack... -
Page 7: Specifications
User’s Manual 2.4 Specifications Electrical Power input 100-240VAC 50/60Hz Power consumption 15W max. Power input/output connector Magnetic DC connector Battery Battery 11.1V 8.8Ah Charge time About 4.5 hours Around 5 hours at full color from one full charge Battery life Around 10 hours for auto color mixing Around 15 hours at running single color Battery capacity... -
Page 8: Installation
User’s Manual 3 INSTALLATION The fixture can be mounted to any metal surface. The table light can be placed on the enclosed metal plate on dinner table. Put the metal plate on dinner table or underneath tablecloth, put your table light to the center of the metal plate. The table light can also be attachd to any solid metal surface. -
Page 9: Battry Charge
User’s Manual 4. BATTERY CHARGE The fixture has a rechargeable lithium battery built in. Always store the fixtures with full battery. Depleted batteries must be recharged immediately; otherwise fixture performance will suffer. Battery runtime will decreased time by time. Battery runtime may be slightly shorter than predicted due to different working enviroments. -
Page 10: Menu Navigation
User’s Manual 5.1 Menu Navigation... -
Page 11: Dmx Addressing
User’s Manual 5.2 DMX Addressing Each fixture must be given a DMX address so that the correct fixture responds to the correct control signals. This DMX address is the channel number from which the fixture starts to “listen” to the digital control information being sent out from the controller. - Page 12 User’s Manual 5.3.2 Connect Fixture to a Wireless DMX Transmitter After fixture is switched on, and if there is no new transmitter, fixture will connect to the old transmitter automatically, no need to re-connect it. To put table light into wireless DMX, receive mode, press MENU button repeatedly until you see “Wireless DMX”, press ENTER to select [ Transmit] / [ Receive].
-
Page 13: Oled Display Setup
User’s Manual 5.4 OLED Display Protection OLED display can be set to turn off in 10-30 second or always “On”. Follow below steps: - Continue pressing “MENU” till “Back Light” appears. for OLED display - Press “ENTER” you will see “Always On”, you can scroll up/down to set up the time back light to turn off, or always “On”... -
Page 14: Operation
User’s Manual 6. OPERATION 6.1 DMX Control Mode This function will allow users to control individual fixture with a standard DMX 512 console. Below is fixture DMX Channel Chart. Channel Mode Channel Function DMX Value Description 0-255 0-100% Green 0-255 0-100% 4 CH Blue... -
Page 15: Auto Run Mode
User’s Manual 236-240 White 8 Colors macro 241-245 White 9 & 246-250 White 10 white balance 251-255 White 11 No function 6-25 R:255 G:215 B:076 A:251 26-50 R:255 G:236 B:095 A:252 51-75 R:249 G:249 B:108 A:253 76-100 R:229 G:255 B:125 A:239 Color 101-125... -
Page 16: Customized Colors
User’s Manual - Press “UP” or “DOWN” to scroll up/down to select “Auto”; - Press “ENTER” to select from “Program 1” to “Program 4”; - Press ENTER to confirm your setting; - Press ENTER again to adjust auto run speed (from 01 -09). To exit out of any above options, press MENU button. 6.4 Customized Colors Users are allowed to program their own color effects and save to the fixture. Follow the steps below: - Press button “MENU” repeatedly until “Custom” appears. - Press “ENTER”, you will see “[Red] 255”, this means you now can program red color, press again “ENTER”... -
Page 17: Maintenance
User’s Manual the fixture. 1 - Set the fixture into blackout (LED on/off). 2 - Adjust auto, strobe & fade speed, sound sensitivity, DMX address, DMX channel, brightness etc. 3 - Run auto mode, use “Speed” button followed by the buttons to adjust auto speeds. -
Page 18: Warranty
User’s Manual The fixture has optical lenses; users should clean the lenses periodically to optimize light output. The cleaning frequency depends on the environment in which the curtain system is installed. Damp, smoky or particularly dirty surrounding can cause greater accumulation of dirt on the lenses. Even in a clean type of surroundings, it is suggested to clean the lens and housing at least once a month. - Page 19 User’s Manual Memo: ______________________________________________________________________________________ ______________________________________________________________________________________ ______________________________________________________________________________________ ______________________________________________________________________________________ ______________________________________________________________________________________ ______________________________________________________________________________________ ______________________________________________________________________________________ ______________________________________________________________________________________ ______________________________________________________________________________________ ______________________________________________________________________________________ ______________________________________________________________________________________ ______________________________________________________________________________________ ______________________________________________________________________________________ ______________________________________________________________________________________ ______________________________________________________________________________________ ______________________________________________________________________________________ ______________________________________________________________________________________ ______________________________________________________________________________________ ______________________________________________________________________________________ ______________________________________________________________________________________ ______________________________________________________________________________________ ______________________________________________________________________________________...
- Page 20 User’s Manual FOS Luminus Table USER’S MANUAL Dealer Info. Copyright reserved Manual version: Ver. 1.0 Date: 20220822...
Need help?
Do you have a question about the LUMINUS TABLE and is the answer not in the manual?
Questions and answers