Bluetti EP600 Installation Manual
Energy storage system
Hide thumbs
Also See for EP600:
- Quick start manual ,
- Installation manual (113 pages) ,
- User manual (88 pages)
Table of Contents
Advertisement
Quick Links
Advertisement
Table of Contents

Subscribe to Our Youtube Channel
Related Manuals for Bluetti EP600


Summary of Contents for Bluetti EP600
- Page 1 EP600 Energy Storage System Installation SOP Version 1.2...
-
Page 2: Table Of Contents
4.2 Connecting the Grid and Backup interface cables......................7 4.4 Connecting the battery power cables.......................... 10 4.5 Connecting the communication cable between EP600 and B500................11 4.6 Connecting the battery expansion cables between B500s..................11 4.7 Connecting the communication cables between B500s....................12 4.8 Installing the IoT controller............................ -
Page 3: Declaration
• This document is provided for reference purpose ONLY and does not constitute legal advice. Please consult the local licensed electrician for details. BLUETTI shall not be liable for any damage or injury caused by improper installation of the backup system. - Page 4 NOTES: For single-phase household appliances with a power larger than 2000W or three-phase loads with a total power larger than 6000W, such as the Embedded induction cooker and air conditioner ,they need to be connected to the grid. Through the energy management system, our energy storage system can intelligently output single-phase 2000W or three-phase 6000W electric energy to household appliances, and the rest of the power supply is provided by the power grid to achieve the purpose of reducing electricity costs.
-
Page 5: Electrical Connection Mode 3: Ac/Dc Coupling
Through the energy management system, our energy storage system can intelligently output single-phase 2000W or three-phase 6000W electric energy to household appliances, and the rest of the power supply is provided by the power grid to achieve the purpose of reducing electricity costs. The single phase load with power greater than 2000W shall not be connected to the BACKUP terminal. -
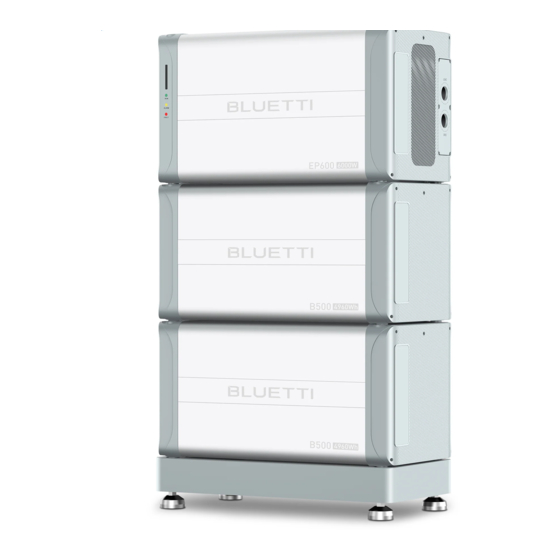
Page 6: Structure Installation Of The Ess
3. Structure Installation of the ESS 3.1 Installing the base, Keep 55mm distance between the base and wall. 3.2 Put the units on the base 3.3 Install the mounting brackets Step 1 Fix the brackets. Step 2 Mark the drilling position. Remove the inverter and batteries from the base and drill the holes on the wall. -
Page 7: Electrical Connections Of The Ess
Step 3 Put back the inverter and batteries, and install the screws to fix the mounting brackets. 4. Electrical connections of the ESS 4.1 Connecting the grounding cables 4.2 Connecting the Grid and Backup interface cables 4.2.1 Prepare the cables Step 1 Strip the wires. - Page 8 Step 2 Install the OT terminals. Step 3 Connect the Backup cable (Sequence: L1, L2, L3, N, PE).
- Page 9 Step 4 Connect the Grid cable (Sequence: L1, L2, L3, N, PE). 4.2.2 Install the AC cable protection case Install the AC cable protection case to EP600. 4.3 Connecting the CT signal cable Connect the CT signal cable to the CT port of EP600.
-
Page 10: Connecting The Battery Power Cables
4.4 Connecting the battery power cables Step 1 Connect the black battery power cable to EP600. Step 2 Install the black protection cover (BAT- Input) back to EP600. Step 3 Connect the black battery power cable to B500. -
Page 11: Connecting The Communication Cable Between Ep600 And B500
Step 4 Connect the red battery power cable to B500. 4.5 Connecting the communication cable between EP600 and B500 Connect the communication cable between EP600 (LINK PORT2) and B500 (TO PCS). 4.6 Connecting the battery expansion cables between B500s Step 1 Connect the black and red battery expansion cables. -
Page 12: Connecting The Communication Cables Between B500S
4.7 Connecting the communication cables between B500s 4.8 Installing the IoT controller Step 1 Connect the signal cable to LINK PORT1 on EP600. Step 2 Drill the installation holes and mount the IoT controller on the wall. -
Page 13: Connecting The Pv Cables
4.9 Connecting the PV cables Step 1 Install the metal core to the PV-/PV+ cable. Step 2 Install the plastic housing the PV-/PV+ cable. Step 3 Connect the PV cables to EP600. -
Page 14: Installing The Auxiliary Parts
4.10 Installing the auxiliary parts Install the plastic cover (PV) to EP600 and install the plastic cover (AC, with label) to EP600. 4.11 Connecting to the main panel 4.11.1 Find out the essential household appliances NOTE: Before installing the EP600 energy storage system, you should consider whether to make a partial backup system. - Page 15 2) When faults occur to EP600, we need to switch to II to use the public grid. 3) If the public power grid is always outage, please switch to I to use EP600 UPS mode, if not, switch to II.
- Page 16 Switch to II...
- Page 17 4.11.4.2 How to connect the transfer switch to the residential circuit home 删除[3010291]: Following is a example residential circuit before EP600 installation home 删除[3010291]:...
- Page 18 NOTES: Connect the L1/L2/L3/N wires from EP600 BACKUP to the pin 2(L1), pin 6(L2), pin 10(L3), pin 14(N) of transfer switch; Connect the L1/L2/L3/N wires from public grid to the pin 4(L1), pin 8(L2), pin 12(L3), pin 16(N) of transfer ...
- Page 19 4.11.5 Installing the CT to grid power cables. The arrow inside the CT points to the grid. Pay attention to the phase sequence. L1 to R, L2 to S, L3 to T 4.11.6 Turn on the transfer switch Step 1 Turn the transfer switch to position II.
-
Page 20: Powering On The Ess
Step 2 Turn the transfer switch to position I. The current flows from the Backup port of EP600 to the loads. 5. Powering on the ESS Step Switch on the DC circuit breakers on B500 battery packs. Press and hold the power button of any battery 删除[Wang Ying(王颖)]:... -
Page 21: More Information
7. More information Website: www.bluettipower.eu Email:sale-eu@bluettipower.com sale-uk@bluettipower.com...
Need help?
Do you have a question about the EP600 and is the answer not in the manual?
Questions and answers